
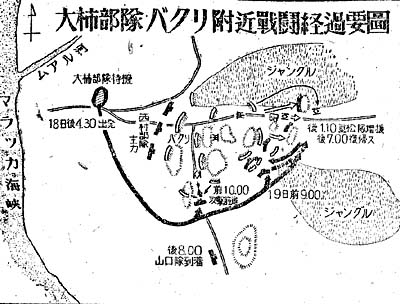
'Ogaki Unit at Bakri' (Japanese map)
The book 'Robbie to Dorie': Lt Col John Robertson's letters from Malaya 1941 - 1942, tells the story of Lt Col John Charles Robertson ('Robbie'), Commanding Officer of the Australian 2/29th Battalion, through the letters he wrote to his wife Dorie about the formation of the Battalion and its activities up until the evening of 16 January 1942 (when he wrote his last letter). Sadly, Lt Col Robertson was killed early in the morning of 18 January 1942, at a time when his Battalion was surrounded by Japanese forces and cut off from the 2/19th Battalion a mile south along the Muar Road at the Bakri crossroads.
The Australian Imperial Force (AIF) during World War 2 was organised in a structure that consisted of Divisions > Brigades > Battalions (usually three per Brigade). Rifle Battalions usually had the following general structure.
Each Battalion would have both an A and B Echelon where supplies were stored and food was prepared. When deployed for combat, A Echelon would normally be located in the vicinity of HQ Company (itself normally located to the rear of any fighting) and supplemented by rifle company echelon groups (Q personnel and cooks). B Echelon would be located up to several kilometres behind the Battalion and include various admin elements. It was also where ammunition and other supplies were stored and fresh meals were prepared.
[Note: Farrell and Pratten, 'Malaya', 2009, page 79. 2/19th Battalion War Diary. Australian Army Journal (1966) - describes a typical A and B Echelon structure from 1966. Australian Army (1986) - note that while dated 44 years after the period of time described below, this document outlines the structure of a typical Rifle Platoon. Also see this AWM web page that provides details of the structure of the Australian military at the time.]
According to Captain Brand, the RAP staff comprised Captain Brand, L/Cpl Val Lynch, Pte Quick (batman), and Driver A E Warburton. [Christie (1983, 63 - Captain Brand's account]
The structure of a typical, 'non-strengthened', Japanese Infantry Regiment is described below:
A Regiment included the following 'attached' elements:
At Muar, the 5th Regiment of the Imperial Guards Division was supported by the Gotanda Medium Tank Company. Tank Companies were part of a Tank Regiment and consisted of the following structure:
* It is worth keeping this number of tanks in mind given the number that were destroyed by the Australians. [US War Department. Technical Manual - Handbook on Japanese Military Forces (TM-E 30-480), 1944. United States Combined Army Research Library]
The Muar area [Google Maps]
The 2/29th Battalion arrived at Singapore, then part of Malaya, on 14 August 1941. After a short period in Singapore, the Battalion moved north and was located at Buloh Kasap, north west Segamat in Malaya from 15 September 1941.
Japanese forces invaded Malaya (and Pearl Harbour) on 8 December 1941 and moved quickly down the Malay peninsula.
As part of the invading force, an advance party of the Imperial Guards Division arrived in Kuala Kangsar (north-west Malaysia) by rail from Bangkok on 14 December. The rest of the force arrived on Monday 22 December whence they proceeded to Kampar, the scene of fierce fighting.
The Japanese had studied and knew British battle tactics well. They assessed the British to be predictable, preferring fixed positions, and showing caution or hesitation at critical points.
See the 1942Malaya website for more details.
Despite knowledge of Japanese military activities in China and other parts of Asia, British knowledge of likely Japanese strategies to invade Malaya before 1942 appeared to be based on a belief that the British and its allied forces would prevail over an 'inferior' force. British forces quickly learned, when Japan simultaneously invaded Malaya and the Philippines and attacked Pearl Harbour on 7/8 December 1941, that the Japanese were a much stronger and determined force.
As the Japanese forces pushed down the Malayan peninsula, intelligence was received about Japanese tactics. The Australian 2/29th Battalion War Diary includes a secret report dated 21 December 1941 stating that the Japanese had great powers of endurance, were likely to advance through the jungle to infliltrate and outflank, and would probably use small tanks through the rubber trees.
Details about Japanese battle tactics were collected and collated by both the British and American military. Some of these tactics were described in detail in documents captured by American forces and issued by American Army Intelligence (click this link to see more).
Japanese battle tactics stressed the superiority of quick, flexible, and determined offensive operations. Defence was regarded as distasteful. The main Japanese tactic, seen time and time again in Malaya, was to apply frontal pressure using holding attacks to engage and distract the enemy's front while conducting infiltrating and flanking operations against static positions, especially through allegedly unpenetrable jungle, to envelope, attack and destroy the enemy. Tanks were to be used in two waves. The first would knock out heavy weapons while the second would lead an infantry assault. Small and well equipped reconnaisance patrols, as well as snipers, would attempt to infiltrate as far as possible to the rear, and then dig in.
Lieutenant General Bennett, Commander of the Australian 8th Division in Malaya, had access to information or intelligence about these tactics. He warned his battalion Commanding Officers (COs) of the dangers of fixed defensive positions and the need for mobile fighting patrols against flanking manoeuvres.
With the situation in the north of Malaya rapidly deteriorating during December 1941, British Lieutenant General Percival, commander of allied forces in Malaya, agreed to the establishment of a small commando force, working in cooperation with the Royal Navy, to raid and disrupt Japanese lines of communication in the north west of Malaya, around Perak.
This new force, established on 23 December 1941, was to be led by Captain DT Lloyd (2/30th Bn) and was known as 'Rose Force' or sometimes the 'West Coast Raiders'. Rose Force would consist of two platoons led by Lt RE Sanderson (2/19th Bn) and Lt M Perring (2/18th Bn). All members of the force had to be single men and volunteers. All Rose Force men were drawn mainly from the six Australian battalions that had arrived in Malaya; a CO, seven men from each of three battalions, an NCO and a local European guide. This meant 1 officer and 24 other ranks for each platoon. Six European guides were also attached for local knowledge.
Number 1 platoon (Lt Perring) included men from the 2/18th, 2/26th and 2/29th Battalions. Number 2 platoon (Lt Sanderson) included men from the 2/19th, 2/20th and 2/30th Battalions. The men who volunteered from the 2/29 Battalion were:
(The names of other Battalion men are available on request.)
Rose Force arrived at the 2/29th Bn HQ in Kluang in the late afternoon of 23 December 1941. After dinner, the force moved with its stores to Kluang Railway Station to catch an overnight train to Kuala Lumpur. They were met the next morning by Major Rose, Lieut Hodge and others.
At 0900 hours on Friday 26 December 1942, No 1 Platoon, as well as Captain Lloyd, embarked from Klang for Kuala Bernam, approximately 70 miles north, on naval Motor Launch (ML1062). The launch was towing another smaller motor boat to be used in landing operations. No 2 Platoon was due to depart on a separate Motor Launch two hours later but was delayed by Japanese air attacks. Both launches reached the mouth of Kuala Bernam in the late afternoon. In the early hours of Saturday 26 December 1942, the convoy reached the mouth of Sungei Trong where they were allocated to smaller boats. However, the boat allocated to No 1 Platoon had engine problems and could not be started. Accordingly, Captain Lloyd ordered No 2 Platoon to go on alone. No 1 Platoon re-embarked on ML1062 which headed for Port Swettenham where they set up HQ. The War Diary noted that 'nothing of any importance happened to this platoon during the time spent waiting for the return of No 2 Platoon'.
The War Diary noted that No 2 Platoon was 'the first AIF troops to go into action against the Japanese in the Malayan Campaign'. The platoon was collected on 28 December and taken to Port Swettenham where they were re-united with No 1 Platoon on 29 December. The Force was re-located to near Klang township on 31 December 1941 where they awaited orders.
On 2 January 1942, Rose Force was ordered to prepare to move north as 'there had been an enemy landing further north and troops were infiltrating down the beach and the coast road'. The Force was ordered to move to a position at Jeram. The Force was replaced during the day by regular units, and returned to Klang.
(Source for the above and subsequent references to Rose Force: Australian War Memorial, Rose Force Malaya and A Force War Diary, 1/5/67)).
Jat regiment insignia during British rule. Post independence, the crown was replaced with lions
The Jat Regiment had its origins in the Calcutta Native Militia that was raised in 1795 and most soldiers are recruited from the Jat community of Haryana and surrounding states. The Calcutta Native Militia later became an infantry battalion of the Bengal Army. After 1860, there was substantial increase in the recruitment of Jats into the British Indian Army. The Class Regiment, The Jats, was initially created in 1897 as infantry units from old battalions of the Bengal Army. In 1922, the 9th Jat Regiment was formed by merging four active battalions and one training battalion into a single regiment. [Wikipedia Jat Regiment
Details of the movements of the 4/9th Jat Regiment was recorded in the Norfolk Regiment booklet 'Fall of Singapore'. The account of the Malayan campaign, extracts of which appear below, were written by Captain F E Mileham, the Carrier Platoon Commander.
The 4/9th Jat Battalion departed Bombay on the HMT Rajula on 21 December 1941. The Jat Battalion formed part of the 45th Brigade, 17th Indian Division, which also included the 5/18th Garhwal Rifles, and the 7/6th Rajputana Rifles (the last two sometimes referred to in various documents as 'Gs and Rs'). All three units had undergone training together in Kumbergaon Camp near Poona before departure. The CO of the Jat Battalion was Lt Col J Williams. His 2IC was Major E P White. The HMT Rajula arrived in Singapore on 3 January 1942 and the Jats were advised that they were to proceed immediately to Malacca.
After being told to be ready to move at once, Rose Force was ordered to move to Asam Jawa, 15 miles north of Klang on the coast road and report there for further orders. The Force was subsequently ordered to Batang Berjuntai where they were to take up positions alongside a British platoon located alongside a bridge crossing the Sungei Selangor. The bridge was to be demolished after all British units had withdrawn across the bridge. On the morning of 6 January 1942, both Rose Force and the British Independent Force re-crossed the bridge to set up ambush positions from thick jungle fringing the road. The forward Independent Force engaged the Japanese then withdrew parallel to Rose Force. The Japanese were routed by 1055 hours. The forces then moved back across the Sungei Selangor from where additional artillery support was brought in against the approaching Japanese forces.
After this action, both the Independent and Rose Forces were ordered at 1140 hours to counter-attack, with Rose Force leading this time. The objective was a high feature on the opposite side of the river with a commanding view of the entire river and bridge; the objective was to be held 'at all costs'. The objective was taken by 1215 hours. Japanese forces continued to move forward despite heavy artillery shelling from the British side.
Both the Independent and Rose Forces were relieved by 0930 hours on 6 January. They returned to the Batang Berjuntei township. At 1100 hours, Rose Force was ordered to move back after 1830 hours to Kuala Lumpur; the Independence Coy was to move to Port Swettenham.
On 7 January, Rose Force was ordered to move to Johore Bahru; thanks to frequent troubles with the trucks, they stopped at Segamat Camp along the way. The Force continued south to Johore Bahru the following day.
The Jats (and possibly also the Garhwalis and Rajputs) left Singapore by road on 7 January 1942 heading for Malacca. According to Captain Mileham, all the trucks 'were camouflaged for snow conditions and made a beautiful target for any aircraft'. Fortunately none occured. Their first stop was Segamat where the 2/29th was based. They departed on the 9th for Malacca where they met up with Lt Col Williams, the CO of the 45th Brigade. At this time the Japanese forces were estimated to be around 150 miles north but a transport ship was spotted off the coast heading south.
The Rose Force war diary notes that arrangements were made 'to return certain men to their respective units and to collect certain stores. Given orders to reorganise on certain lines and await further orders'. The Force now came under the command of General Bennett's 8th Australian Division.
The Jat's B Company was fired on by a small party of Japanese on the 10th. During the same day, while members of the Jats were at Segamat and hoping to bring some Bren carriers back with them, the 45th Brigade was forced to retreat from Malacca to the Muar River. Only three carriers and one truck were taken by Captain Mileham from Segamat. One carrier had to be left at the Brigade workshops near Bakri as it was no longer serviceable.
When Captain Mileham's carrier group reached Muar on 11 January, they were the subject of intensive bombing. They pushed through to the Battalion 'around the 15th milestone on the Muar Lenga Road'.
Japanese forces began to move into Kuala Lumpur during the evening of 11 January 1942. Japanese aircraft began attacks in the Muar area from around the same time. The Imperial Guards 4th and 5th Regiments commanded by Lt General Takuma Nishimura continued to head south, allegedly seeking to reach Singapore before the Japanese 5th Division that was heading south via the main highway, where they encountered the 2/30th Battalion ambush at Gemas, before Segamat on the main road south.
For a Japanese account of their actions in Johore, see this translated version of the Johore part of this website 'Operation Malay (History of the Great East Asia: From the Landing of Malay to the Fall of Singapore)(Planned by the Ministry of The Army, published by Asahi Shimbun, November 1942)'. The website is managed by Toshikazu Kitayama.
The 2/29th Battalion relocated to Segamat from Kluang aerodrome on 11 January 1942, to be held as reserve to the 2/26th and 2/30th Battalions that were located a few miles further north at Gemas. Two platoons from the Battalion's B Company were located at Buloh Kasap; 12 Platoon guarded the main road and the bridge across the Muar River while 11 Platoon commanded a bend of the river about half a mile to the right of the main road. 10 Platoon was placed in reserve at the rear of Company HQ. [Morrison (1942), p35]
According to the Jat's Captain Mileham, 12 January was a very wet and miserable day after heavy overnight rains. A, B and C Companies were endeavouring to hold an 9 mile front from Muar to Lenga, a feat that was said to be 'impossible in this type of country'. It was difficult to locate the Company commanders 'as they were a long way from Company HQ and sometimes on the other side of the river'. Around this time, three English civilians joined the Battalion. These were Major Kidd, a retired Malay Civil Servant, Mr Neaves, and 2nd Lieut Hislop. Malay volunteers also joined the group.
Two more Bren carriers arrived on the 13th with an armoured car. The distance between the companies meant that it could take more than three hours to contact all commanders. And it rained all day.
Strategic positions and movements from 14 January 1942 [Wigmore (1957), 211]
Rose Force was ordered to move to Segamat at 1430 hours on 13 January. The war diary notd that 'very heavy rain was falling and traffic moved slowly' ... 'the roads were packed with traffic moving in both directions, as the AIF was moving up to take over from certain English units'. The following day, 14 January, six men were returned to the 27th Brigade.
The following 2/29th men re-joined their Battalion: Pte LG Barry, Pte WW Bredin, Pte FS Spurrel, Pte RS Pullen. Pte EP Sellens would re-join the Battalion on 16 January, leaving three (Lt Cpl Hargreaves, Pte Flowers, Pte Shipsides) to rejoin after the fighting at Parit Sulong (see below).
Japanese forces
The Imperial Guards Division occupied Malacca on Wednesday 14 January 1942. Their next objective - to be reached by the secondary road from Muar via Parit Sulong, passing the Bakri crossroads (where the road from Parit Jawa on the coast met that road) - was the inland town of Yong Peng on the then main road to Singapore. About half way between Malacca and Yong Peng was the town of Muar, a town at the mouth of the Muar River.
The Japanese 5th Division headed down the main road towards Segamat via Gemas, Batu Anam and Buloh Kasap where the 2/26th and 2/29th were based in reserve behind the 2/30th Battalion.
Meanwhile, the Japanese Imperial Guards Division were moving south from Malacca. Their strategy was to send the two 'pursuit' regiments in different directions:
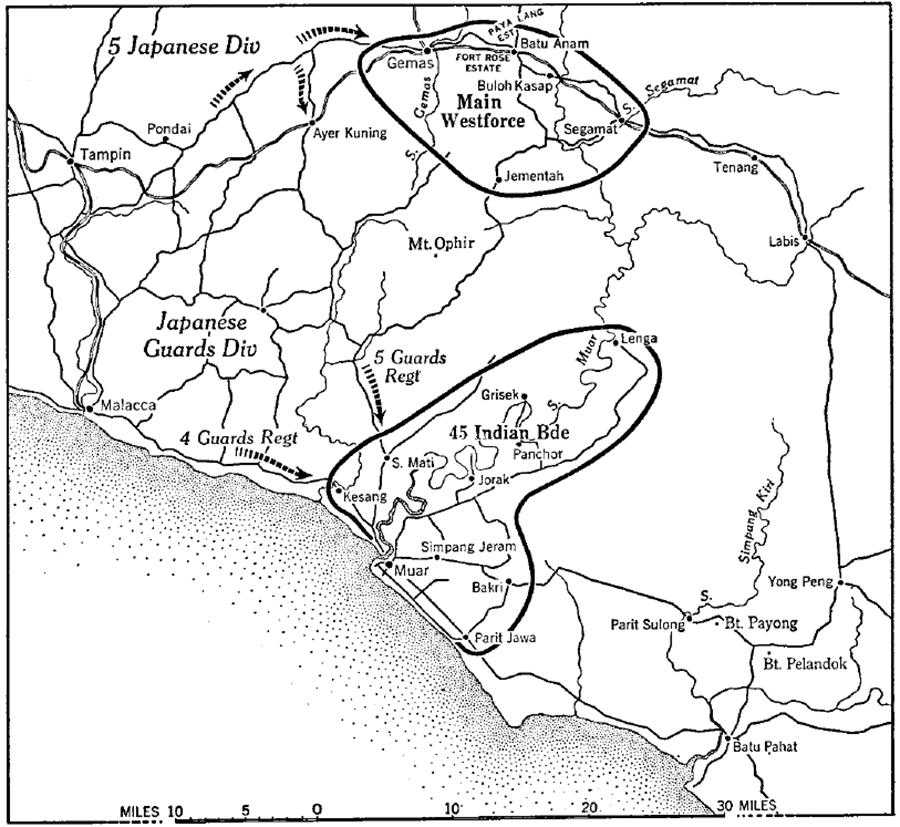
British/Australian forces - Westforce
The north and south banks of the Muar River and the area to the north east along the river were defended by the 45th Indian Brigade (Brigadier Duncan), part of 'Westforce' whose role was to defend the west coast of Malaya. [Wigmore (1957)]
There seemed to be a degree of confidence that the 45th Brigade could hold the Muar front, especially given the requirement to cross the Muar river. According to Wigmore (1957, 222), Bennett '... did not expect any strong enemy thrust in this direction'.
The Jats reported the presence of enemy parties on the north bank of the Muar river on 14 January. The newly arrived carriers patrolled the road all day.
The Muar River area. As this river winds around, references will be made to the Malacca side or the Bakri side of the river.
In advance of an expected move from the Buloh Kasap area to forward areas on 17 January, B Company's 12 Platoon was relieved by a company of Indian troops while its 11 Platoon was relieved by a company of Malay volunteers. [Morrison (1942), p35]
At 0930 hours on 15 January 1942, Rose Force was ordered to collect information and ambush the Japanese on Jementah Road. At 1230 hours, the Force moved from their based at Bukit Siput and 'reported to CO of most forward troops on Jementah Road at approximately 1500 hours. This Unit was the Loyals.' The Force was to move ahead and return through the Loyal's lines by 18 January. The Force was divided into its two platoons - No 1 Platoon (Sanderson) with 16 ORs and No 2 Platoon (Perring) with 14 ORs. See below for what they found when they reached the bridge. [Rose Force War Diary]
On Thursday 15 January 1942, the Japanese Imperial Guards 4th Regiment (Colonel Kunishi) appeared at the mouth of the Malacca side of the Muar River, considered by the Japanese to be ‘a very difficult obstacle’ (presumably because of its depth). They were fired upon by the 65th Battery (2/15th Australian Field Regiment) from the Bakri (Muar Town) side of the river. [Wigmore (1957, 223). Lodge (1986), 91. Tsuji (1960), 203. Farrell and Pratten (2009), 167. Brune (2014), 314]
On the same day, a Company of the 2/30th ambushed advance parties of the Japanese 5th Division forces at the Gemencheh bridge north of Gemas on the road to Batu Anam, Buloh Kasap and then Segamat, slightly delaying their advance. [Lodge (1986), 91. Tsuji (1960), 203. Farrell and Pratten (2009), 167. Brune (2014), 314]
The Rose Force war diary notes that the two platoons arrived at the Jementah bridge at 1630 hours but found it was blown. The Force crossed the river and split into two parties, turning north after passing the township of Jementah. No 2 Platoon continued along the line of the main road, moving parallel and 100 yards in from the road. By 1900 hours, sufficient bicycles had been requisitioned. No 1 Platoon travelled along a track around Mt Ophir, reaching Asahan. They had no contact with any Japanese but rescued seven Gurkhas.
At 1945 hours, two volunteers from No 2 Platoon (Sgt Donaldson and Pte Flowers (2/29th) were sent back with information about Japanese movements. The war diary notes that these men had to ride bicycles in the dark, crossing four blown bridges and mine fields, in the darkness'. The men then returned back to the Platoons.
During the night, No 2 Platoon received information that a large force of Japanese on bicycles were reported at dusk in Tangkak moving south towards them. Accordingly, they halted at Sagil and an ambush position was taken up. No enemy was encountered but reports were received that the Japanese were still at Tangkak. The Platoon observed activities and withdrew towards Segamat on 17 January, arriving at Jementah Bridge to rendezvous with No 1 Platoon at 1900 hours.
Following the ambush by the 2/30th at the Gemencheh bridge, the Japanese quickly repaired the bridge that had been destroyed and sent in Japanese aircraft to bomb the 2/30th Battalion HQ. According to the signallers, it was believed that the Japanese had been able to pin-point the HQ wireless telegraph set by direction finders. Consequently, the Commanding Officers of AIF battalions were said to have then banned the use of wireless at their HQs, 'despite expert opinion to the contrary', and relied instead on direct relay (DR) circuits intead, which were more likely to be cut. (Jacobs (), 90.]
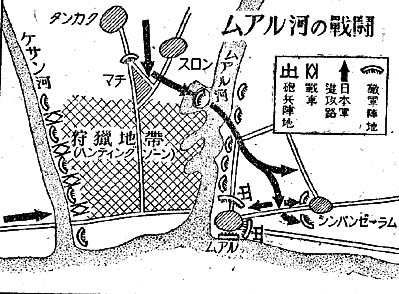
A late 1942 Japanese graphic of the Muar Area in the Asahi Shimbun newspaper showing the Kesang river on the left and the Muar river on the right. On the top right it says 'The Muar War'. At the bottom right it says 'To Simpang Jeram'.
During the night of 15/16 January, the Japanese 4th Imperial Guards Regiment that had taken the coast road from Malacca directly engaged allied forces located at Muar Town on the Bakri side of the river, and engaged in small-boat manouevres in order to cross. According to the account in the Asahi Shimbun article, the Japanese waited for sunset and grouped on the river bank. At 0300 hours they found two eight-seater small boats and one four-seater and commenced the crossing operation.
They were seen by allied troops on the other side of the river, who sent a hail of bullets in their direction. The commander immediately decided to change the crossing point. The new crossing point was in an area where they would not be seen easily by allied troops. Slowly, the 4th Regiment crossed the river and entered the jungle. Their destination would be Simpang Jeram.
While the 4th Regiment was crossing the Muar River, the Imperial Guard's 5th Regiment commanded by Colonel Iwaguro, along with the Gotanda Medium Tank Company and other supporting elements, took a longer route, perhaps because of the need to get the tanks across the river safely). They moved inland along the Malacca side of the Muar River where they overran two companies of the 7/6th Rajputana Rifles located (it is believed on the Malacca side of the river) near Jorak/Jorok, remaining west of the 4/9th Jats that were defending the area on both sides of the winding river from Jorak to Grisek. [Wigmore (1957, 223). Lodge (1986), 91. Tsuji (1960), 203. Farrell and Pratten (2009), 167. Brune (2014), 314 - 317. Norfolk/Mileham account]
Having crossed the river in the early hours of 16 January, the Japanese 'Iwaguro Pursuit Unit' forces belonging to the 4th Guards Regiment quickly moved towards their objective of Simpang Jeram, a few kilometres from Muar town, held by the 5/18th Royal Garhwal Rifles. The Garhwals, who lost (or would lose) their Commanding Officer, Lt Col Wooldridge, in an ambush withdrew along the Muar Road towards the Bakri crossroads (where they would re-group at the 101 mile post). Japanese forces ambushed and killed the CO of the 5/18th Garhwals. The CO of the 7/6th Rajputana Rifles was also killed. The 4/9th Jat Battalion did not make contact with the Japanese. [Wigmore (1957, 224 - 226). Lodge (1986), 91. Tsuji (1960), 230. Farrell and Pratten (2009), 167. Brune (2014), 314 - 317. Lack et al (2005), 82.]
Allied intelligence collection and/or dissemination was very poor. Bennett received (clearly inadequate) reports on the morning of 16 January that a patrol of the 45th Indian Brigade had encountered (likely Imperial Guards 4th Regiment) Japanese troops along the coast road from Muar to Batu Pahat. Bennett ordered the Brigade to investigate.
According to (the Jat's) Capt Mileham, when he was in Battalion HQ on 16 January, he found that 'little or nothing was known about the activities of the rest of the Brigade'. Major White and 2nd Lieut Piper tried to contact Brigade HQ but were knocked off the road by Japanese tanks. They escaped and returned to Battalion HQ. Captain Mileham took two carriers out to patrol the road up to the Jat's B Company's position; one carrier was lost in an encounter. [Norfolk/Mileham]
Bennett travelled after breakfast on 16 January from Labis to Segamat to meet Maxwell and Barstow. Maxwell told Bennett that the 2/30th Battalion needed to rest after their action at Gemas. Bennett agreed to replace the 2/30th with the 2/29th Battalion during the night. [Wigmore (1957), 224 - 225. Lodge (1986), 91. Bennett (1944), 124. Christie (1983), 39 - Captain Bowring's account]
Soon after his meeting with Maxwell and Barstow, Bennett received a message from Brigadier Duncan, commanding the 45th Indian Brigade, indicating that Japanese troops had managed to cross the Muar River but 'he had the matter in hand', which seems somewhat understated given the events that were actually unfolding. [Bennett (1944), 125. Whitelocke (1983), 81]
Another 'panic' message arrived from the 9th Indian Division suggesting that Japanese paratroopers had landed near Buloh Kasap (the location of the 2/29th Battalion, between Gemas and Segamat); this proved to be without foundation. A third message then arrived from an Air Force patrol indicating that 'a large number of enemy troops, estimated at a company [around 200 men] was across the Muar River at Kuala Lenga', with the apparent objective of cutting in on the main northern road behind Segamat. [Bennett (1944), 125. Whitelocke (1983), 81]
Given these reports, Bennett ordered additional protection for parties (including himself) moving along the road between Labis and Segamat. This was to include four armoured cars from the 2nd Loyals and the 2/29th Battalion's D Company under Captain Salier - a move that would reduce the cabability of the 2/29th Battalion in the next day or so. D company was expected to be relieved by Lt Col Anderson’s 2/19th Battalion expected from Jemaluang near the east coast once it had been relieved by the 53rd Brigade the following day, 17 January and re-join the main body. This never happened; the 2/19th would be ordered to proceed to the Bakri front instead to reinforce the 2/29th. [Bennett (1944), 125. See also Brune (2014), 319.]
Just after lunch on 16 January, Bennett received 'an alarming message' from the 45th Indian Brigade stating that it had been pushed south/east from the Muar River and that this would result in a 'wide flanking movement to Yong Peng'. With no troops between Yong Peng and Singapore, and the inability of the 45th Indian Brigade to stop the Japanese movement south, Bennett decided to send the 2/29th Battalion less D company that was guarding the road to reinforce the Muar front. Bennett noted that this move not only would deprive the 2/30th Battalion of a well-earned rest but also would take away his reserves from the Segamat front. [Bennett (1944), 126 - 127. See also Farrell and Pratten, 167 - 168].
The 65th Battery under Major Julius remained in place defending the southern/western bank of the river at Muar until the evening of 16 January. It then withdrew from around 2030 hours as the battery 'was now in an impossible situation as there were no infantry to help defend the guns'. The Battery withdrew under cover of darkness south towards Parit Jawa along the coast road, thence inland to the Bakri crossroads. This seems to suggest that they were moving towards Parit Jawa at the same time the Japanese 4th Guards Regiment was moving towards Simpang Jeram. The withdrawal allowed the Japanese to continue to cross the river at Muar without a challenge. [Whitelock (1983), 81. Farrell and Pratten (2009), 167]
Meanwhile, elements of the Imperial Guards 4th Regiment, travelling in small coastal craft, began to come ashore at Parit Jawa and Batu Pahat in an encircling action designed to cut the road from Muar to Yong Peng. [Lodge (1986), 91. Tsuji (1960), 203. Farrell and Pratten (2009), 167]
A key element to consider here is that the road from Parit Jawa on the coast joined the Muar Road at what was then known as Bakri village. The 65th Battery headed towards Parit Jawa at same time that the Japanese 4th Guards was heading that way with the intention of cutting off the Indian 45th Brigade withdrawal route down the Muar road.
According to Morrison, at 0500 hours on 17 January, the 2/29th's Company Commanders were called to a conference at Battalion Headquarters. They were told that the previous plan had been cancelled and the Battalion was now to proceed to Muar on the west coast of Johore to counter an enemy infiltration. [Morrison (1942), 50]
Given the next event, it is not clear if Lt Col Robertson had been given advanced warning of the impending move or if Morrison got the time wrong given how well the next event is documented.
At 0530 hours on 17 January, Lt Col Robertson and O [Operations] Group left to report to Divisional Headquarters at Labis, south east of Segamat on the main trunk road to Yong Peng, to be briefed by Bennett. Bennett ordered Lt Col Robertson to 'consolidate our position there and then toss the enemy back to the Muar River'. The 2/29th's D Company would remain in the Segamat - Labis area while a platoon from A Company would come under the command of the 45th Indian Brigade. [Bennett (1944), 126 - 127. Wigmore (1957, 226). Lodge (1986), 93. Christie (1983), 39 and 43 - Captain Bowring's account]
Bennett gave Robertson a composite troop from the 13th and 16th Battery of the 4th Anti-Tank Regiment commanded by Lt McCure that had seen action at Gemas, and a troop of armoured cars. According to Harrison, Lt Col Robertson allegedly said that the anti-tank guns 'were not wanted'. However, Robertson was definitely aware of the potential for tanks. A document in the 2/29th Battalion War Diary classified SECRET (which would not have been seen by many people) clearly states they were to be expected. Additionally, Australian newspapers reported on the Japanese use of tanks from December 1941 through January 1942. Lt Col Robertson's comments may have referred to the actual gunners as, according to their own reports (see Finkmeyer), they had got 'on the wrong side' of senior officers. [Bennett (1944), 126 - 127. Wigmore (1957, 226). Harrison (1960), 44). Lodge (1986), 93. Christie (1983), 39 and 43 - Captain Bowring's account].
The following men were included in the composite 13th and 16th Battery lead by Lieut Bill McCure:
Lt Col Robertson would have prepared an 'Operation Order' for the proposed operation. The 2/29th War Diary contains several examples of this type of document which were always classified SECRET. The Operation Order for the Bakri crossroads was almost certainly destroyed, along with the most of the rest of the War Diary, on 19 January 1942 (see below).
An Operation Order contained the following elements:
Eleven copies of the Operation Order would be created, including one for the 27th Infantry Brigade and two for the 8th Australian Division (the files for each of these should be examined to see if the 2/29th Operation Order for the Bakri crossroads still exists.)
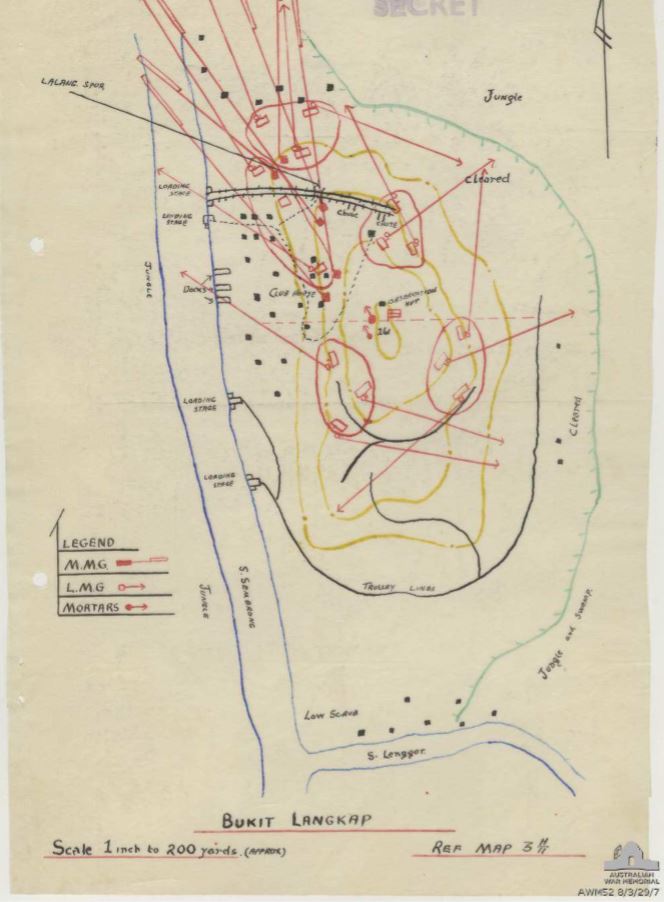
A map dated 30 November 1941, included with an Operation Order. Note how the map shows the disposition of each company, and the location of machine guns and mortars, as well as their 'arc of fire'. [2/29th Battalion War Diary]
At 0715 hours, Lt Col Robertson ordered his Battalion to be ready to move (to Bakri). According to the account of B Company's Captain Morrison, Company Commanders were ordered to a conference at the same time with the GOC (Bennett); this may be confused with the well-documented meeting with the GOC at 0530 noted above. [2/29th Battalion War Diary. Morrison (1942), p36]
After an initial hold up caused by an air raid, the 2/29th Battalion finally departed Segamat around 1030 hours and reached Labis at around 1130 hours on 17 January, then continued on the main road towards Yong Peng. [2/29th Battalion War Diary. Morrison (1942), p36]
The 2/29th Battalion headed off. According to a fictionalised account by Finlay (1991), (the men) sat crowded together in the back of the transport trucks in their full combat gear, including their rifles, tin helmets and webbing, to which was strapped a water bottle and bayonet as well as two basic pouches containing several clips of ammunition. On their backs they each carried a small backpack containing groundsheet, messing gear and other small articles of clothing.' [Finlay (1991), 15]
According to Captain Brand's account, the Battalion passed 'hordes of refugees, smashed cars and truckloads of dispirited looking Indians'. [Christie (1983), 63 - Captain Brand's account. Finlay (1991), 15.]
Around the same time, the 4/9th Jat Battalion HQ moved forwards 300 yards during the morning of 17 January. Major White and 2nd Lieut Piper returned with orders to join up with the 2/29th Australian Battalion at the 101 milestone on the Bakri Muar Road. At 1130 hours the Battalion (which was still largely intact) headed off down a track in the rubber trees towards Bakri. After moving only 300 yards the transport units (with Captain Mileham) stopped and was told to await orders. They lost contact with Battalion HQ; despatch riders were sent out but none returned. Captain Mileham would later meet up with Captain Henry Watson who told him that Col Williams and Captain Lee (Adjutant) had been killed and Brigadier Duncan had led a bayonet charge with what remained of the 45th Brigade and was wounded (he was later at Brigade HQ, see below). [Norfolk/Mileham]
Around or just after lunch on 17 January 1941, Bennett met Percival, Fawcett (3rd Indian Corps), and Key to discuss a withdrawal from Segamat given the deteriorating situation at Muar. Bennett urged an attack at Muar and requested that the 2/19th Battalion also be sent to the Bakri area from Jemaluang, to be replaced by the 5th Royal Norfolk Regiment from the recently arrived 53rd Brigade. This was agreed by Percival and Bennett ordered the 2/19th Battalion to move at 0400 hours on 18 January. [Bennett (1944), 128 - 129. Wigmore (1957, 225/226). See also Lodge (1986), 93]
According to an entry dated 17 January 1942 in Appendix B to the 2/19th War Diary, orders were received for the 2/19th to proceed to the Muar district and come under the command of the 45th Indian Infantry Brigade. The move was to be made from Jemaluang at 0400 hours on 18 January 1942. According to the entry:
At this time the Bn was less Lieut Wilson's Pl (No 16 Platoon) and some patrols from D Coy still engaged in the Endau area. A standing patrol of 1 NCO and 9 ORs from A Coy were at Tenggaroh and Maj R F Oakes, Lieut Davidson, Lieut Neild, Lieut Bennett and 16 ORs representing platoon Sgts or Cpls and members of Q Staff to hand over defence of Jemaluang to the 6 Norfolks, who were to arrive on 18 Jan 42. The orders were to pick up GSO 1, Col Thyer at Yong Peng and to meet a guide from 45 Bde at Parit Sulong. Also that a tp [troop] of British A/Tk guns would come under commd at Yong Peng.
After this meeting, Bennett met Lieutenant-Colonel Byrne, who had just returned from the 45th Indian Brigade. Byrne advised Bennett that 'about 100 Japanese were seen moving around the flank north of Bakri, along Parit Tubi, in an easterly direction'. According to Bennett, 'things at the Muar front are not too good'. He ordered the 2/29th Battalion’s D Company (Captain Hore, approximately 149 men) then guarding the road between Segamat and Labis to return to support the 27th Brigade. That company was then ordered forward to Batu Anam where it came under the command of the 2/26th Battalion. [Bennett (1944), 129]
2/29th Battalion B Echelon location
When it reached Parit Sulong (after passing through Yong Peng), the 2/29th Battalion established its B Echelon in a 'harbour' east of Parit Sulong. The rest of the Battalion continued to move forward. An entry at 1430 hours on 18 January 1942 in Appendix A ('A & B Echelons') of the 2/19th War Diary noted that the 2/29th Battalion had placed its B Echelon 'east of the Parit Sulong bridge'. Given that the road from Parit Sulong runs north west, this is taken to mean that the 2/29th B Echelon was located after the bridge heading east towards Yong Peng, approximately 25 kms away from the 101 milepost where the 2/29th was positioned; this meant it would take perhaps as long as one hour for supply trucks to reach the Battalion. It may be assumed that between 100 and 150 men of the 2/29th B Echelon were located in this location, travelling to and from the Battalion as required. The location of the 2/29th A Echelon is not exactly known but it is assumed that, unlike the 2/19th that placed both together quite close to its Battalion position, the 2/29th smaller A Echelon was likely located either with the Battalion or close by, perhaps near Brigade HQ. See also below. [2/19th Battalion War Diary inc Appendix A]
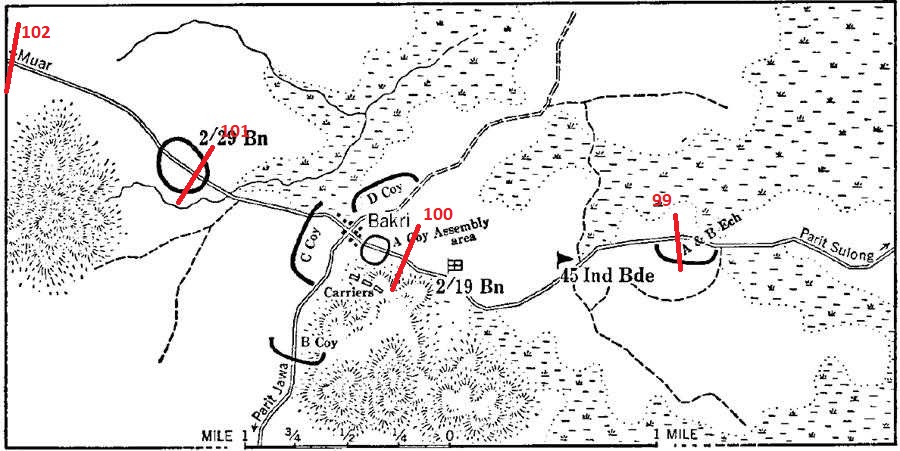
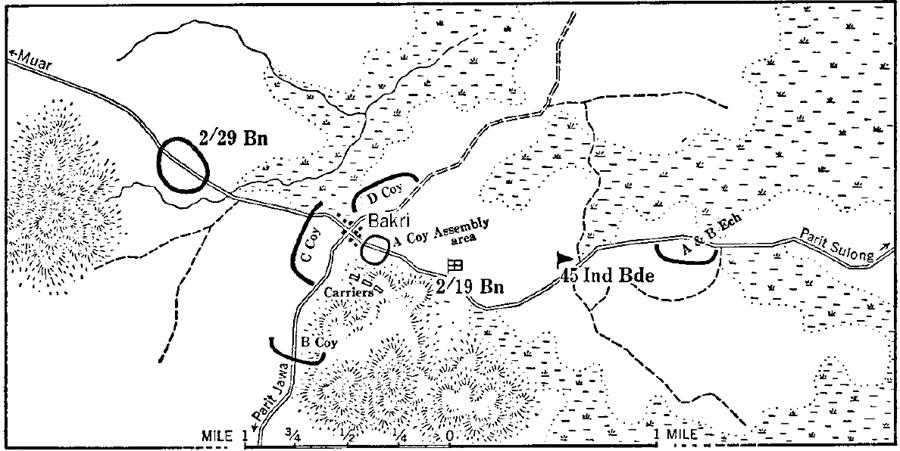
Map of the location of the 2/29th and 2/19th Battalions and 45th Brigade HQ, with approximate mile posts indicated. [Wigmore (1957), 228]
By 1500 hours on 17 January, the leading elements of the 2/29th Battalion (less its D Company and a platoon of around 50 men from A Company) had arrived at the location of the 45th Indian Brigade headquarters just south of the intersection of the road to Parit Jawa (now Jalan Mahmoud) along the road to Muar, known as the Bakri crossroads. Morrison documented the location as 'two miles eat of Bakri (village) and approximately 12 (miles) from Muar. The 65th Battery was also now at the crossroads, having withdrawn up the road from Parit Jawa (likely with Japanese Imperial 4th Guard troops pursuing them). Harrison stated that Brigade HQ was '... located in a big mansion separated from the road by a large padang or open field'. This was likely on the northern side of the road where the terrain rises. [Harrison (1960), 46. Lack et al (2005), 82. Wigmore (1957), 226. Morrison, 1942, p36].
An afternoon thunderstorm fell, slowing the rest of the convoy. [Finlay (1991), 15]
Lt Col Robertson conferred with Brigadier Duncan at the 45th Indian Brigade Headquarters and was advised that there were Japanese troops between that location and Muar. He was also told that the 4/9th Jat Battalion that had been positioned along the Muar River were expected to arrive 'shortly'. [Lack et al (2005), 82. Wigmore (1957), 226. Christie (1983), 63 - Captain Brand's account]
The 2/29th Battalion was ordered to replace the 5/18th Royal Garhwal Rifles in a defensive position at the 101 mile peg along the Muar Road, on a straight stretch in rubber plantations between two slight and opposing blind bends on the road towards Muar. The battalion was then expected to wait for the arrival of the Jats and, with those additional reinforcements, attempt to capture Simpang Jeram along the road towards Muar at daylight on 18 January. The 5/18th Garhwal Rifles was, in turn, ordered to deploy to Parit Jawa on the coast road. [Wigmore (1957), 226. Lack et al (2005), 82.]
Regretably, constant delays in the arrival of the Jats meant that this offensive would not happen and was possibly one of the key factors in the overall outcomes at the crossroads. It appears the Jats were ambushed by Japanese forces and many dispersed into the jungle or rubber. According to Mileham's account, 'at 1700 hours the wounded [members of the Battalion] started coming back up the track'. But not all of the men returned. An Officer stated that he had seen the CO and the Adjutant killed. The transport group was also joined by a battery of Royal Artillery without guns, and also an ammunition wagon. The group decided to prepare to abandon the transport if required. [Norfolk/Mileham]
According to Morrison's account, the CO (Lt Col Robertson) '... and his Company Commanders then went forward to reconnoitre positions for the night. [Morrison, 1942, p36]
The area around the 101 mile post was considered a good place to prevent the Japanese advance because of the jungle to the west and swampy area to the east; the only logical way was along the road itself, which ran through a rubber plantation. No-one seems to have considered the potential for Japanese forces to take alternative, less well-known, routes through the jungle; if anything, it was generally suggested that tanks couldn't go through the jungle. As would be seen, the Japanese exploited this opportunity to their strategic advantage and had air superiority to facilitate surveillance. [Lack et al (2005), 82. Wigmore (1957), 226. Christie (1983), 63 - Captain Brand's account]

Relief map of the area around the 2/29th position.
According to Morrison's account: 'The transport moved up and the companies were immediately placed in position forming a Battalion perimeter. B Company was forward on the right side of the road, C forward to the left, A right behind B with Headquarters Company left rear behind C ... a rough square bisected by the road'. As noted earlier, D Company had remained in the Segamat area. See also below for another description of dispositions in the evening. [Morrison, 1942, 36]
The area where the Battalion was deployed was along a straight stretch of road, that rose slightly to the northern end, with rubber trees on both sides. At the northern end of the road (the location of the forward C and B Companies), a crest and bend in the road afforded some protection from line-of-sight attacks. Just beyond the crest was a natural gully, also providing a degree of protection. The low hill to the west of their position was likely where the 'jungle' is visible on both the 2/29th and 2/19th maps (see below).
At least three war correspondents, Hedley Metcalfe, the official British photographer, Frank Bagnall, the official Australian cinematographer, and Clifford Bottomley, an Australian photographer with the Department of Information, arrived at the Bakri crossroads during the afternoon of 17 January 1942. [2/15th Field Artillery War Diary, entry on 17 January 1942. 'A.I.F. Success with Anti-Tank Guns', Sydney Morning Herald, 21 January 1942. See also Philips (1992), 202. Captain Brand also mentioned the news correspondents - Christie (1983), 63 - Captain Brand's account]
The 2/29th Battalion took almost one hour to travel the mile and a half to the 101 mile peg as the Garhwalis re-deployed in the other direction towards the crossroads. The Battalion was in place by 1800 hours, just as darkness fell. [Harrison (1966), 45.]
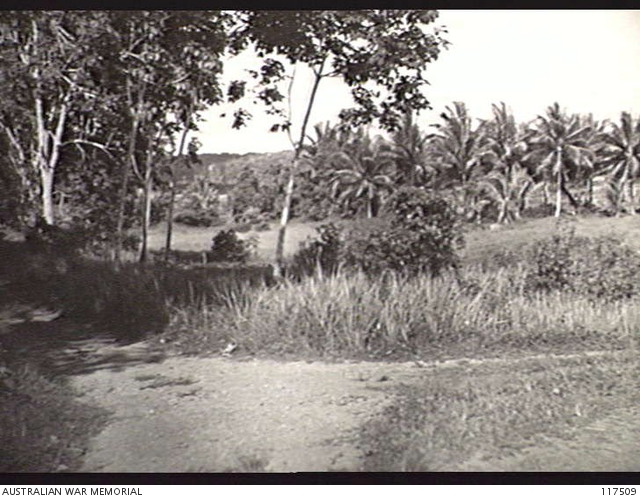
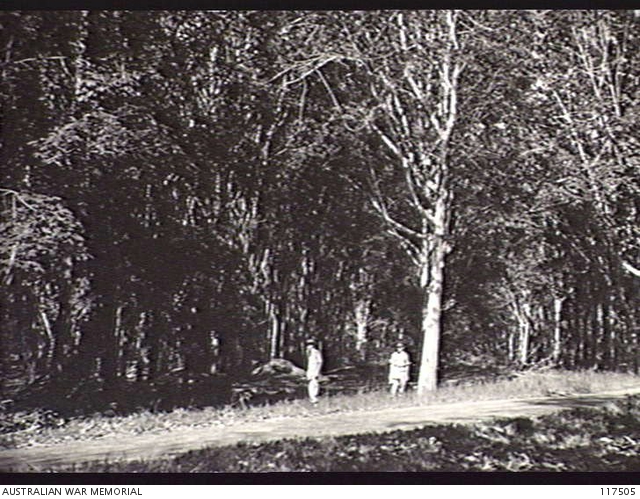
This post-war photo shows the area where A Company was located to the rear across the road from HQ Company. The road in the photo is probably a track running through the plantation. [AWM Photo 117509]
According to Captain Brand, the HQ position was:
'... a patch of rubber on the crest of a small rise. Immediately behind us and on our left was paddy field and open swamp. This rubber area was only about 150 yards in breadth. The RAP was placed about 50 yards from the road, 80 yards from the open swamp behind, on the edge of which was placed a mortar, and 1000 yards from the paddy field on our left'. [Christie (1983), 63 - Captain Brand's account]
According to various documents, the Battalion now consisted of around 650 men: HQ Coy - around 250 men; A Coy - 100 men (one platoon had remained behind); B Coy - 161 men; C Coy - 153 men. Around 100 (or perhaps more) men were located in the rear B Echelon location; curiously, there is almost no mention of this group except in the 2/19th Battalion War Diary.

Map of the Bakri Crossroads area, Johore State, Malaya, as at 1900 hours 17 January 1942 (Map copyright Andrew Warland)
Sunset fell from around 1855 hours on 17 January.
The following describes the dispositions of the 2/29th's companies on the evening of 17 January 1942.
Each of the company's rifle platoons would have established a perimeter defensive position. The men would have dug slit trenches (between the lines of rubber trees) with only a ground sheet to protect them against the rain. Each platoon's section leader would have ensured that each slit trench would allow '... clear lines of defensive fire which would fit into the overall position plans for the site' in the Operation Order. According to Finlay: '... the interlocking fire of each section would form an effective barrier for the platoon, the combined fire of several platons would present a company's defensive 'wall' and the correct placing of the various companies would hopefully constitute a successful defensive position for the whole battalion'. Again, according to Finlay, the men of the 2/29th were very well trained and as a result 'knew the routine backwards'. [2/29th Battalion War Diary. Finlay (1991), 11.]
According to Morrison, a 'small detachment of madras sappers and miners had been occupying a defensive position in the B Company area and these were withdrawn across the road to the C Company perimeter'. [Morrison (1942), 36.]
See below the images for the location of the anti-tank gunners.
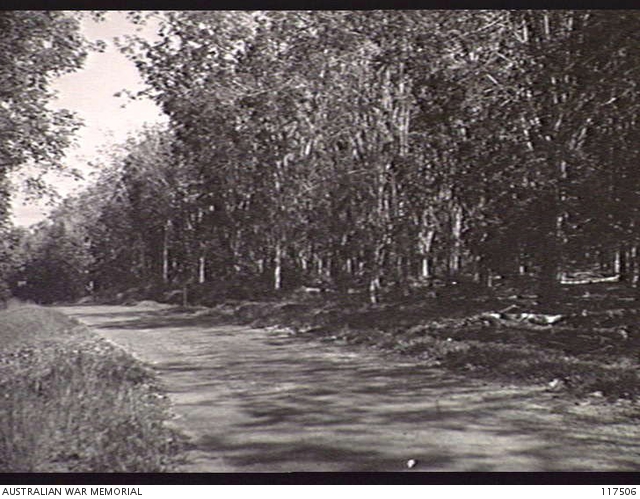
Post-war photo showing the location, from the Japanese side, of C Company (in the trees on the right among the rubber trees).[AWM Photo 117506]
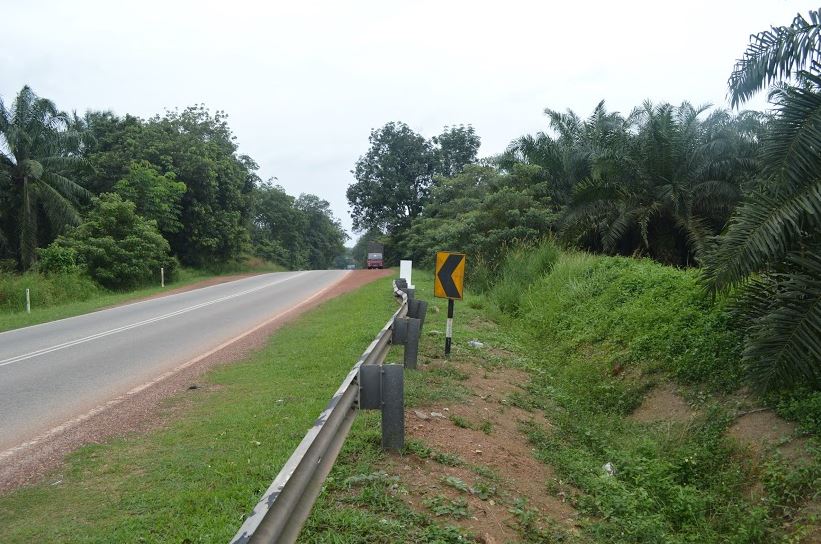
A photograph taken in 2014 of the view towards the 2/29th position from the Japanese approaches. B Company was located to the left and C Company to the right of the image. Note the bend and the crest in the road both of which would have offered strategic advantages to both the Australians (ambush) and Japanese (surprise and ability to outflank without being seen clearly). [Photo - Peter Pindle]
The view from the crest of the road looking 'down' towards the 2/29th position. B Company was to the left, C Company to the right. [Photo - Peter Pindle 2014]

Post-war photo showing the area on the right where the leading C Company was located.[AWM Photo 117503]
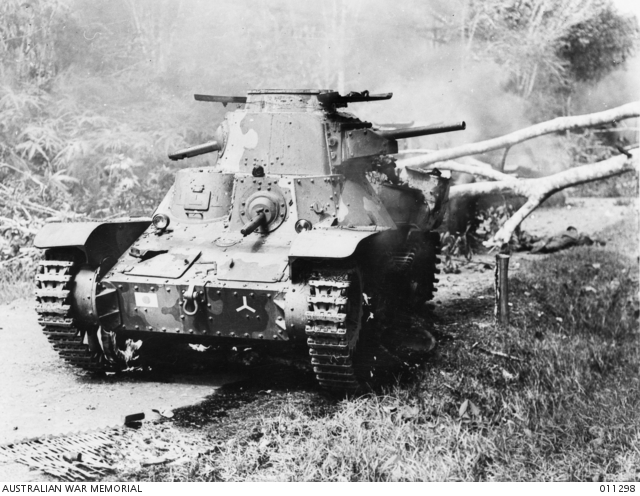
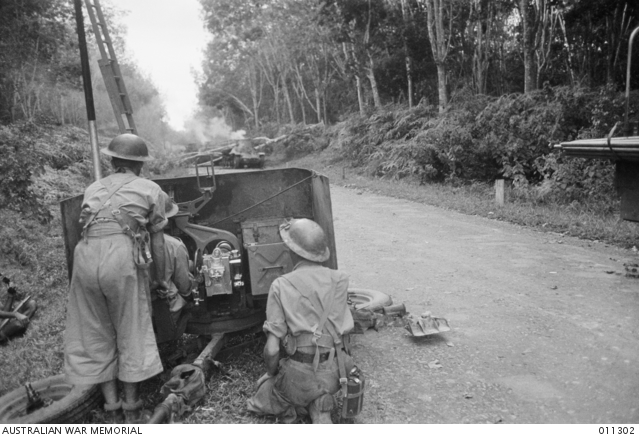
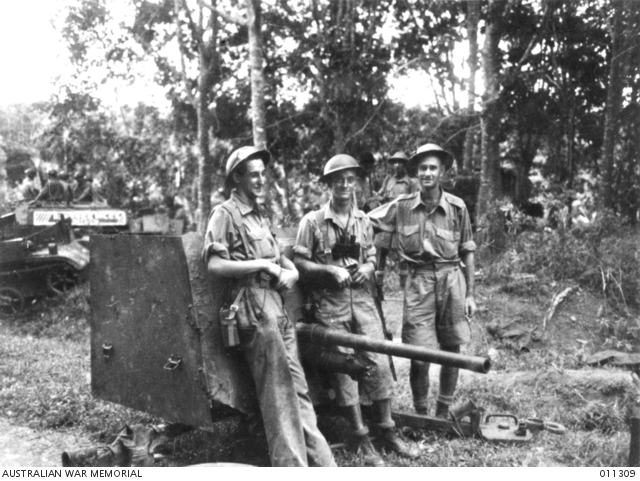
This extract of another photograph below shows the bend in the road (with what appear to be markers for drivers on the left of the road), just near the crest where the road turns to the right. C Company was located in the rubber trees on the left of the road; the leading Anti-Tank gun was likely located at the same point where the tank is burning, but back from the road. [Photo - Australian War Memorial AWM 011300]
A post-war photo showing the B Company area. What appears to be a road may be a track through the rubber plantations. [AWM Photo 117505]
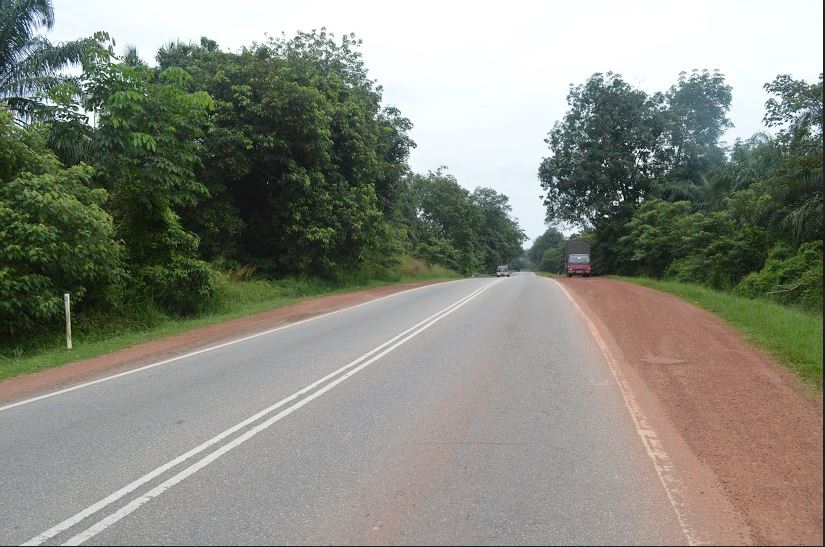
A 2014 photo showing the forward area of B Company. Note the gully in front of the position, the road to the left. Most of the right hand side of the road where B and A Companies were located is lower than the road, suggesting that what appears to be higher ground in the 1942 photos of the destroyed tanks (see below) was in fact just road-side bushes. [Photo - Peter Pindle 2014]
Anti-tank gunner locations
Captain Bill McCure decided where his guns would be best placed. Lt Col Robertson said he didn't want the guns to be located near his men, possibly to avoid them becoming targets once the Japanese worked out the gun locations.
One of the 4th Anti-Tank guns, manned by Sergeant Clarrie Thornton and his gun crew from the 13th Battery, was positioned forward of the Battalion off the road on the left side [near C Company] '... to cover a slight turn (about 400 yards away to the right) in the road' [see photo below]. According to Brune (2014), the gun was 'far enough off the road to provide excellent camouflage and yet it had a long-range view of approaching tanks'. According to Morrison (1942), the leading gun was located 'on the left of the road between B and C forward troops'. It is not clear if this gun was deployed along the road itself (as was Parsons' gun, see next point), in bushes off the road, or among the rubber trees. If it were on the road it would probably have been visible in photographs taken at the time (see below), and also would have been a more obvious target. [Wigmore (1957). 227. Finkemeyer (1994), 33. Brune (2014), 320. Morrison (1942), 50.]
A second gun, manned by Sergeant Charley Parsons and his crew from the 16th Battery, was positioned about 400 yards back alongside Battalion HQ, also on the left side of the road. According to Morrison, this second gun was located 'on the right between A and HQ Companies [located on opposite sides of the road], covering the rear'. Based on photographs taken of Parsons and his crew, this gun was more likely on the left as elements of HQ Battalion can be seen in the background. Lieutenant Bill McCure's base was located in C Company's perimeter, about 300 yards behind Thornton. Two other guns, manned by Sergeant Ken Harrison and his crew, were positioned at 45th Brigade HQ located at the 99.5 mile location, just beyond the Bakri crossroads. [Wigmore (1957). 227. Finkemeyer (1994), 33. Morrison (1942), 50.]
Japanese locations
From the Japanese side, the Imperial Guards 5th Infantry Regiment, supported by the Gotanda Medium Tank Company was located around two miles ahead of the 2/29th Battalion position. The Japanese strategy was to attack directly while sending its Ogaki Battalion through the jungle to cut the line of defeat. According to the US War Department document 'Soldier's Guide to the Japanese Army', the Japanese would have aimed to envelop the opposing forces by bringing frontal pressure in a holding attack while the main effort is concentrated on one or both hostile flanks. These flanking manouevres might pass 'through terrain so difficult that the opposing commander considers it impassable and thus leaves himself vulnerable'. [US War Department (1944), 147. Wigmore (1954), 133. Tsuji (1960), 204 - 205. Farrell & Pratten (2009), 170.]
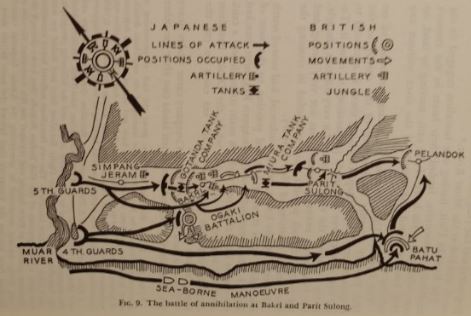
The Japanese lines of attack, according to Tsuji [Tsuji (1960), 204]
According to the US War Department document (noted above) 'Soldier's Guide to the Japanese Army', the Japanese army preferred attacks just after dusk or before daylight, and would 'prefer to attack up a slope to avoid silhouetting the troops'. These attacks would be made 'by single companies or even platoons'. Patrols would be sent ahead to 'ascertain the opposition's position and strength by drawing premature fire'. Special efforts would be made to locate hostile heavy weapons; as soon as these are located with sufficient accuracy, the Japanese bring heavy mortar fire to bear on them. [US War Department (1944), 147 - 153].
Just after dark on a moonless night, at around 1800 hours, both sides started probing each other's positions. An armoured car (was this the Marmon Herrington that was then seen on the side of the road near the tanks? - see below) went forward to reconnoitre the road and exchanged shots with a Japanese machine gun post about two miles ahead. An hour later, a Japanese patrol advanced towards the C Company position and was fired upon. Neither side suffered any casualties in this initial encounter. [2/29th Battalion War Diary. Wigmore (1954), 226. Bowring (1954), 2. Christie (1983), 43 - Captain Bowring's account, 65 - Captain Brand's account]
Despite their outer bravado, Finlay noted that the men were more likely to be 'tense, nervous and afraid'. [Finlay (1991), 30.]
Thirty minutes later, at 1830 hours, the Battalion came under heavy bombardment from Japanese mortars. Lt Col Robertson, perhaps recalling the sound from his experience in France in World War 1, called out 'Here come their mortars'. Although B Company's 12 Platoon reported a mortar barrage and small arms fire, the mortars landed mostly to the rear of Battalion HQ, and in the area where A Company was located. One member of C Company was killed, and several were injured. The injured were evacuated by an Indian ambulance. [Wigmore (1954), 226. Christie (1983, 65. Lack et al (2005), 81. Christie (1983), 43 - Captain Bowring's account, 65 - Captain Brand's account. Finlay (1991), 30. Morrison (1942), 37.]
A small force of Japanese began to close in and the 'fog of war' set in. In the confusion that followed, eight 2/29th troops were wounded, six shot by their own side. Captain Brand noted that the shooting was mostly located on the left flank where the Pioneers were located, and that 'heavy .303 shot mingled with the characteristic crack of the Japanese weapons'. Captain Brand noted that the Indian soldiers had panicked, the Australians thought they were Japanese and opened fire. Pte Hayes, a Pioneer, received a smashed knee caused by a .303 bullet; the next six or seven men brought in to the RAP also had wounds consistent with .303 bullets. [Wigmore (1954), 226. Lack et al (2005), 82. Christie (1983), 43 - Captain Bowring's account, 65 - Captain Brand's account]
According to Captain Bowring, 'it was here that the battalion learned its first bitter lesson in regard to night fighting - to rely on the grenade and the bayonet in the dark'. Soon after, the Japanese mounted a bayonet charge, 'screaming and hurling hand grenades' {Finlay) and were forced back with between 70 and 80 dead and wounded against three C Company dead and twelve wounded. The mortar barrage died down by midnight although the Anti-Tank gunners apparently fired a shell every hour towards the Japanese positions. [Lack et al (2005), 82. Christie (1983), 43 - Captain Bowring's account, 65 - Captain Brand's account. Finlay (1991), 30.]
The Australians learned that the Japanese force was much larger than expected, and the soldiers were taller - thanks to their recruitment practices. The Japanese, meanwhile, learned that the Australians - not Indians - were now at the 101 mile post, and were much stronger and determined than expected.
Bowring later noted: 'It was the general opinion that the Japanese did not know the Australian troops were there'. That is, the Japanese may have thought that the position was still defended by the 5/18th Royal Garhwal Rifles who had only a few hours before vacated the same position. [2/29th Battalion War Diary. Bowring (1954), 2. Christie (1983), 43 - Captain Bowring's account]
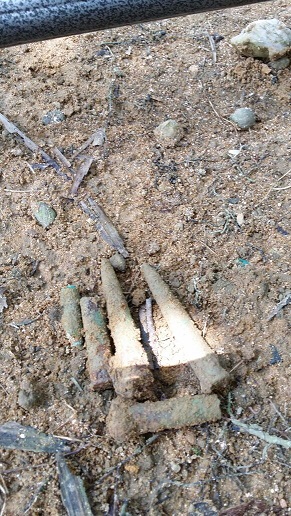
An unexploded Australian hand grenade and unspent bullets found in 2014 in the area where C Company was located. [Photo - Peter Pindle]
Meanwhile the men of the Jat Battalion had been dispersed trying to move south through the rubber and jungle. Sometime during the afternoon of the 17th, a group of four (as yet unidentified) men from the 2/29th Battalion were sent forward to locate the Jats. They arrived at the area where the transport group had halted around 1900 hours and gave those present (said to be around 200 men) orders to abandon the transport and join the (2/29th) Battalion at the 101 mile post. However, according to Mileham, the men of the 2/29th said this order 'was impossible as the enemy had already crossed the rubber track we were intending to use'. It was then decided to try to reach the 96 mile post further down, which would entail travelling through swampy marshes. Fortunately, Major Kidd said he could lead the party as he knew the way. The group of 200 men including Captain Mileham and Major Kidd departed at 2100 hours. Very soon the party got split up in the dark. Captain Mileham's group consisted of around 160 men and were joined by Lieut Hislop. They decided to rest and continue the next day. [Norfolk/Mileham].
At around 2130 hours (according to the War Diary) or midnight (according to Morrison's account, which may have described a second similar event later in the night), two ration trucks for each 2/29th Company came forward (from its B Echelon area). In the dark of the evening, the Despatch Rider and the truck for the leading C Company passed straight through the Battalion’s positions and were shot at by Japanese machine guns. The truck ran off the road and the Company Quartermaster Sergeant (CQMS) and one other man were killed. The Despatch Rider (Signaller Tom 'Borrie' Wiles), a cook, and the wounded driver managed to escape the abandoned truck (see below for a possible photograph of the abandoned truck). Wiles headed off into the jungle and was found a few days later. The other truck had been stopped and provided meals to the men. According to Morrison's account, it was around midnight when 'CQMS Arthur, with the ration truck, was fired on by a Nippon patrol while being directed into position by the second-in-command'. [2/29th Battalion War Diary. Morrison (1942), 37.]
The following deaths were recorded for C Company on 18 January, but it seems more likely they were the four deaths recorded during the evening of 17 January. It is not yet known if one of these men was the CQMS and one other who were killed as described above:
During the same evening, the 5/18th Royal Garhwal Rifles that had been sent down to Parit Jawa were ambushed and forced back along the Bakri - Parit Jawa road (now Jalan Mahmoud) to about a mile from the Bakri crossroads, in an area now held by the remnants of the 7/6th Rajputana Rifles. Only around 400 meny made it back. [Wigmore, 226 - 227]
News of the withdrawal of the 5/18th Garhwal Rifles from Parit Jawa was conveyed in a message to Lt Col Robertson by Major Julius (65th Battery), with the request that his Battalion provide infantry support for his guns. Accordingly, at 2330 hours, Lt Col Robertson ordered Captain Sumner’s A Company (around 100 men), located at the rear across the road from Battalion HQ, to move back to the Bakri crossroads to provide infantry support for the guns, with the promise that it would be returned to re-join the Battalion once reinforced. [Wigmore (1957), 226 - 227. Lack et al (2005), 82. Christie (1983), 43 - Captain Bowring's account]
A Company arrived around 0130 hours and during the night there were several heavy artillery exchanges. It was becoming quickly apparent that the 2/29th Battalion could be cut off by Japanese movements through the jungle to the west and south. [Wigmore (1957), 226 - 227. Lack et al (2005), 82]
During the night and employing a combination of both frontal attacks and loud noises to distract the 2/29th leading companies, the Ogaki battalion of the 5th Regiment moved through jungle tracks to the west and south of the 2/29th position, heading for the crossroads area. The US War Department document notes that jungle terrain 'affords a maximum opportunity to utilise the effective Japanese inflitration tactics. As a holding attack is delivered frontally to confuse and distract the enemy, patrols move to the enemy flanks'. These patrols then 'wriggle through presumably impenetrable jungle to get around the enemy's flanks and into his rear areas'. These infiltrations are 'virtually impossible to stop'; after reaching suitable positions, the 'infiltration patrols dig in'. [Tsuji (1960), 204 (map). US War Department (1944), 164 - 167].
As noted earlier, the 2/19th Battalion had received orders around lunch time on 17 January 1942 to leave Jemaluang for Bakri. The Battalion left in three groups. First the carriers, then the main body (Rifle Companies, 2 trucks per company composite loaded, A Echelon group comprising the remainder of the Company transport, two mortar detachments, No 2 Platoon (AA) carrier platoon 'less those employed on carriers' (transport protective platoon), then B Echelon group. Three 101 wireless sets were attached to the Battalion at Jemaluang for use in the Muar area. [2/19th Battalion War Diary, and Appendix A]
Appendix B of the 2/19th War Diary states that the carriers departed first around 0200 hours; the main body departed at around 0400 hours, followed by B Echelon (3rd Group). The Battalion travelled by motor transport (MT) of the 2/2nd Reserve MT Convoy. This account states that the Battalion main group arrived at Ayer Hitam at 0700 hours, then Yong Peng at 0800 hours. [2/19th Battalion War Diary, Appendix B]
Appendix A ('A and B Echelon') of the War Diary, 'A & B Echelons, led by OC HQ Coy, Captain R.N. Newton, left Jemaluang' at 0200 hours, a time that appears to be inconsistent with the previous paragraph. It noted that the OC A Echelon was Captain H.C.H. Macdonald, the OC B Echelon was T.O. Captain W.P. Bracher. Appendix A stated that A and B Echelons arrived at Ayer Hitam at 0730 then continued on and arrived at Yong Peng at 0830 hours. These times are more consistent with the two Echelons arriving after the main body. [2/19th Battalion War Diary, Appendix A]
Either way, Appendix B notes that after arrival at Yong Peng, the CO (Lt Col Anderson), his adjutant (Capt Hughes), and a recce party group (Captain Newton) proceeded on ahead to Parit Sulong where they met Major Maxwell and then proceeded without the Adjutant immediately to Brig Duncan's HQ at Bakri. The adjutant was ordered to hold the Battalion at Parit Sulong pending further orders. [2/19th Battalion War Diary, Appendix A]
The Bakri front at 8 AM on 18 January 1942. Note that the 2/29th position is not shown expanded in any map that survived the war. Wigmore (1957), 228]
During the same morning, at 0600 hours on Sunday 18 January the weather was 'fine' at the 101 mile post where the 2/29th Battalion was in position, although it may have started to rain by around 1000 hours - see below. [2/29th Battalion War Diary]
The US War Department document noted that 'in division operations, tanks are attached to infantry units and come up at night to designated assembly positions. In a tank-led attack the tanks move forward in waves, followed by the infantry'. The role of the first wave would be to neautralise the anti-tank guns, while the second wave leads the infantry assault. [US War Department (1944), 164 - 167].
The late 1942 account of the Bakri battle in the Asahi Shimbun, contains the following details, which presumably happened very early in the morning of the 18th.
On the morning of the 18th, the tank unit arrived at the front. The unit's captain was Shigeo Gotanda. He had just become a captain. He apparently said "Please let [the] Bakri break through [be] with our tank unit". The Gotanda tank medium tank commander, who knew the struggle of his allies, bravely offered the opinion of the single breakthrough operation to the advance commander. "There are quite a few enemies in Bakri. Moreover, the position is solid. You can't just use tanks. Attach an infantry unit." Gotanda replied "Infantry units are in the way with their feet tied up".
The article states that 'The eyebrows of the tank cap were engraved with the burning determination of the commander of the Gotanda tank squadron'. At this time, Lieutenant Colonel XX of the tank unit came from behind and said: "Lt. Col. XX and Gotanda have expressed their opinions on a single breakthrough attack. How is your expert judgment?" His reply was: "Gotanda, get an infantry soldier". Unfortunately, Captain Gotanda's determination was firm, and he replied: "I don't like it, I'll do it alone". In response, his commander stated: "All right. If so, I agree with the statement of opinion. All right. Let's go, I'll ask.". In this way, the Gotanda Tank Company made a rush toward Bakri.
According to Captain Morrison's account, 'it was just after dawn on 18 January that a heavy rattle was heard coming from the enemy's lines and the first of five camouflaged tanks with guns ablaze came into view'. [Morrison (1942), 37.]
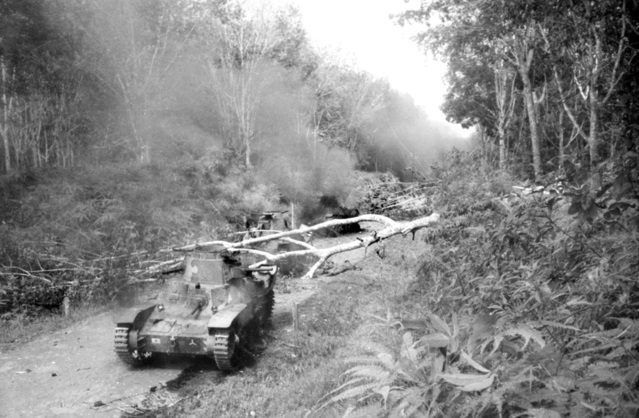
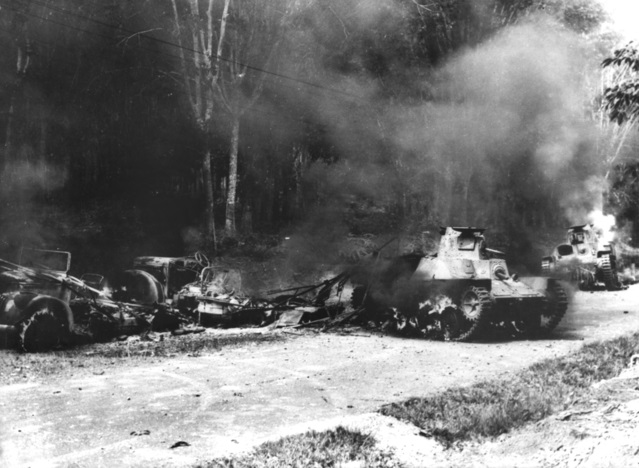
At 0645 hours, Japanese mortars began falling and 'all hell broke loose'. Five Japanese Type 95 Ha-Go light tanks advanced along the road towards the 2/29th Battalion's forward positions. Sgt Thornton's leading gun, 'whose gun was out of sight round a bend', engaged the first, third and fourth tanks, but they continued on. The initial shells used by the leading Anti-Tank detachment (near the top of the road) went straight through the three tanks which kept firing. Sgt Thornton then used high explosive shells to destroy the three leading tanks, which were also shelled by the rear gun located in a slight hollow and manned by Sgt Parson's crew near HQ company, with rifle and grenade support from the Battalion along the road. The fourth and fifth tanks continued but all five were placed out of action; according to Morrison's account, 'the forward gunner then swung his gun and destroyed the two remaining tanks which were blocked by the cripped ones and trying to turn back ... the gallant forward gunner was mortally wounded by small arms fire from a tank while swinging his gun around to engage the two vehicles attempting to escape'. Escaping tank crews were fired upon by a Vickers gun from a bank on the right. [Harrison (1960), 48. Finkemeyer (1994), 11. Farrell & Pratten (2009), 174. 2/29th Battalion War Diary. Lodge (1986), 94. Tsuji (1960), 203. Lack et al (2005), 82 - 83. Christie (1983), 43/44 - Captain Bowring's account, 65 - Captain Brand's account. Morrison (1942), 37.]
A Type 95 Ha-Go tank being demonstrated in 2019. This video gives an idea of the noise made by the tanks.
Seemingly undeterred (or as part of the second wave to lead an infantry assault), at 0715 hours, three more tanks moved forward down the road and were also destroyed by the forward 13th Battery of the anti-tank gunners. Several large trees were felled across the path of the tanks, as can be seen in photographs of the destroyed tanks below. [Finkemeyer (1994), 11. Farrell & Pratten (2009), 174. 2/29th Battalion War Diary. Lodge (1986), 94. Tsuji (1960), 203. Lack et al (2005), 82 - 83. Christie (1983), 43/44 - Captain Bowring's account. ]
To quote the Asahi Shimbun article: 'Sadly, the Gotanda Tank Company was annihilated!'. It went on: 'The death assault of the Gotanda Tank Company upset Bakri's enemies, but the enemy army, which had the advantage of the terrain, still did not flinch and concentrated on the crossfire.
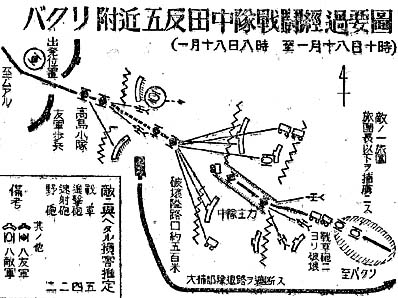
The title of this diagram is 'Gotanda Tanks at Bakri' and underneath 'On the 18th of January'.
After the tanks were put out of action, the cinematographer Bagnall and the photographer Metcalfe were selected by lot to move forward to the 101 mile peg from the Bakri crossroads. Metcalfe took at least eight photographs and Bagnall filmed the leading three tanks (captured in the middle of a longer film (from 0:42 to 1:35), titled 'Singapore and burning tanks' that runs for 2 minutes and 40 seconds. (Australian War Memorial. Singapore and Tanks Burning (film). AWM F01171)), and then moved towards the next two or three tanks near C and B Companies. They returned back to Charley Parsons’ position to take at least two more photographs and film, including the iconic photograph of Parsons’ crew posing behind their gun facing towards the destroyed tanks (see below). [Advocate, Burnie, Tasmania. 21 January 1942. Sydney Morning Herald, 21 January 1942, 6]
The photographs and film provide visual clues as to the location and terrain of the 2/29th Battalion in the area of the 101 mile peg. The photographs below have been placed in the same order as the film.
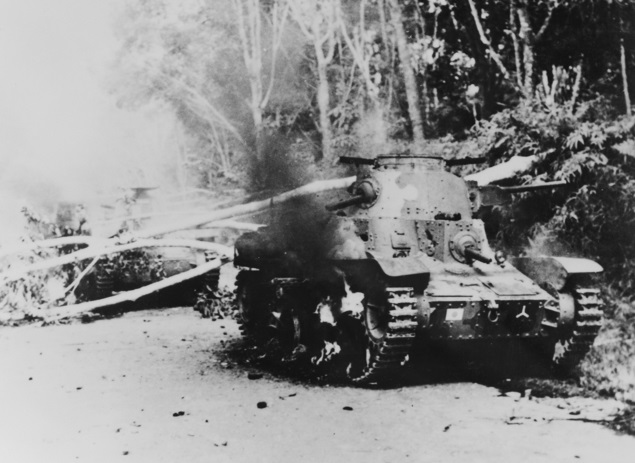
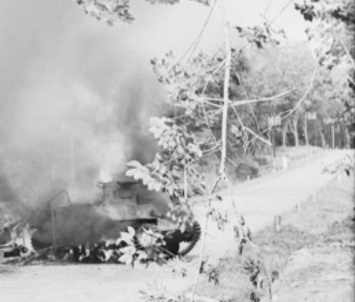
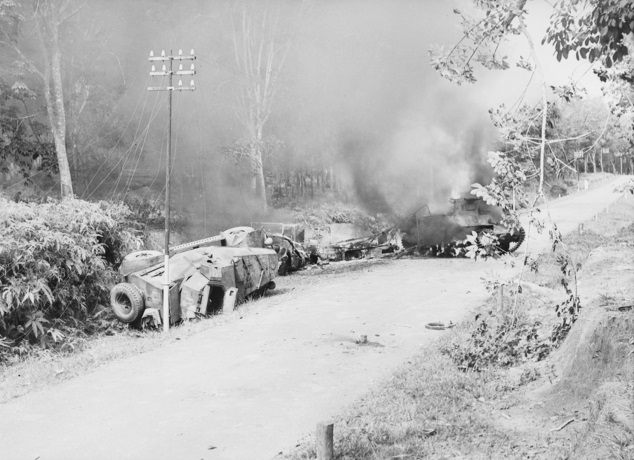
Destroyed tanks at Bakri (AWM 040370)
The first part of the film corresponds to the photograph above (AWM 040370). The photographer and/or film maker have walked over to the first tank that was knocked out. The film maker then moved closer to the tank, filming it from the side where the flames are visible. A second tank is clearly visible behind the felled tree.
Destroyed tanks at Bakri (AWM 011301)
The photographer then climbed the bank on the side of the road to gain a better position of the tanks in this photograph (AWM 011301),obably beside the location where A Company had been located the previous evening (to the right of the photograph), and looking north. Two tanks are visible behind the lead tank, and bodies are visible beside the second tank.
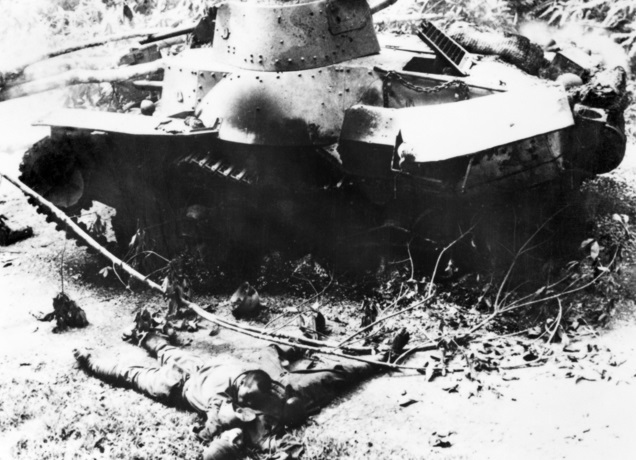
Destroyed tanks at Bakri (AWM 011298)
The photographer has now moved down the bank and approached the first tank on the other side to take this photograph (AWM 011298). Dead Japanese crewmen are clearly visible on the ground next to the second tank.
Destroyed tanks at Bakri (AWM 011307)
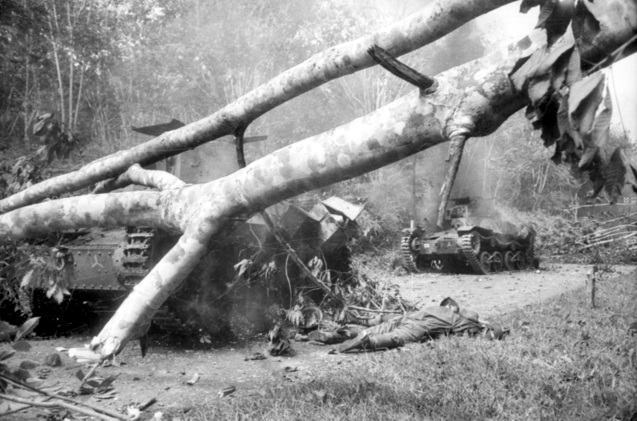
The photographer then moved past the first tank (now to his left) to gain a better photograph (AWM 011307) of the second and third tanks, and dead Japanese crewmen. The film maker moved forward of the felled tree to capture the same scene.
Destroyed tanks at Bakri (AWM 040369)
The photographer has now moved a little further north along the road and taken a photograph (AWM 040369) of the second tank and two dead Japanese. The film maker continued north along the road to film the three leading tanks, looking south along the road. The third tank in the film clearly has severe damage to its rear. The film then shows pierced armour plating, possibly on the tanks.
Destroyed tanks at Bakri (AWM 011300)
The photographer and film maker now moved further along the road in the area around where C Company (left, among the rubber trees) and B Company (right, out of sight in this photograph) were located. Clarrie Thornton’s Anti-Tank gun position was also on the left believed to be just off the road, hidden behind bushes. In the photograph above (AWM 011300), the damaged vehicles on the left include a 175 Marmon Herrington MK III armoured vehicle and possibly two additional burning vehicles (see below for comments on what these may be).
The Marmon Herrington armoured vehicle on its side may be the vehicle that was sent forward in the evening of 17 January to explore the enemy position, but no details have been found yet to indicate that that vehicle was forced off the road and turned on its side. It is not know if it was the truck that was bringing rations to the men, or perhaps it was folllowing the vehicle delivering rations. Either way, it was clearly there before 7 AM on 18 January 1942 when the tanks rolled in.
There has been some discussion (including here) as to how the Marmon-Herrington armoured vehicle ended up on that part of the road as the Australian military did not have them. It is speculated that it belonged to the 2nd Loyals, based on the comment in Wigmore (The Battle for Bakri), page 225:
Unaware of the extent of the enemy forces in the Muar area, [Maj. Gen. Gordon Bennett] directed that [2/29th Battalion] should be used to counter-attack towards Muar, and gave it a troop of 2/4th Australian Anti-Tank Regiment and one [troop] of armoured cars from the Loyals for what he considered good measure.
Telegraph wires had been damaged or cut. The film maker shows the same scene, but from the middle of the road looking north back toward the Japanese position.
Destroyed tanks at Bakri (AWM 011306)
The photographer has now moved closer to the burning tank to include a second tank in the background in this photograph (AWM 011306). The film maker was in the same spot and captured the same scene. Destroyed vehicles can be seen on the left, with what appear to be the tyre marks of a vehicle that has headed off the road. C Company’s position is possibly to the rear and left of this photograph. The photographer and film maker then moved back to Charley Parson’s location to take the next photographs and film.
An Australian made truck/tractor using a Marmon-Herrington chassis towing an artillery trailer in Syria in 1941.
The burning vehicle/s in front of the Marmon-Herrinton armoured vehicle bear a strong similarity to the vehicle above. The burning vehicle/s could potentially be (a) the truck that transported the leading anti-tank guns that was then left on the side of the road (unlikely), (b) the 'truck' or trucks that delivered the rations and was abandoned after crashing, (c) trucks containing ammunition (see below), or (d) just two of the Battalion's trucks that were left on the road and hit by Japanese tank fire (which seems unlikely). Either way, the shape of the front of the vehicle pointing towards the trees looks very similar to the Marmon-Herrington 'tractor', especially the wheel flange and engine hood/bonnet (and air vent), allowing for the fact that the tyres no longer existed and so the vehicle was much lower down near the ground. See also AWM website description and very clear photograph of the same vehicle.
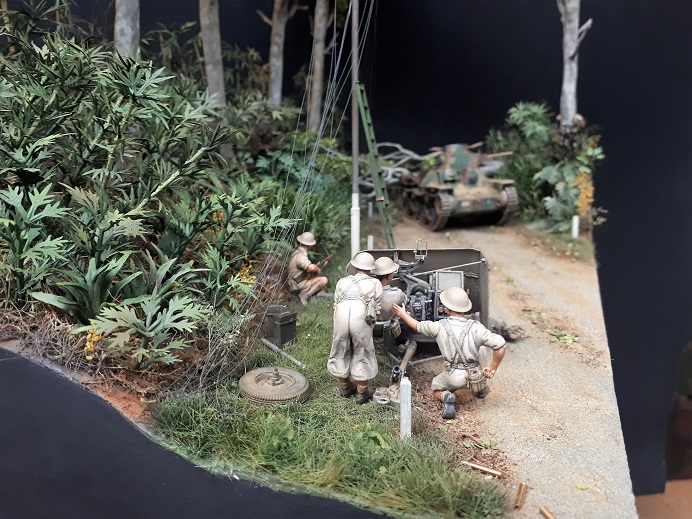
A diorama model of the scene below created by Tim Forster in the UK, used here with his permission. See this page on the Kitmaker.net site for details of the construction process.
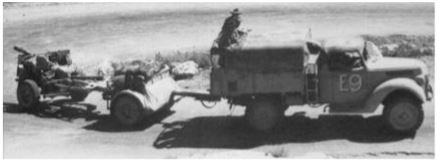
Destroyed tanks at Bakri from Charley Parson's gun (AWM 011302)
The photograph above (AWM 011302) shows the destroyed Japanese tanks in the near distance from Charley Parsons’ gun, said to be located just near Battalion HQ on the west side of the road. A ladder (that does not appear in the film version) has been placed against a telegraph pole, and possibly the rear end of a truck appears on the right hand side. A small square-shaped structure to the right of the photograph could be the 101 mile peg. A Company was located behind the low bush to the right. The film shows the same scene from a similar angle but includes four Anti-Tank gunners appearing to re-create the scene of the battle. A second scene shows Parsons and one of his crew looking forward.
Charley Parson’s (centre) anti-tank crew at Bakri (AWM 011309)
This photograph (AWM 011309) is said to show Charley Parsons and his gun crew, the same three men shown in the previous photograph. To the left, at the rear of the gunners, is a group of men, quite likely members of HQ Company who were in that area. One of these men, to the far left of the photograph, appears to be an officer. To the lower left of the photograph appears to be the rear end of a tracked vehicle, probably a Bren carrier. A soldier stands to the rear of the gunners. The film ends with a short scene showing pierced armour plating.
As the Japanese tanks had been put out of action, a positive mood swept through the Battalion'. The Australians were elated at the outcome but for some reason did not take advantage of the situation to launch a counter-attack. [Lack et al (2005), 84]
The Japanese almost certainly did not expect to lose a tank company that morning, borne out by the Japanese account in which Captain Gotanda is made out to be quite reckless in his attack.
Gunner Harrison was ordered to move another gun forward from Brigade HQ to the 101 mile post. This gun (according to Harrison) was positioned (after some discussion with Lt Col Robertson, who was said to have wanted it in a more exposed location) 'on the side of the road opposite Charlie Parson's gun'. (Harrison (1966), 48).
The 2/19th Battalion's A and B Echelons arrived at Ayer Hitam at 0730 hours. [2/19th Battalion War Diary]
The post-war citation for the Gotanda medium tank company states the following:
The Gotanda Tank Company, under the command of Captain Gotanda, following operations in Malaya with Troop Leader Iwaguro in control, on 18 January participated in the battle of Bakri. The infantry attack, supported by the tank company, penetrated the enemy line with great difficult, and suffered very heavy casualties. When all the company's tanks were put ouf of action by enemy fire, the whole personnel, including the company commander, joined the infantry in the attack and met a heroic death in battle. ... As a result [of this action], the Ogaki Battalion, intercepting the enemy line of retreat, was able to destroy a brigade of enemy troops.
It seems likely that, after this, the Japanese decided to focus their efforts instead on small frontal attacks to provide cover for infiltration and outflanking activities. From around 0830 hours, the Japanese again attacked the forward left C Company of the 2/29th Battalion. At least one account states that the Japanese advanced down the road on bicycles, but this (the bicycles) seems unlikely given the destruction across the road so it probably refers to the road in front of C and B Companies. It was discovered that Japanese snipers (later said by American Intelligence to have much patience but were poor marksmen) had infiltrated the area during the night; Lt Clarke was killed by a sniper. [Brune (2014), 322. This event is not recorded by Captain Bowring, but see below for events from around 1000 hours.]
According to his account, Captain Mileham's group spent most of 18 January 'ploughing through deep swamps'.[Norfolk/Mileham]
Lt Col Anderson's forward party (along with Maxwell, Thyer and Capt Newton) reached the Bakri crossroads by around 0930 hours.[2/19th Battalion War Diary inc Appendix A and Appendix B]
Around this time, Capt Newton of the 2/19th Battalion sought to locate a suitable area for that Battalion's A and B Echelons. According to Appendix A of the 2/19th War Diary, 'the terrain of the country made this a difficult task as the rd [sic] was for the most part built-up, with wide and deep ditches on either side and flanked by swamp.' A few hours later, Capt Newton decided to establish a harbour about 7 miles south of Battalion HQ at a native village (kampung/kg). Soon after it was decided to move the harbour to a location within two miles of Battalion HQ because, according to a handwritten addition, 'Captain Newton considered [the Echelons] had to be close up because of danger of causeway and P/S Bdge being cut'. Despite this move, Appendix A noted that 'It was felt that this position ... was too far fwd in relation to Bn and it was considered advisble to recce on the following day for a more suitable position east of Parit Sulong Br[idge] where 2/29 had its B Ech'. This (and the earlier note in the 2/19th War Diary) is the only reference to the whereabouts of the 2/29th B Echelon group which (with the exception of its men who were caught at the front line, managed to survive largely intact. [2/19th Battalion War Diary inc Appendix A]
Lt Col Anderson established his Battalion HQ about 1 mile east of Bakri, then reported to Brig Duncan at Brigade HQ at the 99.5 mile peg at 0945 hours. Appendix B of the 2/19th War Diary noted that 'owing to a breakdown of comms [communications] the tactical position was not very clear'. [2/19th Battalion War Diary inc Appendix A and Appendix B]
The tactical situation at the time was discussed from 0945 hours and the following points noted in Appendix B of the 2/19th War Diary as follows:
The nature of the ground was reported as being distinctly unfavorable for the Brigade. Nevertheless, Brig Duncan ordered the 2/19th to debuss and deploy in the neighbourhood of the 100 milepost, and cover the Bakri crossroads. A Despatch Rider (DR) was sent back with orders to the Adjutant to move the Battalion up in Company blocks with wide intervals and dispersion 'owing to extremely unfavorable open road conditions between PS [Parit Sulong] and Bakri'. It was noted that the road was 'for the larger part ... without cover and straight and there was considerable enemy air activity'. Note that the Bakri crossroads should not be confused with the small town of Bakri, further along the road to Muar. [2/19th Battalion War Diary inc Appendix A and Appendix B]
Despite fresh attacks on his leading C and B companies, Lt Col Robertson was probably sufficiently confident (or needed) to head to Brigade HQ near the 99.5 mile peg for a conference with Brigadier Duncan and the recently arrived Lt Col Anderson, riding as pillion on a motorbike driven by Despatch Rider Sgt Syd Baulkham. (Brune suggested that Robertson left because he felt confident that his Battalion was 'more than holding its own'.) It is estimated that they left at between 0945 and 0950 hours and took 10 minutes or so to ride the two miles, past the Bakri crossroads (the soon to be location of the 2/19th Battalion just forward of the 100 mile post). [Lack et al (2005), 84. 2/19th Battalion War Diary. Brune (2014), 323. Captain Bowring's account in Christie (1983) states that Lt Col Robertson left at 1100 hours, but this recollection is inconsistent with the record in the 2/19th's War Diary - see below.]
0930 hours to 1000 hours - Robertson arrives at Brigade HQ

Extract from the 2/19th War Diary, confirming Robertson arrived at Brigade HQ at 1000 hours
The 2/19th War Diary records that Lt Col Anderson reported to Brigadier Duncan at Brigade HQ at 0945 hours. It then notes that Lt Col Robertson arrived at Brigade HQ at 1000 hours. Given that a roadblock between the two battalions was reported at around 1000 hours (see below), it is assumed that Robertson must have left just before the roadblock was in place. [2/19th Battalion War Diary.]
The conference was attended by Brigadier Duncan, Colonel Thyer, and Lt Col Anderson. Lt Col Robertson reported enemy movement to his south west, and asked that A Company, located at the Bakri crossroads since the previous evening, be relieved. This was agreed to by Brigadier Duncan - as soon as the 2/19th Battalion was in a position to do so. Duncan also decided that the 2/29th Battalion would wait for the 4/9 Jats (with which comms had been lost) to arrive so a counter attack could be mounted. The remnants of the Garhwali Rifles and the Raj Rifles were disposed some 2 miles south of Bakri on the Parit Jawa Road. [2/19th Battalion War Diary. Lack et al (2005), 84]
0945 hours to 1000 hours - frontal attacks and roadblock reported
At around the time that Lt Col Robertson left to return to his Battalion, Japanese forces began firing towards the Battalion's leading positions. At 0945 hours, a carrier driven by Sergeant Wedlick went forward to find out the source of the fire and dislodge them. According to Captain Bowring, he had 'reckoned without the Japanese who had climbed trees'. Wedlick's gun jammed and he was forced to withdraw. B and C Companies then '... patrolled well forward and were in contact with the enemy force estimated to be 2 Bns [Battalions]'. According to Captain Morrison, B Company's 10 Platoon patrols were 'heavily engaged by fire from well concealed positions'. [2/29th Battalion War Diary. Christie (1983, 44 - Captain Bowring's account. Brune (2014), 323. Morrison (1942, 38.]
Quoting Bagnall and Metcalfe, a news article in Australian newspapers reported the same event a few days later:
They had just secured photographs when about 10 o'clock light fire announced the infiltration of a Japanese platoon. Our troops replied with mortar, rifle, and machine-gun fire on the Japanese position, only to find the Japanese fire coming from other directions, including steady sniping from trees.
The Japanese were said to be 'in trees and must have come up during darkness. Engaged with S.A. [small arms] fire and later with 3” mortars'. [Sydney Morning Herald, 21 January 1942, 6]
The 2/29th Battalion War Diary recorded the presence of a road block at 1000 hours between the 2/29th position at the 101 mile peg and the Bakri crossroads (just forward of the 100 mile peg):
1000 hrs Recce patrol detailed contact Bde HQ - forced back at rd block approx 500x E Bn HQ. [2/29th Battalion War Diary]
The form of this roadblock is not known, it could not have been a physical block (e.g., trees or other structures) given that Robertson was still to return from Brigade HQ. One clue is given in the 2/19th War Diary that states that at 1430 hours attempts to get through to the 2/29th by that Battalions A Company failed because of 'enemy light automatic firing'.
Soon after 1000 hours, Japanese infantry, said to have been 'a couple of hundred' troops on bicycles, advanced towards the leading B and C Companies with machine gunners in front. Captain Bowring later wrote that 'every man of the left [C] company was pinned down, although there were not too many casualties among them'. Dozens of Japanese were reportedly killed in this attack. According to Bowring, 'these machine gunners were fearless, taking tremendous risks to reach favourable positions'. [Bowring (1954), 2 - 3. Lack et al (2005), 84. Christie (1983, 44 - Captain Bowring's account]
At around 1100 hours Lieutenant Harold (Harry) Claude Clark of B Company was killed by a sniper. [2/29th Battalion War Diary. Christie (1983, 44 - Captain Bowring's account.]
Death of Lt Col Robertson
It is worth noting that there are two accounts of when Lt Col Robertson died. The first, which is the most likely given other documented events, is that he died on the way back from the meeting at Brigade HQ, the second was that he made it back and then after realising that communications were cut, took the risk of riding back to Brigade HQ. Both options are presented below.
Death of Lt Col Robertson - first account
Likely unaware of the newly set up road block between Brigade HQ and his Battalion, as communications had been cut, Lt Col Robertson returned to his Battalion riding as a pillion passenger on a motorbike driven by Dispatch Rider Sergeant Syd Bauckham. Travelling past the left bend in the road (the location of the road block, out of sight of both Battalion positions) they were shot at by a platoon of Japanese troops that had infiltrated between the two Battalion positions. Lt Col Robertson was hit and fell off the back of the motorbike within 100 to 200 yards of Battalion HQ. [2/29th Battalion War Diary. Christie (1983), 66. Harrison (1966), 50. Geelong Advertiser, 21 January 1942]
Death of Lt Col Robertson - second account
The second account which, importantly, makes no mention of Robertson's known presence at the conference at Brigade HQ at 1000 hours or the reported road block at the same time, states that sometime after 1100 hours, Robertson was advised that the Japanese wanted a short truce to collect their dead and wounded. Robertson was said to have given the Japanese 30 minutes. This truce is not mentioned in the re-created 2/29th war diary. As communications had been cut, Robertson (who was said to have wanted to confer with Duncan), hopped on the back of a motor bike which seems incredulous given there was a known road block reported in the war diary at 1000 hours and he had the ability to travel in an armoured personnel carrier. While they were travelling down the road, they were shot at by Japanese soldiers who had set up a road block with a felled tree. Robertson fell off but the despatch rider managed to return to the Battalion RAP. Captain Morrison (who was not present and states that the news came through during the afternoon of 18 January) recounted this version of Robertson's death: '... he was killed in an ambush while endeavouring to reach Battalion Headquarters on the pillion seat of a motor cycle'. [Morrison (1942), 38]
Which account is correct?
We know from the 2/19th War Diary that Robertson was at Brigade HQ for a conference at 1000 hours, likely travelling there by around 0930 hours on a motor bike driver by a despatch rider. (Pre-war family photographs show that Robertson owned a motor bike and was likely very familiar with riding one). We know that Japanese forces set up a road block from around 1000 hours on a blind bend in the road but we don't know what the form of this roadblock was at that time. Robertson probably left the conference some time around 1100 hours, unaware of the road block. He and his despatch rider were shot at as they went past the Japanese soldiers who had set up the road block (perhaps a machine gun post, pointing north?) and forced back the recce party 500 yards east of Battalion HQ at 1000 hours, and also cut the communications line.
It seems implausible that, having managed to get through the same road block that stopped a recce party at 1000 hours, Robertson then decided to risk returning to Brigade HQ after 1130 hours. Accordingly, the second account is implausible.
Events after the shooting
Captain Brand was attending to a casualty when he '... heard the rattle of shots down the road, and looked up to see Bauckham (the D.R.) riding up the road with his left arm hanging loose and a strained smile on his face. He turned into the rubber and rode up to us, capsizing his bike almost on top of the man I was dressing. He was severely wounded in the left arm and chest'. Someone called out that Lt Col Robertson had fallen off the bike around 200 yards back. [Christie (1983, 66 - Captain Brand's account]

Although unconfirmed, this photograph (taken by the same photographer at Bakri) shows Captain Brand attending to a wounded soldier. The numbering of this photograph follows the photographs of the destroyed tanks so it is credible that was the next photo taken. The motorbike in the background lends credence to the possibility that this could be Sgt Bauckham (AWM 011308)
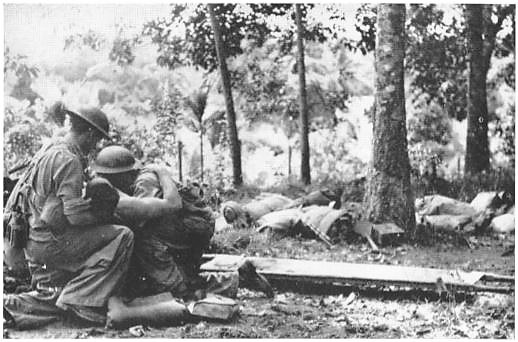
The photograph above appears to be from the same set of photographs and is clearly of the same scene, but it is not contained in the same grouping in the AWM collection. [Wigmore (1957), Chapter 11, relating to the Gemas battle.]
Upon learning of the situation, Sergeant Wedlick and Captain Gahan took an armoured carrier to where Lt Col Robertson had fallen and brought him back in. Lt Col Robertson was seriously wounded, having been hit by at least one bullet in the knee or thigh and probably also with other critical injuries when he fell off the motorcycle. Captain Brand stated that, after arrival at the RAP, Robertson 'was lifted out of the carrier, badly wounded and only partly conscious ... with a head injury and ... some bullet wounds. Half an hour later he quietly died'. The War Diary noted that 'he died a few minutes after reaching HQ'. According to Captain Bowring 'he died from loss of blood and shock half-an-hour later'. In their newspaper report of the events three days later, the photographers reported that Lt Col Robertson was taken 'to the dressing station in a carrier but he died some four hours [sic] later without regaining consciousness'. [2/29th Battalion War Diary. Christie (1983), 66. Harrison (1966), 50. Geelong Advertiser, 21 January 1942. Christie (1983, 44 - Captain Bowring's account, 66 - Captain Brand's account. Melbourne Argus, 21 January 1942. Personal interview with Bob Christie confirming the details.]
Although some post-war stories suggest that Robertson was entirely lucid after being brought in and made several comments, the facts and the interview with Bob Christie who was present at the time and confirmed that Robertson was only semi-conscious before dying indicate that these stories could not be correct.
Lt Col Robertson’s service file records that he was buried at Bakri, ‘near 101 Mile Peg, Muar Road. Ref Sheet 3. 9/15 836605’. At least one account states (without providing any evidence of it) that Robertson was buried 'in a grave large enough to hold both Robbie and a Japanese officer'. Both the Australian War Graves Office, and the Commonwealth War Graves Commission (CWGC) that exhumed his remains after the war, stated that they had no information support such a claim'. [Email from the OAWG, also quoting the CWGC, dated 15 June 2021]
Several other reports after the war, including Captain Bowring's, note that Lt Col Robertson had been 'medically boarded' and was due to be relieved by 19 January 1942 to return to Australia. Both Roberton's service history (available on the NAA website) and his confidential medical record (available only to direct relatives) debunk this claim. Lt Col Robertson's own letters up to 16 January indicate no sign that this might be the case. The origin of these false claims is not known.
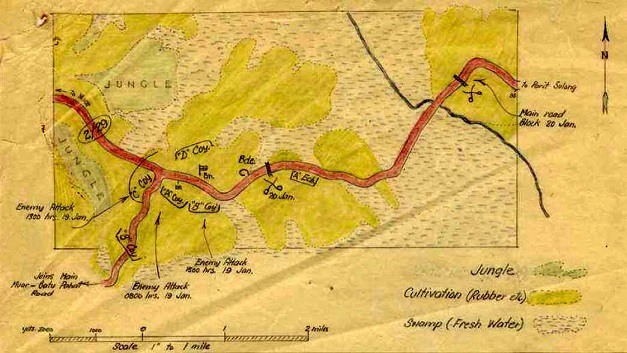
2/19th War Diary map showing the Battalion disposition at the Bakri crossroads.
Elements of the 2/19 Battalion began to arrive and were deployed at the Bakri crossroads from around 1030 hours, as follows:
By this time (1000 - 1100 hours), the 2/19th war diary stated 'enemy between 2/19 and 2/29 at 101 MP'. It seems very likely that the Japanese took advantage of their initial minor roadblock and the 2/19th Battalion's setting up to move additional forces between (and around) the two Battalions. It is not clear why the 2/29th Battalion or its gunners did not attack that position to their rear, but it may be that they were more focussed on defending their frontal positions or were concerned they could hit the 2/19th positions (and vice versa). The 2/19th War Diary noted that 'remnants Ghawalis [sic] & Raj Rifles, south of B Coy [i.e., on the road to Parit Jawa]. Jats about 7 miles North road junction [i.e., closer to Muar town]'. [2/19th Battalion War Diary.]
After Lt Col Robertson’s death, the journalists located at the 101 milepost noted that patrols had left the encampment to discover the extent of Japanese penetration. These patrols revealed that the Japanese had encircled the Battalion's position and made a road-block cutting off the road to the crossroads. Meanwhile in camp, all men were lying in deep mud, the aftermath of rains, while Japanese snipers were pinging bullets into the camp. [Melbourne Argus, 21 January 1942]
Gunner Harrison also noted that the death of Lt Col Robertson's made it clear to everyone that the battalion now had to defend both its front and rear positions. [Harrison (1966), 51.]
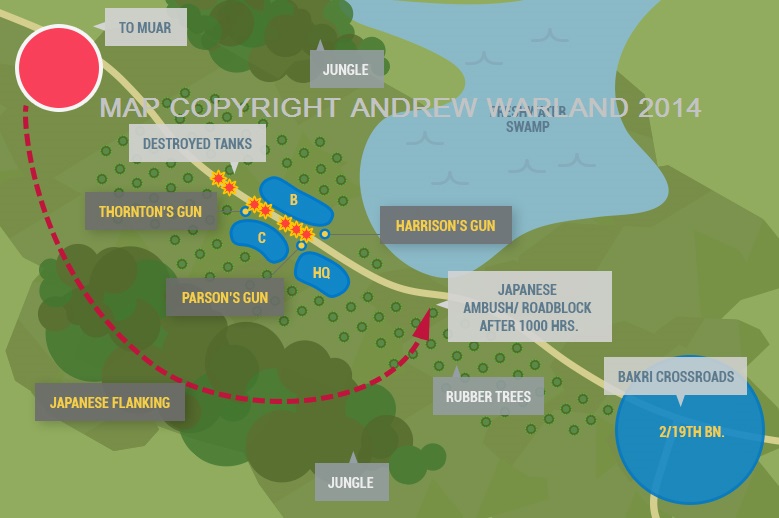
Map of the Bakri Crossroads area, Johore State, Malaya, as at 1100 hours 18 January 1942 (Map copyright Andrew Warland)
Major Olliff, known by his men as 'the Count' (but also a 'perfect gentleman') now took command of the Battalion. Japanese snipers continued to target Australian officers.
According to Morrison, there was intermittent firing during the day and the casualties amounted to one officer and two other ranks killed and three other ranks wounded, the result of enemy sniping. Recces of the enemy's position resulted in fire 'from well concealed positions'. [Morrison (1942, 38]
The ongoing fighting meant further casualties were brought back to the RAP for treatment. Despite rifle fire from Japanese positions, Captain Brand also ventured forward to treat the wounded men, including several Indians attached to the Battalion, some of whom were in an ammunition truck that was destroyed. This may be a reference to the burned out trucks next to the road seen in photos next to the destroyed tanks (above), and possibly also the Marmon-Herrington vehicle on its side, although from the description the ammunition truck was destroyed some time after the tanks were put out of action. Captain Brand gave the mortally wounded men morphine to ease the agony of their wounds. Other casualties included Tibbetts who had a bullet wound to his ankle and Ben Hackney who had a bullet wound to his left calf. [Christie (1983, 67 - Captain Brand's account.]
According to Morrison's account, the 2/29th's B Company sent out a patrol led by Sgt Ross which succeeded in locating the enemy. Mortars were then directed onto the targets which 'was instrumental in clearing the enemy from the area' and 'stemming any attempting advance by the enemy that day' - at least at the front; Japanese forces had continued to flank the 2/29th position through jungle tracks to the west. Two vehicles attacked machine gun nests forward of B Company. [Morrison (1942), 38]
The 2/19th Battalion was in position at the Bakri crossroads by 1230 hours on 18 January 1942, although as noted above, some changes were made after that time (D Coy replacing C Coy, that replaced the 2/29th A Coy by 1400 hours). [Lack et al (2005), 85. 2/29th Battalion War Diary. 2/19th Battalion War Diary]
At 1300 hours, the 2/19th Battalion’s B Company (Captain Keegan), located on the left flank of the Battalion, around 1,400 yards (1,300 metres) down the Parit Jawa road, reported the movement of Japanese troops to the south-west of its position (from/towards Parit Jawa). The 2/29th's C Company (Captain Snelling), '... stationed on the left side of the Muar Road, just forward of Bakri village' (crossroads, and therefore closest to the 2/29th position), reported that the road between the 2/19th and 2/29th positions was cut. An initial attempt by armoured cars from the 2/19th's B Company to clear the road failed. [Wigmore (1957), 228). Lack et al (2005), 85. 2/29th Battalion War Diary. 2/19th Battalion War Diary including Appendix B]
As it had by now been relieved by the 2/19th Battalion’s C Company, the 2/29th Battalion’s A Company under Captain Sumner was now ordered to break through the road block, said to be some 600 yards north-west and also south of the crossroads (firing from the southern side suggests there was line of sight to that area possibly between the 2/19th's C and B Companies, or further south down the Parit Jawa Road).[2/19th Battalion War Diary, including Appendix B. Wigmore (1957), 229.
The first attack, at 1430 hours, ascertained that the roadblock consisted of a burnt out truck and a number of fallen trees, and there were Japanese on both sides of the road. The attack failed - Appendix B of the 2/19th War Diary states that they were stopped by light automatic fire. A second attack at 1510 hours, with the support of two of the 2/19th Battalion’s armoured cars, a carrier (Lieut Howard), two platoons of C Company (Captain Sumner, platoons 13 and 14, commanded by Lt Glasson and Sgt Davies), and a mortar detachment, succeeded. According to the 2/19th War diary, 'the Platoons met with little opposition and the road was cleared'. It was only then that they found that Lt Col Robertson had been killed that morning. The 2/19th C Company continued 'aggressive patrols'. [2/19th Battalion War Diary. Wigmore (1957), 229. Note that Bowring (Christie (1983, 45) states that A Company returned to the Battalion at around 1800 hours. This does not appear to be correct based on other evidence which suggests there were back by around 1600 hours. Christie (1983), 67 - Captain Brand's account.]
Between 1500 and 1600 hours, while the road was being cleared, the 2/19th Battalion fired 'intense and accurate' mortars towards the Japanese, succeeding in breaking up their attack, inflicting many casualties, and causing them to withdraw. [2/19th Battalion War Diary, including Appendix B]
With the roadblock removed, supplies of ammunition and food, a wireless truck and other gear was sent forward at 1600 hours 'with little opposition' under escort of the 2/19th Battalion’s carriers. Burials could now be performed. Padre Macneil, who had come up with the ration truck, officiated at the burial of Lt Col Robertson, Lieutenant Clark, and three Other Ranks. Bowring wrote that when Captain Gahan detailed a section of the mortar platoon to dig [Lt Col Robertson’s] grave (and those of Lt Clarke and three other men in the Battalion HQ area) the sergeant in charge of the section burst into tears and most of his men were also visibly affected. [2/19th Battalion War Diary. 2/29th Battalion War Diary. Bowring (1954), 3. Christie (1983, 47 - Captain Bowring's account, 67 - Captain Brand's account.]
A Jats officer (possibly Major White, see below) reached the Bakri crossroads at 1600 hours and reported to Brigadier Duncan that his battalion was located six miles north west of the village.[Wigmore (1957), 299].
According to a statement made by Captain Cahill (2/19 Bn), an Indian ambulance arrived at the 2/19th Bn B Echelon area (located around the 98 mile post) at approximately 1630 hours and was sent forward to collect the 2/29th wounded but was unable to find any; only two men from the 2/19th suffering from dysentery were evacuated. This statement conflicts with the next paragraph. It is unclear if Capt Cahill was referring to a different event involving an ambulance. [2/19th Battalion War Diary, Capt Cahill's statement]
The following were evacuated from the 2/29th position to the 45th Brigade Headquarters at 1630 hours, thence to Yong Peng: Major White (second-in-command of the Jats, not to be confused with another Major White of the 2/19th), Captain Gibson (2/29th HQ Company Commander), six badly wounded men (including the Despatch Rider Pte Syd Bauckham who managed to return to Australia before Singapore fell), the Padre, the Quarter Master (QM), and the photographers, 'having secured motion films of the guns and infantry in action'. The journalists become the source of much-needed information on the battle at Bakri, including Lt Col Robertson’s death. 12 wounded remained behind, with the expectation that they would be evacuated as well. [2/19th Battalion War Diary. 2/15th Field Regiment War Diary. 65th Battery, War Diary. Christie (1983, 47 - Captain Bowring's account, 68 - Captain Brand's account.]
Appendix B of the 2/19th War Diary states that its C Company was ordered to picquet a gap between the two Battalions and to maintain the road open with an all night picquet of two sections - Cpl Smith to the north and Cpl Irwin to the south. The line of communication between (2/19th) Bn HQ and C Company was established. The War Diary also notes that Lt Col Anderson saw Brigadier Duncan around this time to ask if 17 Platoon at Parit Sulong could be relieved as promised by Westforce, 'also suggesting increase in garrison there'. Major White was 'detailed to bring in the [word covered - guns?] which he had left the day previously some 6 miles north of Bakri and he expressed the opinion that this should be accomplished by early on the 19th'. [2/19th Battalion War Diary, Appendix B].
By 1700 hours, the 2/19th Battalion position came under shell fire. According to Wigmore, Lt Col Anderson was 'chafing under the delay' (of bringing the Jats in) as it was 'playing into the hands of the Japanese' by delaying his proposed offensive. [Wigmore (1957), 229]
Japanese snipers in the trees had been menacing the 2/29th battalion area all day. Towards dusk, an infantry section (about 15 men) was ordered to clear the area before dark. [Harrison (1966), 51].
The Asahi Shimbun article stated: 'For this stubborn enemy, our infantry unit also fired for seven hours, the barrel burned like fire, the bullets scattered, and the death battle itself continued.' In the face of this resistance, the Japanese decided to attempt to flank the 2/29th position. The article continued: 'Knowing the unreasonable base in front of the enemy, the captain of the Iwabe pursuit unit commanded one of his subordinates to detour from the right, attacking the 453 highlands [presumably a locality reference] behind Bakri, to create a pinch tactic'.
Meanwhile, according to the article, the Ogaki battalion, which was ordered to block the enemy's retreat by advancing to the eastern area of Bakri while waiting for a rally near 4 km east of Simpang Jeram, started to act at 1630 hours on January 18 against the enemy bullets. They reached the coastal road at 8 o'clock at sunset.
Title is 'Ogaki Unit at Bakri' and shows the flanking action around the two Australian Battalions. The two shaded areas are titled 'Jungle'.
At 1800 hours, 45th Brigade Command ordered one Company from the 2/19th to move through to the 2/29th location and to contact the enemy along the Muar Road to cover and aid the withdrawal of the Jats. Lt Col Anderson requested a section of anti-tank guns to be attached for the task and ordered his A Company to move at 0730 hours the next morning to fulfil this role. The 2/19th's A Company was located on the southern side of the crossroads, opposite C Company. [2/19th War Diary]
At 2000 hours the dispositions were as follows: [2/19th Battalion War Diary]
After dark (according to Bowring), the 2/29 Bn C Company's Lt Carr, occupying the 'extreme left forward platoon of the battalion', reported that one his (rifle) sections was unable to withdraw because of the presence of a large enemy force. Extra supplies of grenades were sent forward (see example in photograph above), but the Japanese forces had moved on before they could be attacked. [Christie (1983, 47/48 - Captain Bowring's account, 68 - Captain Brand's account. Brune (2014), 327.]
On the other side of the road, B Company reported a temporary lull in hostilities in its area, likely because the Japanese were moving through the jungle trails to the west of C Company. [Morrison (1942), 38].
Gunner Harrison described the night of 18 January 1942 as follows:
Then darkness dropped on us abruptly as it always does in Malaya and with its coming the tension and the strain sharpened. It was a moonless night and visibility under the trees was close to zero. Anxious eyes strained to pierce the warm, velvety darkness and imaginative ears hurried to convey all manner of alarms to receptive minds.
Fireflies caused many a finger to tighten on the trigger, and the wind rustling the trees brought its moments of wild speculation. Was that dark mass between those two trees really coming closer? Could that noise be caused by someone slithering towards us with a knife, or a grenade? Were those two dead Japanese on the roadside by the tanks really dead? The blood of heroes flowed but sluggishly through my veins and that morning I had felt them both for a pulse while holding a revolver to their heads as I did so. I remembered the cold, clammy flesh and the unmistakable stillness. Reason told me they were dead but imagination bestowed on them the gift of life and the power of vengeance, and I shivered superstitiously despite the warmth of the night. [Harrison (1966), 52]
At around 2000 hours, around 100 to 150 Japanese (believed to be separate from the instance reported above) advanced 'shouting and clashing their weapons together and generally working themselves up into a frenzy'. According to Captain Brand there was 'a few minutes of intense silence and then a terrible outcry - Japanese yells and screams, bursting grenades - then the yells of our men - "Come on you yellow bastards". Members of C Company left their slit trenches and engaged the Japanese to throw them off. A further 40 Japanese then attacked and were engaged with bayonets and pushed back. No ground was lost. The rest of the night, which was 'pitch black', was 'reasonably quiet' with patrolling on all fronts. Captain Brand continued to attend to wounded men at the RAP, one of whom had formed the idea that Major Whiteman and his Indian sappers were Fifth Columnists. [Christie (1983, 47/48 - Captain Bowring's account, 68/69 - Captain Brand's account. Brune (2014), 327]
Japanese forces continued their build up between (and flanking) the two battalions. The 2/19 Bn War Diary noted that heavy enemy shelling forced a forward troop of the 2/15th Field Regiment then located at the 100 mile post to withdraw to the 99.5 mile post. [2/19th Battalion War Diary]
The following 2/29th deaths were recorded for 18 January 1942. The list excludes C Company deaths which almost certainly occurred sometime during the evening of 17/18 January, as noted earlier:
The 2/19th War Diary (Appendix B) noted that its B Company was brought closer to C Company (at the crossroads) for night dispositions. The 2/19th Battalion’s C Company (Captain Beverley) was ordered to keep the road open overnight between the two Battalions. The War Diary added that, apart from some patrol actions by the enemy and occasional bursts of fire, the night 'which was very dark, was passed without incident'. [2/19th Battalion War Diary, Appendix B. Lack et al (2005), 90. 2/19th Battalion War Diary. Wigmore (1957), 231. Lodge (1986), 109. Brune (2014), 327]
During the night of 18 January, Lt Col Anderson deployed his forces to be ready for an offensive against the Japanese the following morning. It would appear, from the available evidence, that the Japanese Ogaki battalion had moved quietly through the jungle during the night to prepare for an attack on the Bakri crossroads area. [2/19th Battalion War Diary]
Lt Varley's 17 Platoon from the 2/19th Battalion D Company had left the Parit Sulong bridge (replaced by the Norfolks) soon after midnight on 19 January and re-joined that Battalion's B Echelon located around the 98.5 mile post commanded by Captain Newton by 0300 hours. [Wigmore (1957), 238. 2/19th Battalion War Diary, Appendix A]
At 0600 hours the 2/29th War Diary recorded that the weather was fine. [2/29th Battalion War Diary]
2/19th Battalion A/B Echelon actions
At 0700 hours, the 150 men of the 2/19th Battalion's A and B Echelons under Captain Newton, with Lt Varley's platoon, reported the movement of between 200 - 300 widely dispersed Japanese to their east heading in a north easterly direction. It seems likely that these forces had flanked south of the A/B Echelon area and were now moving 'back' north to cut them off. Fighting broke out in the north east area of the perimeter and snipers shot from trees. A gap was opened by the Japanese on the east side of the perimeter during which time the QM (D.I.McDuncan) was killed (his body would be found a couple of days later). Captain Newtown ordered his forces to withdraw slightly to close the line, consolidate and return fire. The southern side of the perimeter then came under fire but '... this ceased when the Vickers on SW corner opened fire'. [2/19th Battalion War Diary, Appendix A]
Appendix A noted that, at the outbreak of firing, No 17 Platoon of D Company was placed in a position north of a Chinese house in the vicinity of Company HQ. Japanese troops were seen in strength on the high ground to the east. The pressure of the attack forced the east perimeter to withdraw across the road, through the camp. [2/19th Battalion War Diary, Appendix A] By 0900, none of the men of A or B Echelon (or 17 Platoon) were located east of the road. [2/19th Battalion War Diary, Appendix A]
Once the firing started, Captain Bracher then ordered the drivers of about 20 vehicles including one carrier 'to withdraw some back along the road out of danger'. One truck, driven by Sgt Meale, headed back to the Bakri crossroads, passing a road block on the way and reached Battalion HQ - see below. Only four trucks managed to get away. One was abandoned as a result of mechanical failure due to enemy fire at Parit Sulong. The three others suffered machine gun fire from the air all the way to Yong Peng. The remaining vehicles could not proceed as the road was blocked by a water carrier which had overturned and run into a ditch and caught firewhen the driver was shot. According to Appendix A of the 2/19 War Diary, 'Rd to Parit Sulong being thus blocked, the vehicles tried to join Bn but found that our concrete cylinders had been formed into an effective rd block some 600 yds from A & B Ech harbour'. An armoured car coming from Parit Sulong reported that the Japanese had not yet crossed northward over the road. [Wigmore (1957), 238. 2/19th Battalion War Diary, Appendix A]
Ogaki Battalion attacks
At around the same time as the A and B Echelons came under attack (around 0730 - 0750 hours, and before any offensive could begin along the Muar Road (expected at 0730 hours), delayed by non arrival of the British Anti Tank section, the Ogaki Battalion that had been outflanking the 2/19th and 45th Brigade positions during the night attacked the 2/19th Battalion's A Company area forcing its carriers off a ridge from the south western side of the Muar - Yong Peng road. According to the 2/19 Bn War Diary, the Japanese '... took the high ground overlooking and within 150 yards of the 2/19 Bn HQ'. The War Diary noted that 'small forward elements of the enemy succeeded in getting on the ridge that A Company had occupied and which overlooked the road in the Battalion area'. [Wigmore (1957), 231. Lack et al (2005), 90. 2/19th Battalion War Diary. 2/19th Battalion War Diary. Lodge (1986), 109. Brune (2014), 329 - 330]
2/19th Battalion counter attack
The 2/19th Battalion A Company was ordered to attack immediately and recover the hill. That Battalion's C Company was ordered to employ the Indian Rajput and Garwhal troops in the B Company task astride the Parit Jiwa road. A carrier was sent to Captain Keegan of B Company to attack the Japanese from the rear, moving on the line 400 yards south of and parallel with the main road.[Wigmore (1957), 231. Lack et al (2005), 90. 2/19th Battalion War Diary, Attachment B. Lodge (1986), 109. Brune (2014), 329 - 330]
Two platoons from A Company attacked - one from the front, the other in a flanking movement, and re-gained the ridge area by 0830 hours . B Company then attacked from the rear, and A Company from the right flank, thereby sandwiching the small Japanese force which took heavy casualties (said to have been around 140 dead), which then withdraw 'in some disorder' in a south-easterly direction, leaving behind a number of automatic weapons and a 'Bn' (Bren?) gun. The Battalion lost 12 men and a further 10 were wounded. [Wigmore (1957), 231. Lack et al (2005), 90. 2/19th Battalion War Diary, Attachment B. Lodge (1986), 109. Brune (2014), 329 - 330]
Reports came in at around 0830 hours from Transport Sergeant Meale (who arrived with wounded men) that the 2/19th Battalion's A Echelon which was 'harboured in a strong position' near the 98 milepost was (or had been) under attack by 400 to 500 Japanese. [[Wigmore (1957), 232/233. 2/19th Battalion War Diary, Attachment B. Lodge (1986), 109.]
It is clear that by this time, Japanese forces were located to the south/south west of the two battalion areas as well as to the east, and were moving towards Parit Sulong.
At 0930 hours, two scouts were sent out from the 2/29th Battalion to contact the 2/19th Battalion but failed to do so. [Wigmore (1957), 233]
Also at 0930 hours, a Japanese cycle patrol appeared along the road travelling towards the front positions of the 2/29th Battalion. Morrison noted that 'gunners of 12 Platoon and of C Company both claimed to have bagged the patrol which was quickly wiped out'. [Morrison (1942), 39)]
At 0940 hours, the 2/19th Battalion War Diary recorded from patrols the presence of Japanese troops to the south (towards the coast). The 2/19th Battalion's A Company was returned to its original position and B Company was disposed to their left, south of the road, covering the left flank and rear of the Battalion and Brigade HQ. A roadblock at the 98 mile peg further south along the road to Parit Sulong, threatened the line of withdrawal. This was probably the road block created by the Japanese after their attack on the A and B Echelon area. Attempts to reach A Echelon with carriers and two armoured cars failed because of the roadblock. [2/19th Battalion War Diary, Appendix B]
At around 1000 hours, the 2/19th A and B Echelons reported that the main enemy movement in its area had weakened and now there was mostly sniping and machine gun fire. Perhaps Japanese forces knew what was about to happen. [2/19th Battalion War Diary, Appendix A]
Japanese aircraft scored a direct hit on the 45th Brigade HQ south of the Bakri crossroads at either 1000 or 1100 hours (both times are shown in different accounts). The 2/19th War Diary shows both times in different areas of the diary but Wigmore shows it at 1000 hours. 'The whole of Bde staff except the Brig' (Brigadier Duncan) and the Acting Brigade Major (Major Anderson, 3 Ind Corps) were killed or seriously wounded. Duncan was concussed and in severe shock. Major Julius was killed. A note in the 2/19th Battalion War Diary records that, at 1000 hours on 19 January, Lt Col Anderson was requested by the acting Brigadier (Duncan) to assume command as 'most of Bde staff were casualities'. Lt Col Anderson (2/19th CO) now took command of the Brigade. [Wigmore (1957), 233. Lack et al (2005), 90. 2/29th Battalion War Diary. 2/19th Battalion War Diary (different areas). Lodge (1986), 109. Brune (2014), 330 - 331.]
2/19th A and B Echelon situation
Around 1130 hours, the 2/19th Battalion A and B Echelon areas continued to come under attack from three Japanese aircraft, machine guns and bombing, mostly directly at vehicles on the road and causing casualties. A carrier was sent to try to reach the 2/19th Bn HQ but was wrecked by a land mine. The crew were uninjured and were subsequently recovered. [2/19th Battalion War Diary, Appendix A]
From 1130 to around 1530, A and B Echelons reported only spasmodic firing. Large concentrations of Japanese forces were observed to the south, west and north. Machine gun fire from high ground to the east continued. The road itself was covered by Japanese machine guns sited on both sides of the road. [2/19th Battalion War Diary, Appendix A]
2/19th Battalion situation
Between 1100 hours and 1200 hours, light contacts and enemy movements were reported by the 2/19th Battalion A and C Companies to the south and south west, making it impossible to render any assistance to A Echelon 'as the forces threatening Bakri were then in considerable strength and the loss of Bakri X roads endangered both the 2/29 and the Jats'. The diary notes that '... it has been hoped the Jats could be used to relieve the position at A Echelon as soon as they arrived'. Wireless commmunications broke down around this time as well. [2/19th Battalion War Diary (different areas). Wigmore (1957), 233. Lack et al (2005), 90. 2/29th Battalion War Diary. Lodge (1986), 109. Brune (2014), 330 - 331.]
At 1130 hours the 45th Division Brigade Major (BM) arrived at the 2/29th Battalion HQ area, in advance of the arrival of the rest of the Jats. The Major advised that Brigade HQ had been heavily bombed; it is not clear if he knew of the bombing of Brigade HQ further east or was referring to this own Brigade HQ back towards Muar. He asked for a section to accompany him in an endeavour to support the movement of Jats who were reported to be coming in from the jungle on the right flank. Morrison noted that a large party moved in from around 1400 hours, see below. [Christie (1983), 47/48 - Captain Bowring's account. Morrison {1942), 39.]
From 1300 hours the 2/19th Battalion position came under further attack on the left flank of C Company, on a body of Rajputs and Garhwalis that was located on a small ridge forward of C Company's reserve platoon (15). A 'sharp enemy attack' pushed the Rajputs and Garhwalis back but the enemy were engaged by the reserve platoon with 'very deadly fire' that managed to hold off the attack. A British officer with around 25 Indian troops and 15 Platoon recovered the ridge in a counter attack. [2/19th Battalion War Diary, Appendix B]
At 1330 hours (2/19th War Diary and Bowring say this was at 1400 hours), around 200 Jats arrived at the 2/29th position, clusted initially in the area occupied by A Company. Other Jats, however, passed '... to the west of our position and straight through to 45th Brigade HQ'. [Wigmore (1957), 233/234. Harrison (1966), 55. Christie (1983), 48 - Captain Bowring's account. 2/19th Battalion War Diary.]
At 1400 hours (or possibly 1500 hours, the 2/19th War Diary has both times), two companies of Jats passed through the Bakri crossroads with information that the main Battalion was following immediately. They were ordered to assemble east of Battalion HQ in preparation for an attack to relieve A Echelon. Subsequently, firing broke out between the 2/19th and 2/29th positions and no further Jats arrived. Japanese forces attacked two 2/19th picquet outposts, cutting off the northern picquet (Sgt Taylor) of the 2/19th who withdrew to the 2/29th Battalion area. Only one man survived from the other outpost. [2/19th Battalion War Diary]
From 1400 to 1430 hours a Japanese aircraft dropped bombs in vicinity of the 2/29th Battalion HQ, but there were no casualties. This was surprising as, according to Harrison, 'all the enemy had to do was to drop bombs on either side of the tanks, and they could not fail to hit something'. Morrison reported that there was also a heavy artillery barrage for two hours from around 1400 hours. [2/29th Battalion War Diary. Harrison (1966), 56. Brune (2014). Christie (1983), 69 - Captain Brand's account. Morrison (1942), 39.]
From 1430 hours, Japanese forces moved south of the 2/19th B Company (Captain Keegan) position and attacked at about 1500 hours. B Company, supported by carriers and four details of mortars (two of which the 65th Battery borrowed from the Indian troops), as well as two sections from D Company, successfully defended its position. Nevertheless, the 2/19th War Diary noted that the position was 'grave' by 1500 hours. Westforce was advised of the seriousness of situation and was instructed to withdraw to Yong Peng'. [2/19th Battalion War Diary. Brune (2014), 333.]
From 1530 hours, Japanese artillery, with planes above directing the fire, now started shelling the 2/29th A Company area on the east side of the road, using a 'box pattern' (Harrison). The Jats (who were generally not in slit trenches) suffered heavily and, in their attempts to escape shelling, crossed the road in the area between C and HQ Company. Japanese shelling then shifted to the west side of road. C Company sustained some casualties but the mostly unprotected Jats suffered further heavy losses. Most of the Australians were protected to some degree by being in slit trenches but few of the Indians were. Captain Brand later described the Jats as 'the most helpless lot of men I had ever seen. They had no Medical Officer, carried no field dressings, would not obey orders, and did not know how to take cover'. According to Lance-Corporal Roxburgh of HQ Company (quoted in Brune): 'The Indians in front of us instead of lying flat on the ground panicked and began rushing madly through our position. The result was absolute carnage ...' The shelling on the 2/29th position continued and most were 'panic stricken'. During the bombardment, Pt Boyd was killed and Pte Jack Dorward was severely wounded. [Harrison (1966), 57. Christie (1983), 48 - Captain Bowring's account, 69 to 70 - Captain Brand's account. Brune (2014, 333).]
Harrison noted how the men would know when a shell was heading their way:
Every now and then we heard a soft, ominous plop from the direction of Muar. This was followed seconds later by a shrill whine, the tops of the trees shook violently, and suddenly the ground flew up and hit us in the face. [Harrison (1966), 56]
As wireless communication had broken down between the two Battalions, Sgt Quinn and two Loyals volunteered, at 1600 or 1630 hours, to take a message in an armoured car to the 2/29th 'ordering them to be prepared to withdraw at 1800 (later 1830) hours as it was thought then that the remainder of the Jats had been cut off somewhere'. It is not entirely clear if this message was received - see below. Orders were also received from Westforce for the Brigade to withdraw to Yong Peng. Night dispositions were recced and the Brigade Group was moved in near to the Battalion, while the Indians were located to the northern sector. The 2/19th War Diary recorded that: 'The question of relieving of A Ech now became urgent but pressure was now being maintained on all the tps (troops) in the fwd (forward) area and it was felt that from the apparent state of the trng (training) of the two Coys (Companies) of Jats that had arrived, it would have been unwise to have employed them in the relief without some support that could be ill afforded from the front'. [Wigmore (1957), 233. 2/19th Battalion War Diary.]
Japanese shelling of the 2/29th position eased from 1630 hours but mortar fire and air attacks resumed. An infantry attack was launched by the Japanese on the leading B (right) and C (left) companies. According to Bowring, the 'enemy machine-gunners who came creeping up on the right flank met with a hot reception and were beaten off'. B Company repelled the attack but with heavy casualties; according to Morrison's account, there were 'heavy losses to the enemy' but without loss to 11 Platoon that was subject to the barrage. [Wigmore (1957), 234. Christie (1983) 48 - Captain Bowring's account. Morrison (1942), 39.]
On the 2/29th left flank (C Company), a strong attack caused a few of the more advanced positions to become 'untenable'. C Company suffered heavy mortar attacks and automatic fire, driving a platoon back 50 yards. C Company then counter-attacked and drove enemy back for a distance of several hundred yards. [Christie (1983, 48 - Captain Bowring's account.]
Some of the wounded were evacuated during the afternoon by truck but not all managed to get through. Many men had metal splinters, including Sgt Wedlick and Cpl Barker. The Japanese began to use bullets that could pierce armour plating. [Christie (1983) 70 - Captain Brand's account.]
The 2/29th Battalion's position was increasingly becoming untenable and Captain Morgan told Captain Brand that the Japanese might break through; accordingly, Captain Brand fixed a red cross sign on a tree among the wounded. Major Olliff sent a message back to HQ Brigade at the crossroads asking for the road to be kept open if possible, but that proved to be impossible.[Christie (1983) 71 - Captain Brand's account.]
2/19th A and B Echelon situation
Further south down the road to Parit Sulong, by 1630 hours, Captain Newton (A and B Echelon area) formed the opinion that, given the concentration of Japanese forces to his east, south and west, the 2/19th Battalion had 'either been overwhelmed or had withdrawn in the other direction'. Consequently it was decided to evacuate the area as soon as it was dark, via the eastern side of the road. A complete cessation of fire by 1700 hours appeared to have supported the need to evacuate. The remaining personal were to withdraw in three companies under Lt Varley, Capt Bracher, and Capt MacDonald, crossing the road then heading north then east then south to outflank the Japanese and rejoin the road beyond the causeway to Parit Sulong. [Wigmore (1957), 238. 2/19th Battalion War Diary, Appendix A]
By 1700 hours, Captain Newton decided the commence his withdrawal as 'he may have felt that the force under his commenad was not sufficiently strong to withstand an attack during the night time'. [2/19th Battalion War Diary, Appendix A]
Communications restored between the 2/19th and 2/29th Battalions
The 2/19th Battalion War Diary recorded that wireless communications were restored at 1700 (or 1730) hours. The 2/29th Battalion received a message (either by wireless or the earlier carrier delivery) ordering it to 'cut its way back to 2/19th travelling east side of the road'. Major Olliff provided details of his proposed artillery program to support the withdrawal, commencing at 1830 hours. The wounded, numbering around 50 AIF and Indians, were to be loaded on all available trucks and proceed when they could. Many Indians stormed the trucks, hoping to escape. Based on a suggestion from the Anti-Tank gunners, the sides of the trucks were reinforced in part with the steel armour plating from the Anti-Tank guns. Papers and maps were burnt. [Christie (1983), 71 - Captain Brand's account. 2/19th Battalion War Diary, Appendix B]
Captain Mileham of the Jats noted that his group encountered many wounded Australians later in the day, 'some of whom we helped along'. Some of these wounded men said that the troops on the Bakri road had suffered 'very heavy casualties'. He also noted that Captain Dyer's group turned up and they then travelled together 'as one large party, led by Major Kidd'. Based on other detail below, it is believed this refers to events on 20 January. This appears to be confirmed by the next paragraph (and the following, see below] that states that 'at dusk we came upon the Muar/Bakri road south of the 101 mile post and 'seemed to have by-passed the Japanese' [meaning unclear but it might mean that there were no Japanese present]. Major Kidd travelled south down the road (towards Parit Sulong) where he apparently met 'an Australian in charge of a camp about a mile down the road in the direction of Parit Sulong'. They moved down the road but they could not find the Australians This may be a reference to Captain Newton, CO of B Echelon of the 2/19th Battalion [Norfolk/Mileham]
2/19th A and B Echelon situation
Meantime, at the 2/19th Battalion A/B Echelon area, at around 1715 hours, Lt Varley's group were initially prevented from crossing the road. The machine gun was put out of action and Varley's party got away and lost contact with the others, re-joining them on 21 January. Captain Bracher's party managed to cross the road and covered the road for the remaining troops to cross over. Captain Macdonald was wounded leading his men across; he instructed the party to continue without him, led by Captain Newton. These two groups continued south. [2/19th Battalion War Diary, Appendix A]
2/29th Battalion withdrawal
The 2/29th Battalion's Commanding Officers met at 1735 hours to finalise a plan for withdrawal from 1800 hours (before sunset). Actual timings of the artillery program and withdrawal are unclear, but most of the withdrawal activity appears to have commenced by 1800 hours. Information was given that the 2/19th Battalion had been trying, unsuccesfully, to link up with the Battalion all day. A Company was to move first, followed by Battalion HQ, HQ Company, C Company and then B Company at the rear, moving at 10 minute intervals. Transport, said to be with around 40 - 50 wounded troops, was to move last (at 1815 hours), with the anti-tank guns and a small rifle detachment at the rear. [Christie (1983, 48 - Captain Bowring's account. 2/19th Battalion War Diary. Morrison (1942), 39]
According to Morrison's account, B Company was to move at 1800 hours 'the direction being down the left and [sic - hand?] side of the road'. As it was preparing to move, 'a minor attack was launched against the Company ... repulsed with no loss to us'. At 1830 hours, a further barrage of mortars landed in 10 Platoon area, resulting in two casualties who were placed on a truck already loaded with stores, driven by Lt Cpl J McDonald and Pvt E Christie who were attached as transport drivers. Another attack was launched on 11 Platoon but the Japanese were driven off, assisted by armoured carriers. [Morrison (1942), 39, 40]
At around the same time, the 2/19th Battalion formed a 'wide perimeter', presumably to assist the withdrawal. Unfortunately however, wireless communications between the battalions was again broken off around 1740 hours (which may have been a factor in 'friendly fire' from the 2/19th Battalion. The 2/19th Battalion's C Company, on the same side of the road as the 2/29th Battalion's HQ Company, came under attack from enemy patrols, likely to be those associated with the road block between the two battalions. [Christie (1983, 48 - Captain Bowring's account. 2/19th Battalion War Diary.]
At 1830 hours, Major Olliff commenced his artillery program. Patrolling units of the 2/19th located north of the crossroads engaged Japanese units. In one of these Lieut Glasson was severely wounded. Firing could also be heard in the direction of the 2/29th Battalion 'which was obviously meeting with some opposition'.[2/19th Battalion War Diary, Appendix B]
Morrison noted that B Company began to withdraw by platoon; first 10, then 11 then lastly 12. The carriers that had helped fend off the attack helped to cover the movement of the rear platoon. The story of B Company's withdrawal continues below. [Morrison (1942), 39, 40]
The 2/19th established its night dispositions and the Brigade Group was moved in nearer to the Battalion as planned. Just after dark, at around 1900 hours, reports were received that the road between the 2/19th Battalion and C Company at Bakri had been cut. One platoon from A Company (Lieut Ritchie) was ordered 'to clear any opposition with bayonet and bombs, no firing'.[2/19th Battalion War Diary, Appendix B]
It was a 'very dark night'. Artillery support for the withdrawal of the 2/29th was provided by the 2/19th Battalion and 65th Battery from the crossroads. Japanese machine gunners set up in two concrete/brick dwellings between the two battalions and possibly across the road also (or with line of sight of that area), ready to block any attempt at withdrawal. This meant that they were probably just out of the line of fire of the 2/19th Battalion and 65th Battery further down the road at the crossroads. See also the photograph below which appears to show the open area next to the swamp through which the 2/29th A Company and HQ Company had to withdraw. [Brune (2014), 333).]
It is worth examining the terrain of the area in the map below from the 2/19th War Diary to understand what happened during the withdrawal. Photographs taken after the war show that the swamp came almost right up to the road, making any withdrawal very difficult - the Japanese had machine guns on both sides of the road, and there was little or no space between the swamp and the road to withdraw.
A water truck was sent forward first to see if the road was open but was met with a stream of bullets and careered off the road. Some of the Indian drivers turned on their truck lights, drawing attention to themselves and their position; their lights were subsequently smashed. Captain Brand, accompanied by Lynch, Warburton and Hughes, tried to carry a wounded man through the road block but found that the man had died, and gave up on the idea as there were simply too many wounded to carry. [Christie (1983), 72 - Captain Brand's account.]
Several detachments from the 2/29th A Company attempted to reach the Japanese machine gun position/s but failed and were either killed or forced back to the open area. The rest of A Company, which left at 1800 hours (before nightfall?), was caught in heavy fire whilst crossing the open ground to the rear of its original position on the north side of the road, and suffered many casualties. Only 45 - 50 Other Ranks made it back to the Bakri crossroads.[Christie (1983), 48/49 - Captain Bowring's account, 72 - Captain Brand's account. 2/19th Battalion War Diary.]
The following men from A Company were reported killed on 19 January 1942. Note that this list seems too low if A Company, less one platoon of 50 men, had around 100 men and only 45/50 made it back to the crossroads.
Battalion HQ and HQ Company, located on the west side of the road, was next to attempt the withdrawal, but had to cross the road which by that time came under Japanese machine gun fire. The other side of the road afforded some protection at first as it was lower than the road and so out of side of the machine guns. But the men then had to cross an open area. At 1815 hours, Major Olliff CO was shot in one hand and, after noting aloud that he had been shot, was then killed by a shot to the chest. Members of Battalion HQ and HQ Company first had to cross the road and then, after having some cover at first from the lower terrain on the other side of the road, had to cross an exposed stretch of ground of approximately 20 yards, completely controlled by Japanese machine gun fire, before reaching the relative protection of rubber trees. Signaller Lt Sheldon was said to have been shot crossing the open area. [Christie (1983), 48/49 - Captain Bowring's account. Brune (2014), 334 quoting L/Cpl Roxburgh.]
According to L/Cpl Roxburgh (quoted in Brune), 'word was sent back from A Company that the Japanese had consolidated in front' of their position. Faced with little alternative, HQ Company moved back north east (towards C Company) to skirt the open ground and then head into the swamp to the north of the road. In the process they missed a narrow track that had been used by some of the Jats. They were followed soon after by B and C Companies. The men of HQ Company came under fire from a barrage of artillery fire from the Australian battery meant to support the withdrawal and many were killed as a result. Having missed the track, HQ Company continued north of the crossroads area heading towards Parit Sulong, aiming to reach Yong Peng - see below. They did not reach the 2/19 Bn position but some did meet up with the withdrawing column (see below). [Christie (1983), 48/49 - Captain Bowring's account. Brune (2014), 335. ]
The following men from the 2/29th HQ Company were reported killed on 19 January:
C Company detached a Platoon under Captain West to attempt to bomb the Japanese machine gun positions and clear the area for transport but were unsuccessful. The Company then followed the route into the swamp taken by HQ Company, where they continued to come under Japanese machine gun fire. Some men were said to have been shot (a 'mercy bullet') by their fellow soldiers, unable to drag them further through the swamp. C Company eventually caught up with HQ Company around 1930 hours, probably after leaving the swamp. A mixed body consisting of seven Officers and 150 ORs from C and HQ Companies then assembled under Captain Morgan. [Christie (1983), 48/49 - Captain Bowring's account, 76 - Captain Brand's account. Brune (2014), 336 quoting Sgt Bert Mettam.]
The following men from the 2/29th C Company were reported killed on 19 January:
B Company followed the main body of HQ and C Companies but managed to reach the 2/19th perimeter. Five carriers and two Anti Tank guns, acting as rear guard, remained in position until B Company were clear of area. According to Morrison's account, 'the leading Platoon moved further to the left than was intended and soon struck a jungle swamp. After moving into this for a short distance in a single file, the Company was halted. Captains Maher and Lovett moved to the front and after a study of the map, decided to carry on through the swamp as far as the cross roads' (because of the) 'heavy concentration of enemy fire in the proximity of the roadway'. The Company continued, 'hacking a pathway through the dense jungle with a bayonet'. Morrison noted that it was a 'nightmare journey; most of the time the men were wading through mud and water waiste deep (clutching at) vines and bushes for support while endeavouring to keep rifles and light automatics from being immersed in water'. Although one man was killed from a stray mortar bomb, B Company eventually reached the 2/19th Battalion at the crossroads that evening without further casualties. [Christie (1983, 48/49 - Captain Bowring's account. Morrison (1942), 40]
The following men from the 2/29th B Company were reported killed on 19 January:
At least 50 wounded men who were unable to leave remained with Captain Brand (the Medical Officer) and the remaining transport drivers, waiting for the road to be cleared. [Christie (1983), 49 - Captain Bowring's account.]
At 1930 hours, the anti-tank guns at the 101 mile peg were demobilised and the anti-tank gunners prepared to leave. The anti-tank crews attempted to move down the road in a truck but were stopped by 'a nest of machine-guns located in two houses, on either side of the road'. According to Harrison, a 'large [but unnamed) infantry officer' took control and ordered a small group with bayonets to attempt to take the machine gun post. The attackers were killed. It is not known if this was Captain West from C Company noted above, or another group. [Harrison (1966), 58. Christie (1983), 49 - Captain Bowring's account, 72 - Captain Brand's account.]
Two trucks carrying wounded men and two carriers attempted to get past the road block. One carrier - probably the one reported by Morrison as 'racing down the road firing at an enemy machine gun nest which had opened up on it - and a truck of wounded behind it driven by Jim Vague were successful while the other one was abandoned. The remaining three carriers were demobilised. [Harrison (1966), 58. Christie (1983), 49 - Captain Bowring's account, 72 - Captain Brand's account. Morrison (1942), 41.]
Captain Brand was now left with a truck load of around 50 wounded men and around 25 exhausted riflemen. As their position seemed hopeless, Captain Brand made the decision to depart with six walking wounded and eleven anti-tank personnel, leaving the wounded behind. According to Harrison, they had to 'run the gauntlet of machine gun fire and make the eighty-yard dask to the jungle on our left'. Not long after they left, 'shots rang out ... and every man made for the shelter of the swamp'. Yelling and screaming from the wounded after they left made it clear that the Japanese were killing them. This group of men, travelling in single file along the edge of the swamp, now found themselves being shelled by Australian artillery. [Harrison (1966), 59. Christie (1983), 49 - Captain Bowring's account, 73/74 - Captain Brand's account.]
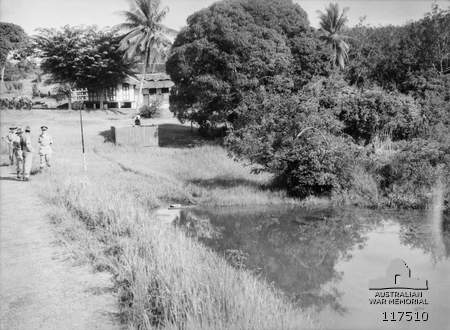
Australian War Memorial Description: 'The area between the Bakri village and the 101 mile peg on the Muar Road where the Japanese bayonetted 19 wounded Australian soldiers to death and then threw their bodies into a swamp' This may be the wounded who were killed after Captain Brand left. (AWM - 117510)

The area in the above photo is believed to be the area circled in red in this map.
At the edge of the scrub, Captain Brand found himself in the company of Pte Cant, Cpl Aldridge, Cpl Cameron, and Ptes Robinson and Neilson, as well as another man. Guided by Pt Cant, the party headed north east through knee-deep water and jungle, and through 'terrible country'. They eventually linked up with Captain Gahan and his party (which included Warburton, but not Quick), and a bit later the 2/19th Battalion on the road to Parit Sulong during the evening of 20 January 1942. [Harrison (1966), 59. Christie (1983), 49 - Captain Bowring's account, 73/74 - Captain Brand's account.]
Lieut Ritchie (2/19th A Company) arrived at the 2/19th C Company (Capt Snelling) location around 2000 hours and reported that the previously blocked road between the Battalion and C Company was now cleared. The 2/19th War Diary notes that the force (presumably the C Company location) came under heavy machine gun fire but suffered no casualties.[Christie (1983), 49 - Captain Bowring's account. 2/19th Battalion War Diary, Appendix B]
Parties from the 2/29th Battalion began to arrive in the 2/19th Battalion's perimeter from around the same time. Capt Snelling was ordered to send the 2/29th parties through in Company groups 'so that they could be led into areas in their location in the perimeter with the least difficulty'. The first two groups to arrive were from A Company (45/50 ORs) and B Company (4 Officers under Captain Lovett, 100 ORs), both of which had previously been located on the north side of the road. Capt Maher (2/29th Battalion B Company) temporarily assumed command of the 2/29th Battalion.[Christie (1983), 49 - Captain Bowring's account. 2/19th Battalion War Diary, Appendix B]
Also at around the same time (2000 hours), the 2/19th War Diary states that Indian troops located on the northern perimeter (of the 2/19th position) 'suffered a terrific fire panic and opened up very heavy fire, throwing grenades at the same time. It is believed that some of this firing may have been directed at the parties of the 2/29th withdrawing through the swamp. They were steadied with the greatest difficulty and suffered from jumpiness the remainder of the night'. [2/19th Battalion War Diary, Appendix B]
At 2100 hours, Captain Snelling (C Company, 2/19th) was ordered to hold the Bakri crossroads until 2300 hours in the hope that further parties would arrive. That position was vacated at 2330 hours.
A group from C Company (3 Officers including Captain Morgan, 45/50 ORs) arrived around 2330 hours. In total, only around 190 to 200 of the approximately 550 - 650 men who had been at the 101 mile peg made it to the 2/19th perimeter. The 2/19th War Diary notes that 'apparently the rest of the Bn had been cut off'. The force moved inside the 2/19th perimeter and bedded down for the night. [Wigmore (1957), 234. Christie (1983), 49 - Captain Bowring's account. 2/19th Battalion War Diary, Appendix B.]
The Japanese commenced shelling the area occupied by the 2/19th around midnight. One shell scored a direct hit on a 25 pounder of the 65th Artillery. The shelling did not cease until around 0300 hours the next day, Tuesday 20 January. [2/19th Battalion War Diary, Appendix B]
The remnants of the 2/29th HQ Company and some of the anti-tank men, meanwhile, continued to move east of the 2/19th position. According to Harrison and Bob Christie, the officers in the group (Gibson, Morgan, McGlinn) decided to split the group into groups of six, but then took the compasses. According to Cpl Jim Kennedy (quoted in Brune), 'they took the compasses! Bob Christie was with us; Jackie Cowell, Strahan White and Alec Ross and us (Roxburgh, Kennedy).' The eleven anti-tank men remained together, led by Bill McCure, and agreed to head to Malacca (by then in Japanese hands), then head for Sumatra. The fate of each group varied. Some ran into Japanese patrols and were either captured and taken to Pudu Prison in Kuala Lumpur or executed, some joined the Chinese communists, some managed to escape to Sumatra (where they were captured), and some made it back to Australia. [Harrison (1966), 66. Christie (1983), 49 - Captain Bowring's account. Brune (2014), 337). ]
As Major Olliff had been killed, Captain Maher now assumed command of the remnants of the 2/29th Battalion and Captain Lovett took charge of B Company. B Company initially formed a line of defence around the 2/19th Battalion HQ and remained there until the following morning. [Morrison (1942), 41]
During night of 19/20 January, Captain Newton and the men of the 2/19th B Echelon as well as Lt Varley's platoon, decided to head into the jungle but in the process Lt Varley's platoon became separated from the main group. The next morning, having heard that the bridge at Parit Sulong had been taken by the Japanese, Captain Newton decided to withdraw south to Batu Pahat. [Wigmore (1957), 238.]
On the same day, the two forward companies of the 6th Norfolk at Bukit Pelandol had been forced back by a Japanese force from the coast, thereby controlling the road and sealing off the Bakri area. [Wigmore (1957). 235]
According to the 2/19th Battalion War Diary, orders for the evacuation of the Bakri crossroads area came at 2330 hours on 19 January 1942. The message was originally received from HQ AIF by Lt Col Anderson in high grade cipher but as the cipher had been destroyed it was not possible to decode it. Eventually, the message was received in syllabic 'Withdraw on Yong Peng'. [2/19th Battalion War Diary, Appendix B.]
Japanese forces continued to shell the Australian positions from 0100 hours until around 0300 hours.[2/19th Battalion War Diary, Appendix B.]
Lt Col Anderson called a conference of his commanders at 0430 hours to establish a plan to withdraw from the Bakri crossroads at 0700 hours.
The combined force was re-organised.
Unnecessary gear in trucks was to be removed to provide transport for the many wounded men, under the control of Capt Cahill (RMO) assisted by Sgt Thompson (Ord Rm Sgt) and Sgt Guerin (Stretcher Bearer Sgt). [Wigmore (1957), 236. Christie (1983), 49 - Captain Bowring's account. 2/19th Battalion War Diary. Brune (2014), 339)]
The withdrawing force was to proceed as follows:
[Wigmore (1957), 236. 2/19th Battalion War Diary, Appendix B. Brune (2014), 339, quoting Lt Col Anderson in Newton's 'The Grim Glory of the 2/19 Battalion AIF')]
2/19th War Diary map showing the Battalion disposition at the Bakri crossroads. The map also shows: (a) the previous location of the 2/29th along the Muar Road, (b) the direction of Japanese attacks on 19 January, (c) the two separate road blocks on 20 January and (d) the swamp area the withdrawing force had to travel through to get past the second road block on 20 January.
The withdrawal commenced on time at 0700 hours, heading east towards Parit Sulong, and aiming to reach the 95 mile peg by that evening to take cover in rubber trees before the open swamp land and exposed causeway. [2/19th Battalion War Diary, Appendix B]
As the 2/19th column was moving south towards Parit Sulong, it was already outflanked by the Ogaki Battalion (and possibly other elements of the main force) which had established road blocks to the rear, and was being pursued at the rear by the rest of the 5th Regiment forces. [Japanese sources]
First road block
Around an hour later, at around 0800 hours, the advance guard (the 2/19th B Company) came up against a Japanese ambush at a roadblock near the 99 mile post, '... covered by a well dug position on top of a cutting with approximately six machine guns'. Swamp lay right up to the road on the left. Rubber and more low-lying land and swamp lay to the right. [Wigmore (1957), 236. Christie (1983), 49/50 - Captain Bowring's account. 2/19th Battalion War Diary, Appendix B. Brune (2014, 340/341]
The 2/19th B Company was ordered to attack and did so 'with great vigour', suffering heavy casualties. Lieut Ibbott was killed. The 2/19th War Diary states that the Japanese 'were holding a line on the south of the road'. Capt Beverley's A Company (on the right side of the road) was ordered to attack on the right of the leading B Company's flank and attack the Japanese left flank, initially meeting with only light opposition (possibly a Japanese tactic to lure them further). After breaking through, A Company met with stronger opposition in the former A Echelon area a few hundred yards further on, on the right hand side of the road, which had been abandoned. A Company was unable to break through ('the enemy ambush still continued to hold with great determination'), so a section of carriers (Sgt Leaver) was sent forward to assist. Despite their attempts, they were also unable to force the block. D Company, travelling on the left hand side of the road, reported that the left flank was clear. A Company, 'on clearing its area, came back to attack the enemy in rear'. [2/19th Battalion War Diary, Appendix B.]
By 0900 hours, it was clear that additional support would be required to break through. Lt Col Anderson ordered the 65th Battery to put up harrassing fire back in the direction of the Bakri crossroads, possibly setting fire to the village ('it was thought that the arty fire had set alight to the village'). Eventually, there was little choice but to attack the Japanese positions head on with bayonets and bombs. The men of the 2/19th A Company were said to have sung Waltzing Matilda while attacking. The 2/19th B Company, led by Lt Col Anderson, again attacked and three platoon commanders were killed. Lt Col Anderson led the final assault on the position, 'putting one gun out of action with a grenade' and 'shooting two Japs at other gun with his pistol'. The 2/19th War Diary states that 'it was a very grim and determined stand made by this enemy body'. [Christie (1983), 49/50 - Captain Bowring's account. 2/19th Battalion War Diary, Appendix B. Brune (2014, 340/341]
The roadblock was finally cleared by 1100 hours. Lt Ibbott had been killed and B Company suffered 'fairly heavy casualties'. The force continued on at 1145 hours, with the 2/19th A Company now as the advance guard, moving through the former A Echelon area. There was no sign of any survivors of previous Japanese attacks. The area 'had consisted of transport drivers, 6 platoons, 1 section carriers, 2 detachments mortars plus Lt Varley's platoon from Parit Sulong'. They located the bodies of several men, including Capt D.I. McDuncan (QM), and recovered much needed rations. [Brune (2014), 341. 2/19 War Diary].
The force then continued along the mostly exposed road, with low-lying and swampy land on both sides of the elevated road (nowadays full of palm oil trees).
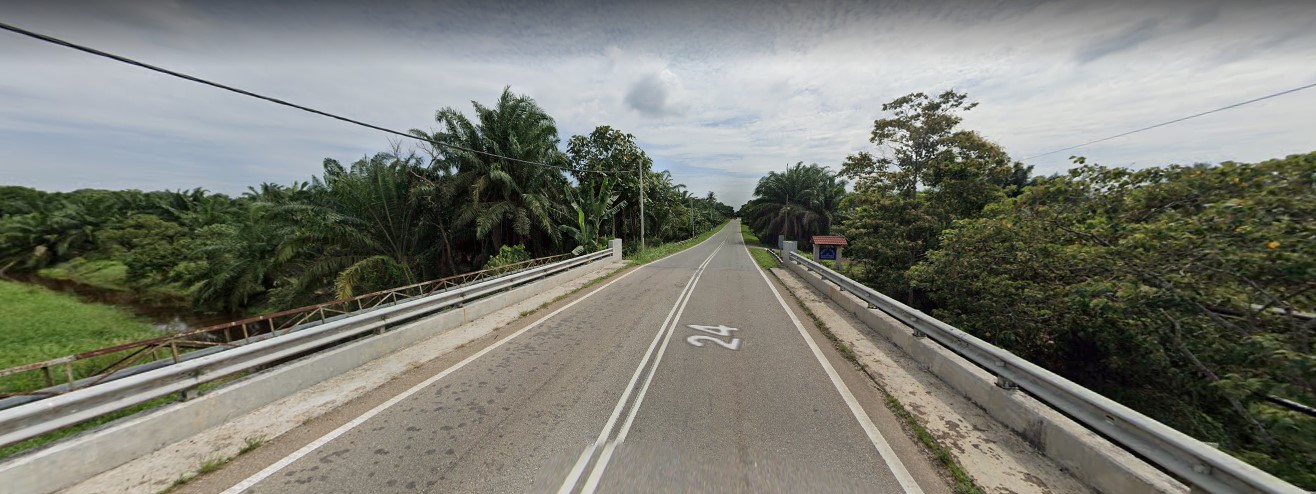
Google street view of the approach to the area of the second ambush on 20 January. The area to the rear right and left is all low-lying area; the river runs as indicated on the map above. On the other side of the river, on the left, the land rises. The ambush was likely further along this section of the road, possibly on a bend to the left.
Second road block
At around 1230 hours, the force reached a 'very solid' roadblock at (or between) the 96.5 and/or 97.5 mile post/s (both are mentioned). This roadblock was said to have been at the top of a rise where the low-lying land and swamp ended and the rubber began. The terrain of this area is higher on the left side heading towards Parit Sulong, and there is a bend in the road. This roadblock consisted of two machine guns; four to the right (on lower ground) and another eight on the left (on higher ground). Transport trucks and felled trees blocked the way. At around the same time, Japanese forces were harrassing the rear parts of the force (back towards Bakri) and were also shelling the road, causing many casualties. [Christie (1983, 50 - Captain Bowring's account. See also Brune (2014), 342, quoting Gunner Jim Kerr. 2/19th Battalion War Diary, Appendix B].
The 2/19th A Company's forward platoon (Lieut Crawford) was pinned down by Japanese machine gun fire. The two other A Company platoons (Lieut Weily and Lieut Ritchie) moved to the (higher ground) on the left flank 'which appeared to offer the best prospects'. A section of carriers under Sgt Christie was employed to assist A Company. The composite D Company was also ordered to attack on the left flank, with the support of the carriers. Lieut Cootes (2/29th) D Company platoon was ordered to go round through the jungle on the left flank and provide covering fire, but they went too far and was not seen again. Lieut Carr's (2/29th) platoon (part of the combined 2/19th D Company) then moved forward on the left through the swamp. All the units were pinned down by machine gun fire and the carriers were unsuccessful. Lieut Carr's platoon reached a point about sixty yards from the machine guns and was then ordered to assault. The task was impossible. Carr, followed by Corporal Uren and his men all rose as one and, singing Waltzing Matilda, were mown down. [Christie (1983, 50 - Captain Bowring's account. See also Brune (2014), 342 and 343, quoting Gunner Jim Kerr. Wigmore (1957), 239.]
The attacking force withdraw but Lt Cootes, who heard shooting, approached the Japanese position from the rear and attacked. His small force had little chance of success. 23 out of his 42 men were killed before Cootes could withdraw. The 19 survivors failed to re-join the main group and were eventually caught or executed, including Lt Cootes who was executed on 12 March 1942. [Christie (1983, 50 - Captain Bowring's account.]
The 2/19th Battalion War Diary noted that there was 'continual endeavour all afternoon to force Jap position, with very limited success and heavy casualties. Heavy fighting ensued, with no conclusive outcome. Japanese shelling made the situation worse; 'owing to the unfavorable terrain and the thick cover, it was necessary to close up the transport'. Japanese penetration and attacks on the rear succeeded in taking the last four trucks. Morrison noted that heavy mortar fire was poured onto the rear, causing some casualties. [2/19th Battalion War Diary, Appendix B. Wigmore (1957), 239. Christie (1983, 50 - Captain Bowring's account. Morrison (1942), 42]
A determined counterattack by the Jats and various elements of the AIF, led by Brigadier Duncan (despite his wounds), was mounted (at an unrecorded time) and was 'succesful' in driving the Japanese back. Brig Duncan was killed in this assault. [2/19th Battalion War Diary, Appendix B].
The force was now in an 'extremely serious' position and 'demoralised', constricted into a length of road around 800 yards long.
At around 1730 hours, Lt Col Anderson decided to mount a dusk attack under the cover of heavy smoke and high explosives. According to the War Diary, 'every man was fighting mad'. Major Vincent, who had been controlling the forward area using heavy mortars, brought C Company (Captain Snelling) from the rear and ordered them to attack the right flank after further mortar fire to enable them to get through the heavy machine gun fire. D and A Companies (D Company presumably less Cootes and Carr's platoons) were ordered to synchronise their attacks with C Company. C Company, supported by carriers and 'some 60 Indian troops', advanced on the right; it became pinned down around 150 yards short of their objective. The carriers and heavy weapons were focused on the Japanese positions. [Wigmore (1957), 239. Christie (1983, 50 - Captain Bowring's account. Brune (2014), 343. 2/19th Battalion War Diary, Appendix B.]
According to Morrison, Corporal Gill from the 2/29th B Company was detached to the forward troops to operate a bren gun in a carrier attacking one of the road blocks. (This may be the gun crew noted below). [Morrison (1942), 42]
The 2/19th Battalion War Diary records the following:
Mortar shells were directed on to targets by Infantry men a few yards from the target ... gunners were fighting with rifles, bayonets and axes (range too short for 25 pdrs. except to Jap rear areas west). A gun crew pushed its 25 pdr [around] a cutting [suggesting the roadblock was on a bend in the road] and blew out the first road blocks (vehicles) at 75 yds range. Carriers pushed within 5 yds of Jap M.G.'s and blew them out. Two carriers almost cut the walls of a 4 inch walled concrete house to pieces with Vickers. House contained 3 Jap M.G.s and about 60 men. Men went forward under heavy M.G. fire and chopped road blocks [consisting mostly of felled rubber trees] to pieces with axes. [2/19th Battalion War Diary. Morrison (1942), 42 has a summary version of these events]
The 2/19th Battalion War Diary noted that the attack was successful but Capt Snelling was severely wounded in the leg. The 2/19th War Diary states that the 'very solid' roadblocks were 'rapidly demolished by working parties, assisted by the artillery firing HE [high explosives] into the stacked MT [motor transports]'. There were still some snipers about, resulting in further casualties. 50 men from the 2/29th Battalion's B Company (12 Platoon led by Capt Maher and Lt Bonney) were ordered to move through the left flank and mop up any remaining opposition at bayonet point. They found that the majority of the Japanese had withdrawn. Reconnaisance patrols returned the information that the right side of the road was held as far as the causeway (linking Singapore). [2/19th Battalion War Diary, Appendix B. Morrison (1942), 42.]
By about 1830 hours the Japanese 'had had enough and cleared out, leaving hundreds of casualties'. As darkness had fallen, the wounded were collected and placed on trucks, gun limbers and every available space. Control had been regained and the infantry were deployed on either side of the transport. [2/19th Battalion War Diary, Appendix B.]
The following men from different companies of the 2/29th were reported killed on 20 January:
Japanese report of the action
By the time it reached the area north of Parit Sulong, the Japanese Ogaki battalion had suffered many casualties. Its post-war citation reads as follows:
This battalion, under the command of Major Ogaki, participated with the Konoe Division in the drive along wth the western seacoast of Malaya, maintaining rapid pursuit of the enemy. Taking the lead from the Iwaguro Pursuit Unit Corps, on 15 January it confronted as superior enemy force and checked its advance in the vicinity of the mouth of the Muar River and, after crossing that river with great difficulty in face of strong enemy resistance, made a surprise attack from the rear of the enemy position [Note - believed to the the 45th Indian Battalion], which it destroyed.
Next, to undertake a surprise attack on the enemy around Bakri, the battalion made a detour from the coast road, and in the early dawn of 19 January, intercepted the line of retreat of the main enemy forces. Attacking and being counterattacked from all sides by superior enemy forces accompanied by armoured cars, the battalion lost more than half its officers and non-commissioned officers and suffered very heavy casualties among the rank and file in the most violent battle of the campaign to that date.
Captain Seno, who then commanded the battalion, bravely sustained the attack on the enemy rear, cooperating closely with our forces attacking their front, and notwithstanding its own heavy losses the battalion wiped out an entire enemy brigade.
The force then continued in the night towards Parit Sulong, lead by an advance guard with 'carriers at the head of main body, followed by vehicles (filled with wounded) and armoured cars at rear, (Indian and Australian) troops marching in single file on each side of road, with M.T. in the centre'. The 2/19th War Diary noted that there were swamps on either side of the road and the already exhausted infantry had to march on either side of the slow moving transport on a narrow road, and also an issue with a carrier track that needed replacing. It was a very dark night which added to the fatigue. Despite the situation, morale was said to be high and good progress was made. [Christie (1983), 50 - Captain Bowring's account. 2/19th Battalion War Diary, Appendix B. Morrison (1942), 42. ]
Sometime during the movement, Captain Brand and Captain Gahan's now combined party came upon the 2/19th force. According to Brand, 'trucks crept along nose to tail and a few 25-pounders limped along on punctured tyres'. [Christie (1983), 76 - Captain Brand's account. 2/19th War Diary, Appendix B]
Fate of 2/19th A/B Echelon
Appendix A of the 2/19th War Diary notes that the group of A/B Echelon men under Captain Newtown contacted a detachment of Norfolks under Major W Kidd at an unstated time on 20 January. This event may have occurred before or after the event in the next paragraph that occured around 2200 hours. Major Kidd told the group that Parit Sulong had fallen to the Japanese. Accordingly, Newtown decided to head south through Batu Pahat and make his way back to British lines. Many small enemy forces were met. Accordingly, Newtown decided to break up his force now with around 100 men into small parties. He would be captured by Japanese forces on 10 February 1942, after which he was sent to Pudu prison in Kuala Lumpur where 170 other Australians were also incarcerated. [2/19th Battalion War Diary, Appendix A.]
Jats encounter the combined 2/19th force
The 2/19th War Diary also recorded that the column was 'joined here by some survivors of A Echelon, Indian Troops and No 17 Platoon (Lieut Varley). The Indians were likely to have been Captain Mileham's group of Jats. According to Mileham's account, 'At 2200 hours I heard a noise of approaching transport coming down the road from Bakri, which I thought might be tanks having broken through our forward positions. 2nd Lieut Hislop and I went forward with our tommy guns to see what it was and found to our joy that it was the 19th and the 29th Australian Battalions and what remained of the 45th Brigade, who had had many casualties'. He also met Captain Henry Watson, now in command of around 100 men left of the 4/9th Jats Battalion. Captain Mileham's group joined the body moving south. Before they left, Major Kidd (who was apparently exhausted) told Mileham that a Malay had said that Japanese troops were on the bridge at Parit Sulong. Major Kidd decided not to continue with the group and was never seen again. [Norfolk/Mileham]
The 2/19th War Diary recorded that, as it was impossible to confirm if Parit Sulong was in Japanese hands, a halt was ordered at 2230 hours at mile 91, on the open straight causeway without any cover. Attempts were unsuccessfully made to get wireless communication to Westforce. Two despatch riders (Levick and White) volunteered to go on ahead to endeavour to establish the position at Parit Sulong. The men returned an hour later with the information that they go on to the bridge without being challenged, but the suspicious actions of a sentry group nearby led them to suspect the presence of Japanese forces in the area. The column continued on in an effort to reach an area with more cover. [2/19th War Diary, Appendix B]
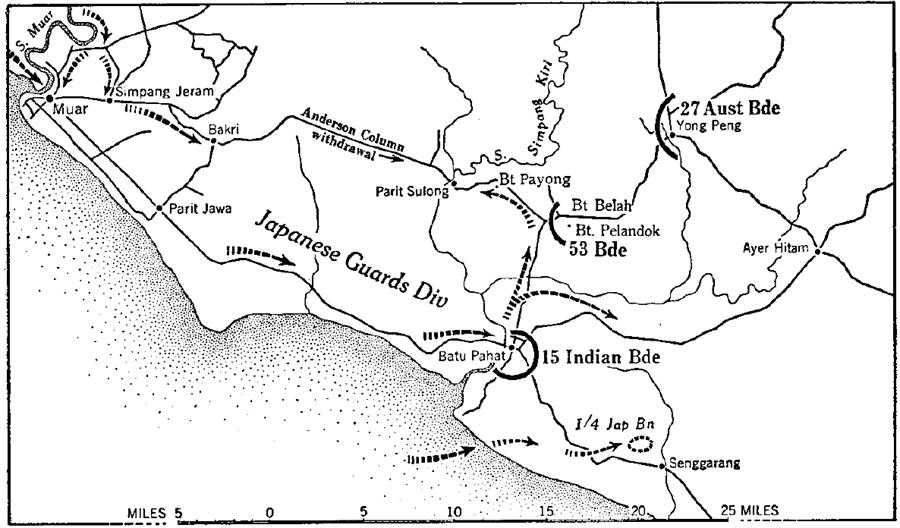
Map of the area from Muar to Yong Peng, showing the withdrawal route and the Japanese movements.
After reporting to 8 Division HQ in Labis on 19 January, a Rose Force platoon was ordered to go to Lenga via Bukit Siput to find out of the Japanese were coming up the river. The party was to consist of one Officer, two guides and 15 ORs. They found no evidence of Japanese forces and continued on to Lenga on 20 January where they arrived at 1500 hours. The war diary notes 'As it was now obviously impossible to return to Bukit Siput by the specified time' they had two options: try to reach Labis through very thick jungle or head south for Parit Sulong where 'it was hoped that our troops would still be in position'. The war diary continues 'unfortunately, as the party reached Parit Sulong, heavy mortar and small arms fire broke out and it was evident that the Japanese were in possession of the village'. The Force then moved to Kangkar.
The remainder of Rose Force were ordered to a position between Labis and Yong Peng, then to Kengam. Sanderson's party was reported missing on 1200 hours on 21 January. (Rose Force War Diary)
At 0200 hours (also reported as 0400 hours by Morrison) on 21 January 1942, the advanced elements of the combined force were located four miles from Parit Sulong on the mostly straight causeway without any cover. These advance units travelled a further mile, arriving three miles from the bridge at around 0230 hours. Communications were re-established with WestForce who advised that support had been sent. [2/19th Battalion War Diary, Appendix B. Morrison (1942), 43]
At around 0300 hours, Lt Varley (CO of the 2/19th Company Platoon that had previously been guarding the Parit Sulong bridge, and who had been with Newtown's group, re-joined the unit. As Lt Col Anderson was unsure what lay ahead, he sent a patrol of 8 men from C Company (Sgt Daviess) to the Parit Sulong bridge at around 0400 hours. The group was challenged by men speaking a foreign language, but were not fired upon (Morrison noted that the 'four unidentifiable Asiatics in uniform' ran away). The patrol determined that the Parit Sulong bridge was in Japanese hands. At the same time that the patrol left, Lt Col Anderson issued orders to his commanders that at 0600 hours the 2/19th Battalion, less transport and carriers, would push on into Parit Sulong and the remainder of the force would follow under Captain Hughes, to attack the bridge at 0700 hours. [2/19th Battalion War Diary. Brune (2014), 344. Morrison (1942), 43. ]
At around 0715 hours the 2/19th Battalion's C Company was fired upon about 3/4 of a mile from the (Japanese held) south bank of the river, but were unsure if they were actually Japanese forces. Two well-dressed Malays approached Lt Col Anderson and assured him there were no Japanese in the vicinity, only members of the Johore Military Forces (JMF). Lt Col Anderson was said to have disbelieved their report and decided to deploy his forward companies through the trees. The 2/19th War Diary states that a decision was made to push ahead, especially given the 'strong enemy forces' to the rear. [2/19th Battalion War Diary, Appendix B. Wigmore (1957), 242. Brune (2014), 344.]
The 2/19th War Diary noted that the road to the bridge ran straight through rubber with an occasional Malay home on either side, set back around 50 yards. There were large drains on either side orf the road, some with up to 5' of water in them. Nearly all of the foobridges across the drains had been destroyed. The force moved to within around 600 yards of Parit Sulong village which was north of the bridge. As it did, rapid fire broke out from the left of the road following by a bayonet attack by about 100 - 150 Japanese. This force was held at bay by B Company (Keegan) and C Company (Beverley), then mostly destroyed by carrier fire. The Japanese that survived the counter-attack withdrew. [2/19th Battalion War Diary, Appendix B.]
The main body of the force finally arrived by 0830 hours, reporting enemy tanks in the rear. Both the transport and artillery were forced to remain on the road because of the drains and boggy ground. One artillery troop shelled the south banks of the river at Parit Sulong, while another at the rear was harrassing the Japanese tanks and rearguard units - the composite 2/19th D Company (Westbrook) on the east of the road, with the 2/29th B Company (Maher) on the west. Tanks attacking at the rear were beaten off by 1000 hours. A small reserve of 40 AIF personnel were held in reserve in this area under the command of Lieut Reynolds 'who although severely wounded handled the small force with great gallantry'. [2/19th Battalion War Diary, Appendix B. Christie (1983), 53/54 - Captain Bowring's account, 78 - Captain Brand's account. See also Brune (2014), 344/345.]
Attempts were made to attack and take the bridge. At 0900 hours, B and C Companies attempted to secure the north bank of the river but were prevented by machine gun nests concealed in isolated buildings and the village. At 0930 hours (around the same time the force was shelled by artillery and mortars), two Companies of Jats were ordered to take the north bank, attacking from the west of the road. This group was able to take the bank south of the village but could not deal with the machine gun nests. [2/19th Battalion War Diary]
At 1030 hours, three carriers were sent to recce the machine gun positions. These positions were destroyed 'by vigorous action'; as a result, B Company was able to secure the remainder of the north bank of the river. Two mortar detachments helped to support the infantry and engaged in searching and harrassing tasks against Japanese positions. [2/19th Battalion War Diary]
Japanese pressure at the rear exacerbated the already difficult situation. Japanese shelled the convoy during the day. The remmants of the 2/29th (which included Captains Bowring, Maher, Lovett, Gahan, Brand, and Lieutenants Bonney and Hosford, as well as the RAP and some wounded) was now formed into two equal companies, each assigned to hold one side of the road as the front line, while the 2/19th formed the sides of the perimeter and the attacking force. Morrison noted that B Company were alloted the task of covering the right rear flank of the attacking troops who were endeavouring to capture the bridge. Captain Brand found Ptes McGovern, Browning, Bennett and Bredin and others in the trucks carrying wounded men [Wigmore (1957), 242. Christie (1983, 52 - Captain Bowring's account, 77 - Captain Brand's account. 2/19th Battalion War Diary. Morrison (1942), 43.]
According to the account of Capt Mileham (Jats), Major White of the Jat Battalion along with 2nd Lieut Barker (both of whom were wounded) were in the group. White was unable to walk and was being driven in an open Morris 8 car. Lt Col Anderson asked Capt Watson of the Jats to collect as many Indian troops together as possible to attack the bridge. This group, led by Maj Anderson, attacked Parit Sulong from the west, managing to reach the north bank of the Simpang Kiri west of the bridge where they exchanged fire with Japanese across the water. [Wigmore (1957), 242.]
By around 1100 hours, the force held a triangle-shaped perimeter with '... apex at the bridge, baseline about 1000 yds from apex with A Coy near the bridge, B Coy north side of road, C Coy south side, then 2/29th Bn and Jats south side and D Coy north'. The 2/19th A Company was ordered to recce and prepare to attack the bridge with the support of mortars. They were to relieve the 2/19th B Company who were to come back in reserve. The 2/19th B and C Companies were ordered to patrol strongly both sides of the road. [2/19th Battalion War Diary, Appendix B]
Indian troops led by Captain Mileham formed a perimeter alongside the Australians, Japanese fighter planes flew very low and machine-gunned the position. Only 10 Indians remained from various 45th Brigade Battalions; Captain Mileham requested that these be accompanied by one Australian each. They stayed in this perimeter for the rest of the day.[Norfolk/Mileham]
As noted already, Sanderson's party was reported missing at around midday on 21 January 1942. Accordingly, Capt Lloyd was ordered by the GOC to take the remainder of Rose Force 'through to Parit Sulong and try to clear the bridge so that the remains of the 2/19 and 2/29 Bns could continue down the road towards Yong Peng'. A message was sent to Lt Col Anderson to advise that the unit was being sent his way. As it had to be sent in clear text, and as Sanderson was known to Anderson, the message read 'Look out for Sandie'.
Capt Lloyd assembled a party of 17 ORs from Rengam and headed to Yong Peng. (Rose Force War Diary)
Around 1200 hours, Japanese pressure at the rear was increasing and the force was required to rectify its line 'considerably'. One platoon from D Company (Sgt Hunt) was moved from the right of the road to strenghten the 2/29th B Company's left flank. B Company (Keegan) and C Company (Beverley), with the help of carriers, engaged the Japanese machine guns at point-blank range, managing to push through the village and reach the north bank (where Maj Anderson had reached before 1100 hours).[2/19th Battalion War Diary, Appendix B. Wigmore, 242.]
The War Diary notes that 'about this period wireless comm from Westforce advised the column that strong assistance was on its way and that an independent Coy would be operating that night to our assistance'. No support arrived. [2/19th Battalion War Diary, Appendix B. Wigmore, 242.]
For the rest of the day there was irregular sniping and shelling. According to Capt Brand, mortar rounds were constant and wounded and killed were lying everywhere. According to Capt Mileham, 'a very heavy bombardment of our positions by heavy guns and mortars began. We were all very much in the open and the shells and mortar bombs were bursting in the rubber trees causing many casualties'. Lt Col Anderson wanted Capt Beverley's C Company to investigate whether it could attack the bridge but it became apparent that this was likely a lost cause. [2/19th Battalion War Diary. Norfolk / Mileham. Wigmore, 243.]
According to Morrison, the 2/29th B Company during the day 'made a series of short withdrawals until in the afternoon when it formed a close perimeter covering 2/19th Battalion HQ'. [Morrison (1942), 43.]
The 2/19th War Diary notes that the Indian troops were demoralised or had broken down and thrown away their arms, and had become 'an absolute nuisance and were finally sent out of the area to become POW'. [2/19th Battalion War Diary. Norfolk / Mileham]
At around 1615 hours, two large calibre bombs were dropped by Japanese aircraft, inflicting heavy casualties. A further rectification of the perimeter was required, especially at the rear. Ammunition was getting very low. [2/19th Battalion War Diary, Appendix B]
According to Morrison (2/29th B Company), heaving shelling of the right flank commenced around 1700 hours, when Captain Lovett was wounded. Japanese forces attempted several attacks on the perimeter but were all repulsed. Darkness brought a lull in the fighting. [Morrison (1942), 43]
Faced with this situation, at either 1630 or 1700 hours, Captains Brand (2/29th) and Cahill (2/19th) approached Lt Col Anderson with a plan to load all the wounded on trucks and, headed by an ambulance, hope that the Japanese would let the convoy pass. After it was decided that only 15 of the most severely wounded would go on one or two ambulances, the convoy was ready. The ambulances were to be driven by wounded men. [Christie (1983), 53/54 - Captain Bowring's account, 78 - Captain Brand's account. 2/19th Battalion War Diary. See also Brune (2014), 344/345. Morrison (1942), 44.]
At around 1700 hours, with food and ammunition running low, a request was made by wireless for bombs to be dropped on Japanese positions on the far end of the bridge and for both food and medicine to be dropped the next morning. As the cipher books had been destroyed, a clear-text message was received to 'look up at sparrow fart'. Later, Anderson received another message from the wireless truck, stating that 'Australia is proud of you - HQ 8 Aust Div'. It was now clear that no relief would be provided. Casualities were increasing, as was Japanese pressure. A closer night perimeter was formed. [2/19th Battalion War Diary, Appendix B]
One of the drivers in the ambulances that left at 1800 hours returned at 2000 hours and reported that the Japanese had refused passage (after a 'parley' with the Japanese commander, according to Morrison) and demanded the complete surrender of the Australian forces. Morrison noted that 'it was feared that any attempt ... made to move the vehicles back' might draw fire. Accordingly, they were left in place and between 2200 and 2400 hours, the drivers in the two ambulances rolled them back bit by bit to the force perimeter. [Wigmore (1957), 244. Christie (1983), 53/54 - Captain Bowring's account, 78 to 80 - Captain Brand's account. 2/19th Battalion War Diary. Morrison (1942), 44.]
The Rose Force unit under Captain Lloyd arrived at Yong Peng at 1800 hours. He was advised that there were four Battalions on the Yong Peng-Parit Sulong road. As he was being briefed, a group of English and AIF troops came in from Parit Sulong 'in a very bad state of exhaustion'. This group had travelled via the Iron Mine road that was now impassable. Given this situation, the Rose Force unit was sent to an alternative track running past the top of the iron mine starting around 4/5 miles from Yong Peng and camped for the night.
While events were unfolding on the bridge, Japanese tanks began to infiltrate from the rear. Lieut Ross and Sgt Tait of the 2/15th Field Regiment ran to a 25 pounder (anti-tank) gun but could not locate any ammunication. Instead, they moved along the ditches along side the road and used grenades thereby stopping the leading tank. They then ran back to the anti-tank gun and found its crew in position. According to Wigmore, 'the first shot hit the target and after others had been fired it burst into flames, forming a temporary road block behind which the gunners continued to fire. Tank hunting parties were organised by Capt Westbrook of D Company and around six tanks were destroyed using bakelite bombs and Mills grenades. [Christie (1983), 53/54 - Captain Bowring's account, 78 to 80 - Captain Brand's account. 2/19th Battalion War Diary. Wigmore, 243. Morrison (1945), 44. ]
Throughout the night, it was said that not a shot was fired (presumably by Lt Col Anderson's force) but many 'strange sounds' were heard. The 2/19th War Diary described the night as 'nasty'. Wigmore notes that, thoughout the night, the column was 'assailed by the fire of tanks, artillery and machine guns'. Captain Mileham's account states that the Japanese 'intended to frighten us into thinking we were completely surrounded'. He also stated that the Royal Artillery had knocked out 11 tanks. Many men were killed, including Captain Maher of the 2/29th B Company, who was killed when a shell hit a car in which he had been placed. [Wigmore (1957), 244. Christie (1983), 53/54 - Captain Bowring's account, 78 to 80 - Captain Brand's account. 2/19th Battalion War Diary. Norfolk/Mileham. Morrison (1942), 44. ]
The following men from different 2/29th Battalion Companies were reported killed on 21/22 January:
The 2/19th War Diary recorded that there was 'enemy pressure all night'. During the hours before dawn on the morning of 22 January 1942 the Japanese recommenced shelling the troops who were given 'a frightful pounding'. [Wigmore (1957), 244. Christie (1983), 79 - 80 - Captain Brand's account. Brune (2014), 346. 2/19th Battalion War Diary.]
At around 0800 hours on Thursday, 22 January 1942, RAF or RAAF aircraft dropped medical supplies and some food (and returned to bomb the Japanese and - inadvertently - Australian positions). [Wigmore (1957), 245. Christie (1983), 54 - Captain Bowring's account, 80/81 - Captain Brand's account. Morrison (1942), 45]
Before 0900 hours, Lt Col Anderson initially ordered Capt Beverley's C Company to test the resistance at the Bridge in a 'heroic charge', but the Japanese response made it clear this was a lost cause. Five Japanese heavy tanks then fired at the rear left of the force. Without any relief in sight, Lt Col Anderson made the decision by 0930 hours to abandon the position, ordering the destruction of carriers, guns and transport, and for the companies to move off at spaced intervals to the north east and make their way to Yong Peng, around 35 kms away. Soon after, he received a message from Bennett stating that there was little prospect of relief reaching the column, and leaving it to Anderson to withdraw. [Wigmore (1957), 244-245, note 4. 2/19th Battalion War Diary. Morrison (1942), 44-45. ]
The 2/19th Battalion War Diary recorded that it was '... decided to leave M.T., guns and wounded and withdrew North, then East to Yong Peng. Orders were given for the force to withdraw to the North (bearing 340 degrees), then East, 'B' Coy, then 'C' Coy, then 'A' Coy, then 2/29th Bn., then 'D' Coy at five minute intervals'. [2/19th Battalion War Diary.]
According to Morrison, the 2/19th B Company was ordered to fire ten rounds rapidly and then move to the right side of the road. 'Then every second man fell out followed five minutes later by the remainder. The men then advanced through withering fire from the rear, heading north'. [Morrison (1942), 45].
The withdrawal had been completed by 1000 hours, except for Anderson, Maj Vincent, Capt Hughes and Padre Greenwood (all 2/19th), as well as Lieut Bonney and 20 men (2/29th), and several others. [Wigmore, 245]
According to Morrison, after most of the troops had withdrawn a convoy headed by a clearly marked ambulance approached the bridge with the hope that the Japanese would let them through. The convey was sprayed with machine gun fire, while the trucks at the rear were destroyed by shells. Those who tried to escape were gunned down. [Morrison (1942), 45]
Around 145 wounded men were left behind; 110 Australians and 35 or 40 Indians. The prisoners were tied together at around sunset on 22 January 1942. Some were bayoneted, some shot, and some survived. Petrol was then doused on the bodies (dead or alive) and set alight. All but three survived, including the 2/29th Lieut Ben Hackney, Lieut A.H. Tibbitts (believed died that day) and Sgt R.F.T. Croft, and a soldier named Wharton. [Christie (1983), 54 - Captain Bowring's account, 80/81 - Captain Brand's account. 2/19th Battalion War Diary. Brune (2014), 347/350.]
Morrison noted that the withdrawal was '... further hindered by a tributary of the Simpang Kiri River (the crossing of which presented great difficulty to the exhausted men). Enemy planes again machine gunned the unfortunate troops as they plunged through the the river and dived for cover in the jungle'. [Morrison (1942), 45].
Many men drowned or were killed attempting to cross a stream of the Simpang Kiri river. [Christie (1983), 54 - Captain Bowring's account, 80/81 - Captain Brand's account. Brune (2014), 347/350.]
Captain Brand reported that the following 2/29th men were together with him around midday on 22 January:
Others included Sgts Fowler and Barton of the 2/15th Field Artillery and also two 2/19th personnel - 65 men in total.[Christie (1983), 54 - Captain Bowring's account, 82 - Captain Brand's account.]
During this time, Captain Lloyds Rose Force unit was travelling through swamps and reeds towards Parit Sulong, encountering men from the 45th Indian Brigade and AIF units trying to make it to Yong Peng. (Rose Force War Diary)
The following 59 men from different 2/29th Companies (except the some men of HQ Company - see below) were reported killed (or were murdered by the Japanese at Parit Sulong) on 22 January 1942:
The following lists HQ Company deaths that were recorded for 22 January 1942, all 'probably Killed in Action'. Note that this is the same day as the killings at Parit Sulong. It is not known if these men were at Parit Sulong or with the rest of HQ Company.
The following is the list of 2/29th Battalion men who had served at Bakri and who died from 23 January 1942 until 27 January, presumably during the withdrawal to Yong Peng.
According to Morrison, Sgt Atkinson from the 2/29th B Company formed a party of over 200 men who escaped from Parit Sulong. This group was said to have trekked across the country for eight days before finally joining the British lines on the west coast at Benut. After a short halt in a rubber plantation, the group headed for Yong Peng but on the way split into separate groups after crossing the Bekok River. Sgt Atkinson's (smaller) party reached Yong Peng but found it was already occupied by the Japanese. They were noticed and escaped through a banana plantation. The party crossed a stream with the assistance of local Malays but some disappeared and were never seen again. The party then reached Batu Pahat but found it was also occupied, so they headed towards Ayer Hitam on the main north-south road. Eventually they joined up with a party of English troops and reached Benut and the safety of British lines. [Morrison (1942), 46-48]
Captain Lloyd's unit of Rose Force that had attempted to reach Parit Sulong eventually realised it was pointless and return back towards Yong Peng. They reached Rengam on 23 January.
Captain Sanderson's unit of Rose Force eventually reached the Parit Sulong - Yong Peng road during 22 January, apparently after the British and Australian units had withdrawn. At 1530 hours they engaged with 'a considerable force of Japanese' riding bicycles down the road. 'Before the enemy had time to come around behind and attack ... our party withdrew to the slopes of Bakit Payong. From this point they observed and sometimes engaged with Japanese forces (estimated at three battalions), delaying their advance towards Yong Peng. Consequently, the Force decided to head to Batu Pahat, which they reached at 1700 hours on Friday 23 January. The party then continued on to Johore Bahru General Base Depot (GBD), arriving there on 24 January 1942.
Despite many navigational, terrain and other difficulties, the withdrawal was 'reasonably successful' [2/19th Battalion War Diary] and many of the men reached Yong Peng from 1500 hours on 24 January. The men who made it to Yong Peng rested and eventually made were transported to Singapore [Christie (1983), 55 - Captain Bowring's account. 2/19th Battalion War Diary. Morrison (1945), 46. ]
According to Wigmore, of the 2/29th Battalion that had taken the weight of the Japanese advance near Bakri, only 130 men mustered at Yong Peng; the remainder were killed or missing. According to the 2/29th Official History, 58% of those who went into action from 17 January 1942 had been killed by 23 January, although the actual numbers appear to be 178 dead of the 600 who fought. Lt Col Anderson had 271 men left. [Wigmore (1957), 249. Christie (1983), 55 - Captain Bowring's account. 2/19th Battalion War Diary. 2/29th Battalion Roll of Honour. ]
The 2/29th War Diary contains the following information written by Lt Col Pond 'as an Appendix to 2/29 War Diary'.
A. General Comments
When I took over the Unit on 25 Jan 42 and commenced to reform it, it consisted only of one Coy existing as a formed Unit; this was 'D' Coy then detached to and under Commd 2/26 Bn. The rest of the Bn consisted only of B Echelon with an increasing number of men filtering back from the Muar engagement in an exhausted state.
[Note: Assuming D Company was relatively intact with perhaps 135 men, and B Echelon may have had 100 or so men, it is not clear exactly which men were included in the number of 'only 130' who mustered at Yong Peng, but it is assumed that these were the survivors from Bakri/Parit Sulong. If the numbers, as recorded in the 2/29th Nominal Roll, are correct, then approximately 422 men survived the fighting at and on the road from Bakri. Not all of these men arrived at Yong Peng. As will be noted below, 520 men joined the Battalion from 25 January 1942, which would seem to indicate that around 300 to 350 men were from D Company, B Echelon, and those who come in from Bakri/Pariut Sulong (130?). These numbers need further investigation.
B. Replacement of Casualties
The first problem to be met was the replacement of casualties. These amounted to over 500 and by arrangement with HQ AIF, 2/29 Bn was given a preferential right of selection among all 27 Inf Bde reinfs in GBD.
(a)The whole of Bn HQ was lost at Muar and a new HQ was built up as follows:
In addition it was necessary to find new clerks and 5 of the 7 members of the 'I' Sec.
Only one Coy Comd (Capt W B Bowring of C Coy) had survived the Muar action and new Coy Comds had to be selected. The following Officers were selected in addition to those already mentioned in Bn HQ.
A. (1)a) Replacement of Casualties (cont)
This list, it will be seen, includes 19 new officers for the Unit. As no suitable personnel could be found, vacancies for Capts to command 3 & 4 Platoons were left unfilled.
(b) The replacement of casualties for the ranks was made by taking in the following numbers (approx):
Of these men, the Queensland personnel were better trained than the others. There was a strong disadvantage in taking a mixed collection of reinforcements, for troops from Queensland and NSW drafted to a Victorian Bn felt that they had been rather unfairly treated. This was a poor start to attempting to build up a new Unit spirit.
(2) Standard of Reinforcements
All of the reinforcements (with very few exceptions) had arrived in Malaya on 24 Jan, i.e., 2 or 3 days before joining the Unit. They were consequently (a) not acclimitised, (b) quite ignorant of conditions in Malaya both in regard to fighting and otherwise, and (c) in poor physical condition after some weeks at sea.
Pond went on to note that the standard of training achieved by the reinforcements prior to joining the unit was very disappointing indeed and 'gave me great concern'. Also, 'owing to heavy losses at Muar, the reorganisation was commenced with no Sig equipment, no mortar equipment, no carriers, no MMG, a deficienty in Motor Transport (MT), only a few LMGs and SMGs, and no ATk rifles at all'. Pond noted that 'some of this equipment was made up fairly soon and most of it was ultimately replaced except for some Sig equipment, SMGs, LMGs, and all ATk rifles. Only four carriers were received.
Pond noted that his re-established Battalion was to be ready to fight again by 28 January 1942. However, owing to the re-location of the Battalion to Singapore, 'it was virtually 28 Jan before any tng really commenced'.
Rose Force was disbanded on 26 January 1942, all men were ordered back to their own units. 'The stores, arms, ammunition and transport etc were handed to the 2/29 and 2/19 Bns as directed'. (Rose Force War Diary)
There were no deaths recorded for (the separate group of) 2/29th HQ company men from 22 until 28 January 1942. This may be because they attempted to keep well away from the Japanese. The following is the list of 2/29th HQ Company men who had been at Bakri, and who were reported killed on (or possibly around) 28 January 1942. All except Pte Stanton and Pte Wheatley (who were reported as Killed in Action) were 'probably Killed in Action'.
The following is the list of other (non-HQ Company) 2/29th Battalion men who had served at Bakri and who were reported killed on 28 January 1942.
The following 2/29th HQ Company Private was reported to have been killed on 4 February 1942, probably Killed in Action. It is not known if he was with the Anderson convoy or HQ Company.
After reaching Yong Peng, the remnants of the 2/29th Battalion withdrew to Singapore where they were reinforced with around 500 men and 19 officers. The reinforcements came from Queensland (220), NSW (150), Tasmania (70) and Victoria (100) - many of whom had been in the military for only a month. Col Pond felt that the Queenslanders were the best trained of the reinforcements. Before 4 February, the Battalion was then deployed to the Causeway Sector as the 8th Division reserve.[Christie (1983), 97 - Col Pond's account. Brune: 434, 439]
Around 1030 PM on Sunday 8 February 1942, hundreds of small watercraft began to cross the Johore Strait from Malaya heading directly towards the north west coast of Singapore. The Japanese were not expected to land along this 15 kms of coast. It was a tangle of mangroves, swamps, tidal islands and thick tropical coastal vegetation, with few obvious landing places. They were, instead, expected to land on the north east coast and had tricked Malaya Command into believing that they were doing just that.
The Japanese knew that this part of the coast was thinly defended. It was - by around 2,500 men from Brigadier Taylor's 22nd Brigade - the 2/20th, 2/18th and the 2/19th, supported by units of the 2/4th Machine Gun battalion and the 2/15th Field Regiment. Many of the men were recently arrived reinforcements with little to no training or combat experience.
The area between the 22nd Brigade and the west bank of the Kranji river was defended by around 2,000 members of Dalforce, a local mostly Chinese volunteer unit. The area from the east bank of the Kranji river to the causeway was defended by the 2/26th and 2/30th battalions of the 27th Brigade commanded by Brigadier Maxwell. The 2/29th Battalion was deployed further south, in reserve.
The watercraft heading towards the 22nd Brigade came under heavy machine gunfire and grenades. But they kept coming and landing wherever they could pinpoint gaps in the defences. Upwards of 13,000 battle-experienced Japanese soldiers from 16 battalions of the 5th and 18th Regiments landed in 3 or 4 waves, to be followed soon after by 10,000 more. Their initial objective was to capture Tengah airfield.
The Australians had little chance of stopping or holding the Japanese or pushing them back to Johore.
By the early hours of Monday morning, 9 February 1942, the men who survived the attack withdrew eastwards in small groups, many having to fight their way back. Many did not make it. The three battalions of the 22nd Brigade were 'cut to ribbons and virtually destroyed' as fighting units. The Japanese landing had created a 'gaping military wound.'
The 2/29th Battalion, the newly raised Special Reserve Battalion and a reserve company of the 2/4th Machine Gun battalion, were deployed to a reserve position [according to a note by Lt Col Pond in the War Diary) 'bounded on the north by the east west road north of Bukit Mandai, on the east by the pipeline, on the south by the road running west from Bukit Panjang village, and on the west by the Peng Siang river (Sungei)'. Other accounts state that this was between Mandai village and the intersection with the road to Choa Chu Kang (or Tengah airfield?) in order to defend Tengah airfield.
Pond noted in the 2/29th War Diary that 'As a result of the system of patrols carried out it was not possible to move the Bn without allowing at least 2 1/2 hours to warn the outlying Coy and the patrols. At the same time the area was so large that it could not otherwise be satisfactorily protected'. Pond also noted that 'it has been suggested that the Bn was at one hours notice to move but no intimation such a fact was ever received by the Unit'. [2/29th War Diary]
The causeway area came under intense shelling. The Kranji/Jurong Line, running only 5 kms from the head of the Kranji river, east of Tengah airfield in the north, to Jurong river in the south, was established. Other British units, including the 44th, the 12th and 15th Brigades, and the Malaya Brigade were brought in to defend and try to hold the line.
At 0045 hours on 9 February 1942, the 2/29th Battalion was told it would be moving towards the west coast. At 0145 hours, the Battalion was advised that 'enemy attacks had been successful in the north of Arm Keng village, but nothing was known about the situation west of Choa Chu village. The 2/29th was ordered to occupy a position at Tengah Road Junction by first light, just west of the aerodrome, with two Companies forward towards Experimental Farm, and two Companies near the road junction. The 2/29th Companies were in place to defend the aerodrome but by 0730 found that both Indian and Australian troops were moving back through their position. 'These troops were quite out of control and leaderless and stated that they have had enough'.
Throughout the morning there was confusion and uncertainty. The airfield was lost by Monday morning. By 1400 hours, orders were received (from 22 Aust Inf Bde) to withdraw to Bulim 'at once'. This position was occupied from 1630 hours. By 1900 hours, the 2/29th Battalion War Diary noted that 'Frontage too wide to be adequately covered but endeavoured to do so by means of patrols. Bn had no comms with Bde except through 2/18 at Bulim Village'.
As darkness fell that Monday evening (9 February) on a complex tactical environment, the Japanese Imperial Guards started to land in the causeway area. They were initially stopped from moving beyond their beachhead, but, with events unfolding to their south west, the 2/26th and 2/30th battalions were ordered to withdraw south during the early hours of Tuesday morning (10 Feb).
Two Bakri veterans of the 2/29th Battalion were killed on 9 February 1942:
[Christie (1983), 97 - Col Pond's account. Brune: 434, 439]
On Tuesday 10 February, the 2/29th Battalion remained deployed near Bulim (the Kranji - Jurong line). Faced with Japanese flanking movements, the Battalion was ordered to withdraw and began to do so from 0535 hoursfirst to near Keat Hong and then to Bukit Panjang on the intersection of the Woodlands and Choa Chu Kang roads. In an attempt to re-take the Jurong line, the 12th Indian Brigade with the 2/29th attached was to attack the right flank.
The Kranji/Jurong Line was lost by Tuesday afternoon 10 February. Bukit Timah, the highest point in Singapore, where critical stores of food, ammunition and petrol were located, was lost that night. Attempts to re-take both were a costly disaster. To quote the book 'Descent into Hell', 'unit after unit was belatedly committed, torn to shreds, demoralised, and then scattered'.
The Australian Field Ambulance and other supporting units did whatever they could, in terrible circumstances, to care for the wounded and dying.
After dark, the 2/29th Battalion was attacked and withdrew first to the pipeline thence to the racecourse. [Brune, 452 - 460].
The following 2/29th Battalion Bakri veterans were killed on 10 February:
The 2/29th Battalion re-grouped early on 11 February. The following Bakri veterans were recorded as being killed in action on 11 February 1942:
By the evening of Thursday 12 February, allied forces had withdrawn to a final defensive arc around Singapore town. Australian forces established a perimeter around the Tanglin Barracks area. But it was all now too late.
With no hope of any further offensive action, with critical infrastructure lost, and in an attempt to reduce casualties, senior allied commanders discussed the need to capitulate on Friday afternoon. Final evacuations were underway from the port amid ongoing fighting, air attacks and artillery shelling. During the late morning of Sunday 15 February, a small delegation of British officials approached the Japanese to indicate that they would surrender at 4 PM that day.
The fighting ended on Sunday night, 15 February, at 6.10 PM local time, when General Percival signed the document of surrender at the Ford Motor Factory.
The following Bakri veterans were recorded as being killed from 14 February 1942:
From 12 March 1942 (when two were executed) a further 239 men of the original 2/29th Battalion who had served at Bakri died mostly as Prisoners of War, but also from drowning and from injuries received. Of the original 1003 men who joined before Bakri, 455 died by the end of the war. Of the 597 men who joined as reinforcements at Singapore (including from other Battalions who had been in Malaya for a period of time beforehand), 222 died, 44 of which were before the fall of Singapore.
Lest we forget.
The following is a select bibliography for the above content and further reading.
Page created 1 May 2014, updated 10 November 2024 (added content from Morrison's B Company memoirs). Copyright © Andrew Warland (andrewwarland(at)gmai1.com