
William Neilson in 1914
William Neilson - Gallipoli - 1914/1915
William Neilson, born on 25 March 1864 (or more likely on 30 November 1864) in Muirkirk, Scotland, was the first born child and son of William Neilson and Grace Copeland who married on 25 March 1864, whose background and history is documented on this page.
1914 - William Neilson enlists for World War 1
World War 1 was declared on 4 August 1914. William, now aged 49, decided to enlist soon after, on 17 August 1914. His children were now aged between 8 and 18. His motivation for enlisting, at that age, with such young children, having just migrated to Australia the year before, remain a mystery.
Some of the information below, including timelines and locations, is derived from the book 'Esprit de corps: the history of the Victorian Scottish Regiment and the 5th Infantry Battalion', a series of sections edited by F.W.Speed and published in 1988 by Allen & Unwin. The book quotes from a book by a former 5th Battalion member, A.W. Keown, titled 'Forward with the Fifth : the story of five years' war service, Fifth Infantry Battalion, A.I.F.' published by Specialty Press in 1921. See also this wikipedia article about the 5th Battalion which quotes various other sources. Other sources are listed throughout the text.
Formation of the Battalion
The 2nd Brigade, initially commanded by Colonel James Whiteside and then by Colonel J W McCay, was raised in Victoria and consisted of the 5th, 6th, 7th and 8th Battalions. The 5th Battalion was commanded by Lt Col David Stanley Wanliss who was appointed on 12 August 1914.
The 5th Battalion's War Diary (AWM Ref 23/22/1) provides useful background to the formation of the battalion. It noted that 'The Battalion was recruited from the Territorial Area of the 13th Brigade (less 48th Bn)[this area was 'Melbourne south of the Yarra'], and from past members of the old Victorian Scottish Regiment and Victorian Rifles'.
The War Diary continues: 'The Headquarters of the Battalion were fixed at the Sturt Street Drill Hall South Melbourne on the 13th August, and Recruiting Depots at 52nd Infantry Drill Hall South Melbourne [Hobsons Bay]; the 49th Infantry Drill Hall, Commercial Road, Prahran; the 51st Drill Hall Albert Park; and the 46th Infantry [Brighton Rifles] Drill Hall Elsternwick'.
'Recruiting commenced on the [Friday] 14th August and the undermentioned officers were provisionally appointed as Company Commanders':
- Captain Fethers 'A' Coy
- Lieut Clement 'B' Coy
- Captain Flockart 'C' Coy
- Lieut Luxton 'D' Coy
- Captain Greig 'E' Coy
- Captain Carter 'F' Coy
'2nd Lieut Lillie was placed in charge of the Depot at Elsternwick where 'H' Coy was being formed and Captain Walstab was provisionally appointed as Coy Commander on the 17th August.'
Note that the eight company model was based on the British model which was changed to four companies in October 1914; the AIF adopted the new model in January 1915 - see below.
'Recruits enlisted at the 52nd Infantry Drill Hall formed the nucleus of 'A' and 'B' Companies, those at 52st Drill Hall 'C' and 'D' Coys, those of the 49th Infantry Drill Hall 'E' and 'F' Coys, and those at the 46th Infantry Drill Hall 'H' Company'.
We do not know what motivated him, or the nature of the conversations he may have had with his wife and/or children, but William Neilson turned up to enlist on Monday 17 August 1914.
The finalised nominal roll of the 5th Battalion (AWM Reference RCDIG1067377) lists all the members each of the Battalion's Companies as well as Headquarters and the Machine Gun section. It appears to show the order in which the men were signed up, by the Regimental number they were assigned. For A Company, the first 10 on the list were as follows. The first three do not show a regimental number and both 22 and 27 are missing - see below for possible reason:
- Captain Erle Finlayson Denton Fethers, aged 27, a bank accountant from East Malvern, formerly with the 48th Infantry
- Lieutenant Robert Murdoch Finlayson Hooper, aged 25, railway engineer and blacksmith from Albert Park, formerly with the 52nd Infantry
- 2nd Lieutenant Stanley Gladstone Gilmour, aged 24, salesman from South Melbourne, formerly with the 52nd Infantry
- (20) Private John Francis Boldarini, aged 19, clerk from Port Melbourne, formerly with the 52nd Infantry
- (21) Private Thomas Stanley Jemmerson, aged 20, saddler from Hawthorn, formerly with the 52nd Infantry
- (23) Corporal Charles Harold Turner, aged 22, engineer from Malvern, formerly with the 52nd Infantry
- (24) Private Albert Percy Fleming, aged 25 tramway employee from Collingwood, formerly with the 52nd Infantry
- (25) Colour Sergeant William Neilson, aged 49, caretaker from St Kilda, not with any previous infantry
- (26) Corporal Thomas Hudson Nesbitt, aged 33, master mariner from Essendon, not with any previous infantry
- (28) Private Robert Bryant, aged 19, bread carter from Windsor, formerly with the 49th Infantry
It is not known if the order above means that Neilson stood behind Fleming waiting to enlist. He was not a previous member of any infantry battalion but may have known men who were. Interestingly, aside from Lt Col Wanliss and the Quartermaster Captain William Chassar who were both 50, Neilson was the oldest recruit at age 49. His age was not however, a factor in being appointed Colour Sergeant; the age of the men in the same role in other companies was between 20 and 29.
From 1813, the British Army had eight companies in every infantry battalion and each had a colour sergeant. The role of colour sergeants traditionally was to protect ensigns (junior officers carrying battalion colours into battle). When battalions were re-organised into four companies in October 1913 in the UK (and soon after in the Australian army), the colour sergeants in each company became either a company sergeant major (senior) and company quartermaster sergeant. As we will see below, William was appointed as a Regimental Sergeant Major, a senior Warrant Officer responsible for all aspects of duty and discipline of the warrant officers, NCOs and men. (Sources: Wikipedia article on Colour Sergeant, Colins Dictionary definition for RSM)
According to the book, 'Esprit de Corps' (page 24), nearly the whole of A Company and part of B Company were described as 'old Scottish men'. This statement conflicts with the actual ages of the men - the average age was 25.5.
The book 'Esprit de Corps adds that 'While A and B Companies were dominated by Scots, F Company was composed almost entirely of men who had attended a public school or college. Because of their exclusive background, F Company was viewed with a certain amount of suspicion by the other companies'. The book notes that 'F Company was 90 per cent officer material which was transferred [over time] out to other units over the next few years ... until there were only a few left in the 5th'.
The Battalion War Diary notes that 'the first drafts consisted of men who were serving in the Citizen Forces or had service in the Militia Forces, or who had seen service, but a small percentage of the later enlistments had practically no military training to record.
Broadmeadows
The first draft of 790 men, including Neilson, assembled at Victoria Barracks on 19 August 1914. Colonel J W McCay, commanding officer of the 2nd Brigade gave a 'stirring patriotic speech'. According to the book 'Esprit de Corps' (page 21), quoting A W Keown's book 'Forward with the Fifth', it was a 'motley crowd' that marched the 11 miles from Victoria Barracks to the camp at Broadmeadows. The recruits were unused to this type of exercise - and the thought of even walking from Victoria Barracks to Broadmeadows now would be considered a very long hike. We must assume that Neilson was included in that march.
Broadmeadows military 'camp' was no more than a large open paddock with tents arranged in lines; water supply and latrines had to be hastily improvised.
The War Diary notes that training commenced during the first two weeks. Musketry was carried out at North Williamstown rifle range. Members of the Rifle Clubs Union acted as instructors 'and proved of great value'. The War Diary has a curious entry: 'Backward men were also exercised in miniture cartridge practice'. This appears to suggest that some found the training difficult. Company and Battalion training were trained in attack and defence, with 'special attention being paid to the use of the intrenching [sic] tool and cover'. Battalions practiced against other battalions.
The Battalion War Diary notes that a second draft of 200 men was carried out on 21 August and thereafter smaller drafts until 29 August 1914 when the depots were closed.
Captain Richard Saker was provisionally appointed to command 'G' Company on 28 August 1914.
According to the Battalion's War Diary, 'A number of men in excess of the authorised establishment were enlisted and sent into Camp, but on a second medical examination being made by the M.O. of the Battalion, the most of this excess was wiped out by men found to be unfit. In many cases the medical examinations were carried out in an extremely unsatisfactory and perfunctory manner and caused much trouble subsequently'.
On 2 September 1914, according to the War Diary 'authority was obtained to recruit up to 5% over the establishment. This reserve was used up by wastage mostly by men discharged as medically unfit but in many cases as the result of pressure brought upon Members of Parliament and other officials'.
Access to suitable clothing and equipment was a major problem. Many men did not have a great coat to keep warm, boots were defective, and other pieces of clothing were found unsuitable. 'Absolutely no funds' were made available to purchase better or the correct clothing. (War Diary). Some men apparently worried, given the number of Scottish men, that the kilt might become a compulsory part of their already poor uniform. (Source: Esprit de Corps, page 24)

Group photograph of A Company, 5th Battalion, taken at Broadmeadows, Melbourne in October 1914. Australian War Memorial details: Eighth from left, front row, is Company Sergeant Major (CSM) William Neilson. It is not known why the three men in front appear to have a different (darker-coloured) uniform.
On the morning of 21 October 1914, the 5th Battalion marched out of Broadmeadows camp to the local train station to travel by train to Port Melbourne. The 5th Battalion, along with several other units, was assigned to the HMAT Orvieto, a converted Orient liner that had been stripped back for the purpose. The Orvieto was the last in the convoy to depart Melbourne and apparently received a huge farewell. (Source: Esprit de Corps, pages 24 - 25)
En route to Egypt
The Orvieto arrived off Albany, Western Australia on 25 October and joined the rest of the convoy of 38 shops. The convoy headed for Colombo, Ceylon (now Sri Lanka) for a brief stopover, departing that location on 17 November. It stopped over at Aden on 25 - 26 November and arrived in Port Said on 1 December.
The 5th Battalion's A Company (presumably including William Neilson) disembarked and travelled by train to Cairo as part of the Division's advance party. The rest of the Battalion travelled to Cairo over the next few days. (War Diary)
Egypt
The Battalion set up camp with the rest of the Division at 'Mena Camp', about 12 kms from Cairo, not far from the pyramids (which can be seen in the background of camp photographs). The Battalion spent four months in this camp, mostly in gruelling conditions with insufficient and unappetising food; they were put on the 'Imperial Scale of Rations'. A messing allowance was added later on that helped to supplement the meagre rations.
A number of photographs were taken by soldiers, some of which may include William Neilson. The Battalion's CO, Lt Col Wanliss 'shared the privations of his men', becoming 'the best belowed of commanders'. (Source: Esprit de Corps, pages 27 - 28)
The Battalion's horses, less 3 that died on the journey, arrived in Egypt. (War Diary)
The Battalion spent Christmas and New Year's Eve 2014 in Egypt. Their behaviour during this period resulted in some criticism. On 1 January 1915, the entire 2nd Brigade was forced to line up to be lambasted by Col McCay for their 'widespread debauchery', something that apparently did not endear him to the men. We may wonder how Neilson felt or was treated by his superiors given his position.
Following the British model, the Battalion's companies were re-organised at this time, from eight companies to four. (Source: Esprit de Corps, pages 29 - 30) It is not known (yet) how these companies were organised. For example, were A and B combined to be A, or was A and E combined? Or some other arrangement. According to the book 'Esprit de Corps', F Company was merged with H. It is also not known yet for sure whether Neilson remained with the 'new' A Company.
Reinforcements arrived on 9 February and again on 24 February 1915. The Battalion's strength was kept at 10% above the establishment.
William Neilson was appointed Regimental Sergeant Major on 5 March 1915.
Members of the 5th Battalion were said to have been involved in the infamous 'Battle of the Wazza/Wazzir' on Good Friday on 2 April 1915 when rioting Australian troops wrecked a brothel and some shops in a street called 'Haret el Wasser', an area of Cairo. The cause of the riots were said to have been increased costs and too much alcohol. (Source: Esprit de Corps, page 30)
On 4 April 2015, the Battalion was marched out of Mena Camp bound for Cairo's Kasr-el-Nil military railway station from where they took a train to Alexandria. The men were then transferred to the HMAT Novian, a transatlantic cargo ship that had been requisitioned for the war effort. The Battalion would spend the next three weeks on the Novian undertaking training.(Source: Esprit de Corps, page 31 - 32)
Lemnos
The Novian arrived at Mudros, the main town and harbour on the island of Lemnos, about 65 kilometres from the Gallipoli peninsula. At the time, Mudros harbour was the busy host for many other allied ships and allied troops, all preparing for the Gallipoli offensive. (Source: Esprit de Corps, page 31 - 32)
The Battalion spent the next two weeks carrying out drills, learning how to disembark onto smaller vessels with heavy packs (and how to avoid drowning if they fell in the water), practicing landing procedures, and learning what it would mean to march with a full pack. (Source: Esprit de Corps, page 31 - 32)
The aim of the Gallipoli campaign was said to be to clear the Dardanelles, capture Constantinope and remove Turkey from the war. The strategy of the overall commander, Sir Ian Hamilton, was for the ANZACs to disembark at Gaba Tepe on the Turkish shore as part of the second wave, from around 5 AM on 25 April 1915. The 2nd Brigade's objective was to be Hill 971 (Koja Chemen Tepe) as well as the lesser peak of Mal Tepe to the left. The task of capturing the peak was assigned to the 5th Battalion. It would then protect the left flank by holding the line along North Beach to Fisherman's Hut. The 1st Brigade would be in reserve for the advance on Mal Tepe. (Source: Esprit de Corps, page 34)
The Novian left Mudros harbour at 1230 hours on 24 April 1914, steaming slowly along with the other ships towards Gallipoli. The men were awoken at 0200 hours on 25 April and a hot meal served. For many, it would be their last. (Source: Esprit de Corps, page 34)
Landing on Anzac Cove
The 3rd Brigade (9th (Queensland), 10th (South Australia), 11th (Western Australia) and 12th Battalions (Tasmania)) began to disembark at around 0415 hours. The 9th landed first, at 0428 hours. However, instead of landing along the cove that would become known as Anzac Cove, the boats rounded Ari Burnu and landed on the beach beneath the slopes of that point. It had landed a mile too far north, creating confusion on the ground and for those who would follow.
The mostly Victorian 2nd Brigade followed. Originally, the 5th Battalion was to be the first to disembark. However, as a result of delays and confusion, the plan was changed so the order was the 7th then the 6th, the 5th and finally the 8th.
This photograph shows members of the 7th Battalion being towed to shore after disembarking.
According to this page on the 'Spirits of Gallipoli' website, after landing behind the 7th Battalion, it made its way to the rendezvous point in Shrapnel Valley (Gully), around 240 metres from the 7th. Half of the 6th Battalion under Col McNicoll had arrived by 0700 hours.
The first troops of the 5th Battalion started landing at Anzac Cove from 0530 hours, under fire from Turkish troops at the south end of Anzac Cove, at Gaba Tepe. The men of the Battalion who started arriving formed behind the 6th.
As the 3rd Brigade was now too far north it had effectively changed places with the 2nd in terms of strategic objectives. As Plateau 400 was exposed, Col MacLagan requested Col McCay to deploy the 2nd Brigade directly ahead (to the east). According to Les Carlyon's book Gallipoli, McCay was said to have been sceptical of this order and requested assurance that the left was secure, which MacLagan gave. McCay established the 2nd Brigade headquarters on the seaward slope of 400 Plateau (which became McCay's Hill).
Conveying this change of plan on the beach, Major General Bridges told Lt Col Wanliss not to wait for the rest of his troops but move to 400 Plateau. By this point, A Company (Maj Fethers) and B Company (Capt Saker) were forming up. One platoon from C Company (Maj Robert Pearce Flockart), let by Lt Derham had arrived and was ordered to join A Company.

Extract of Anzac Cove Battlefield map by H.E.C. Robinson.Map Source
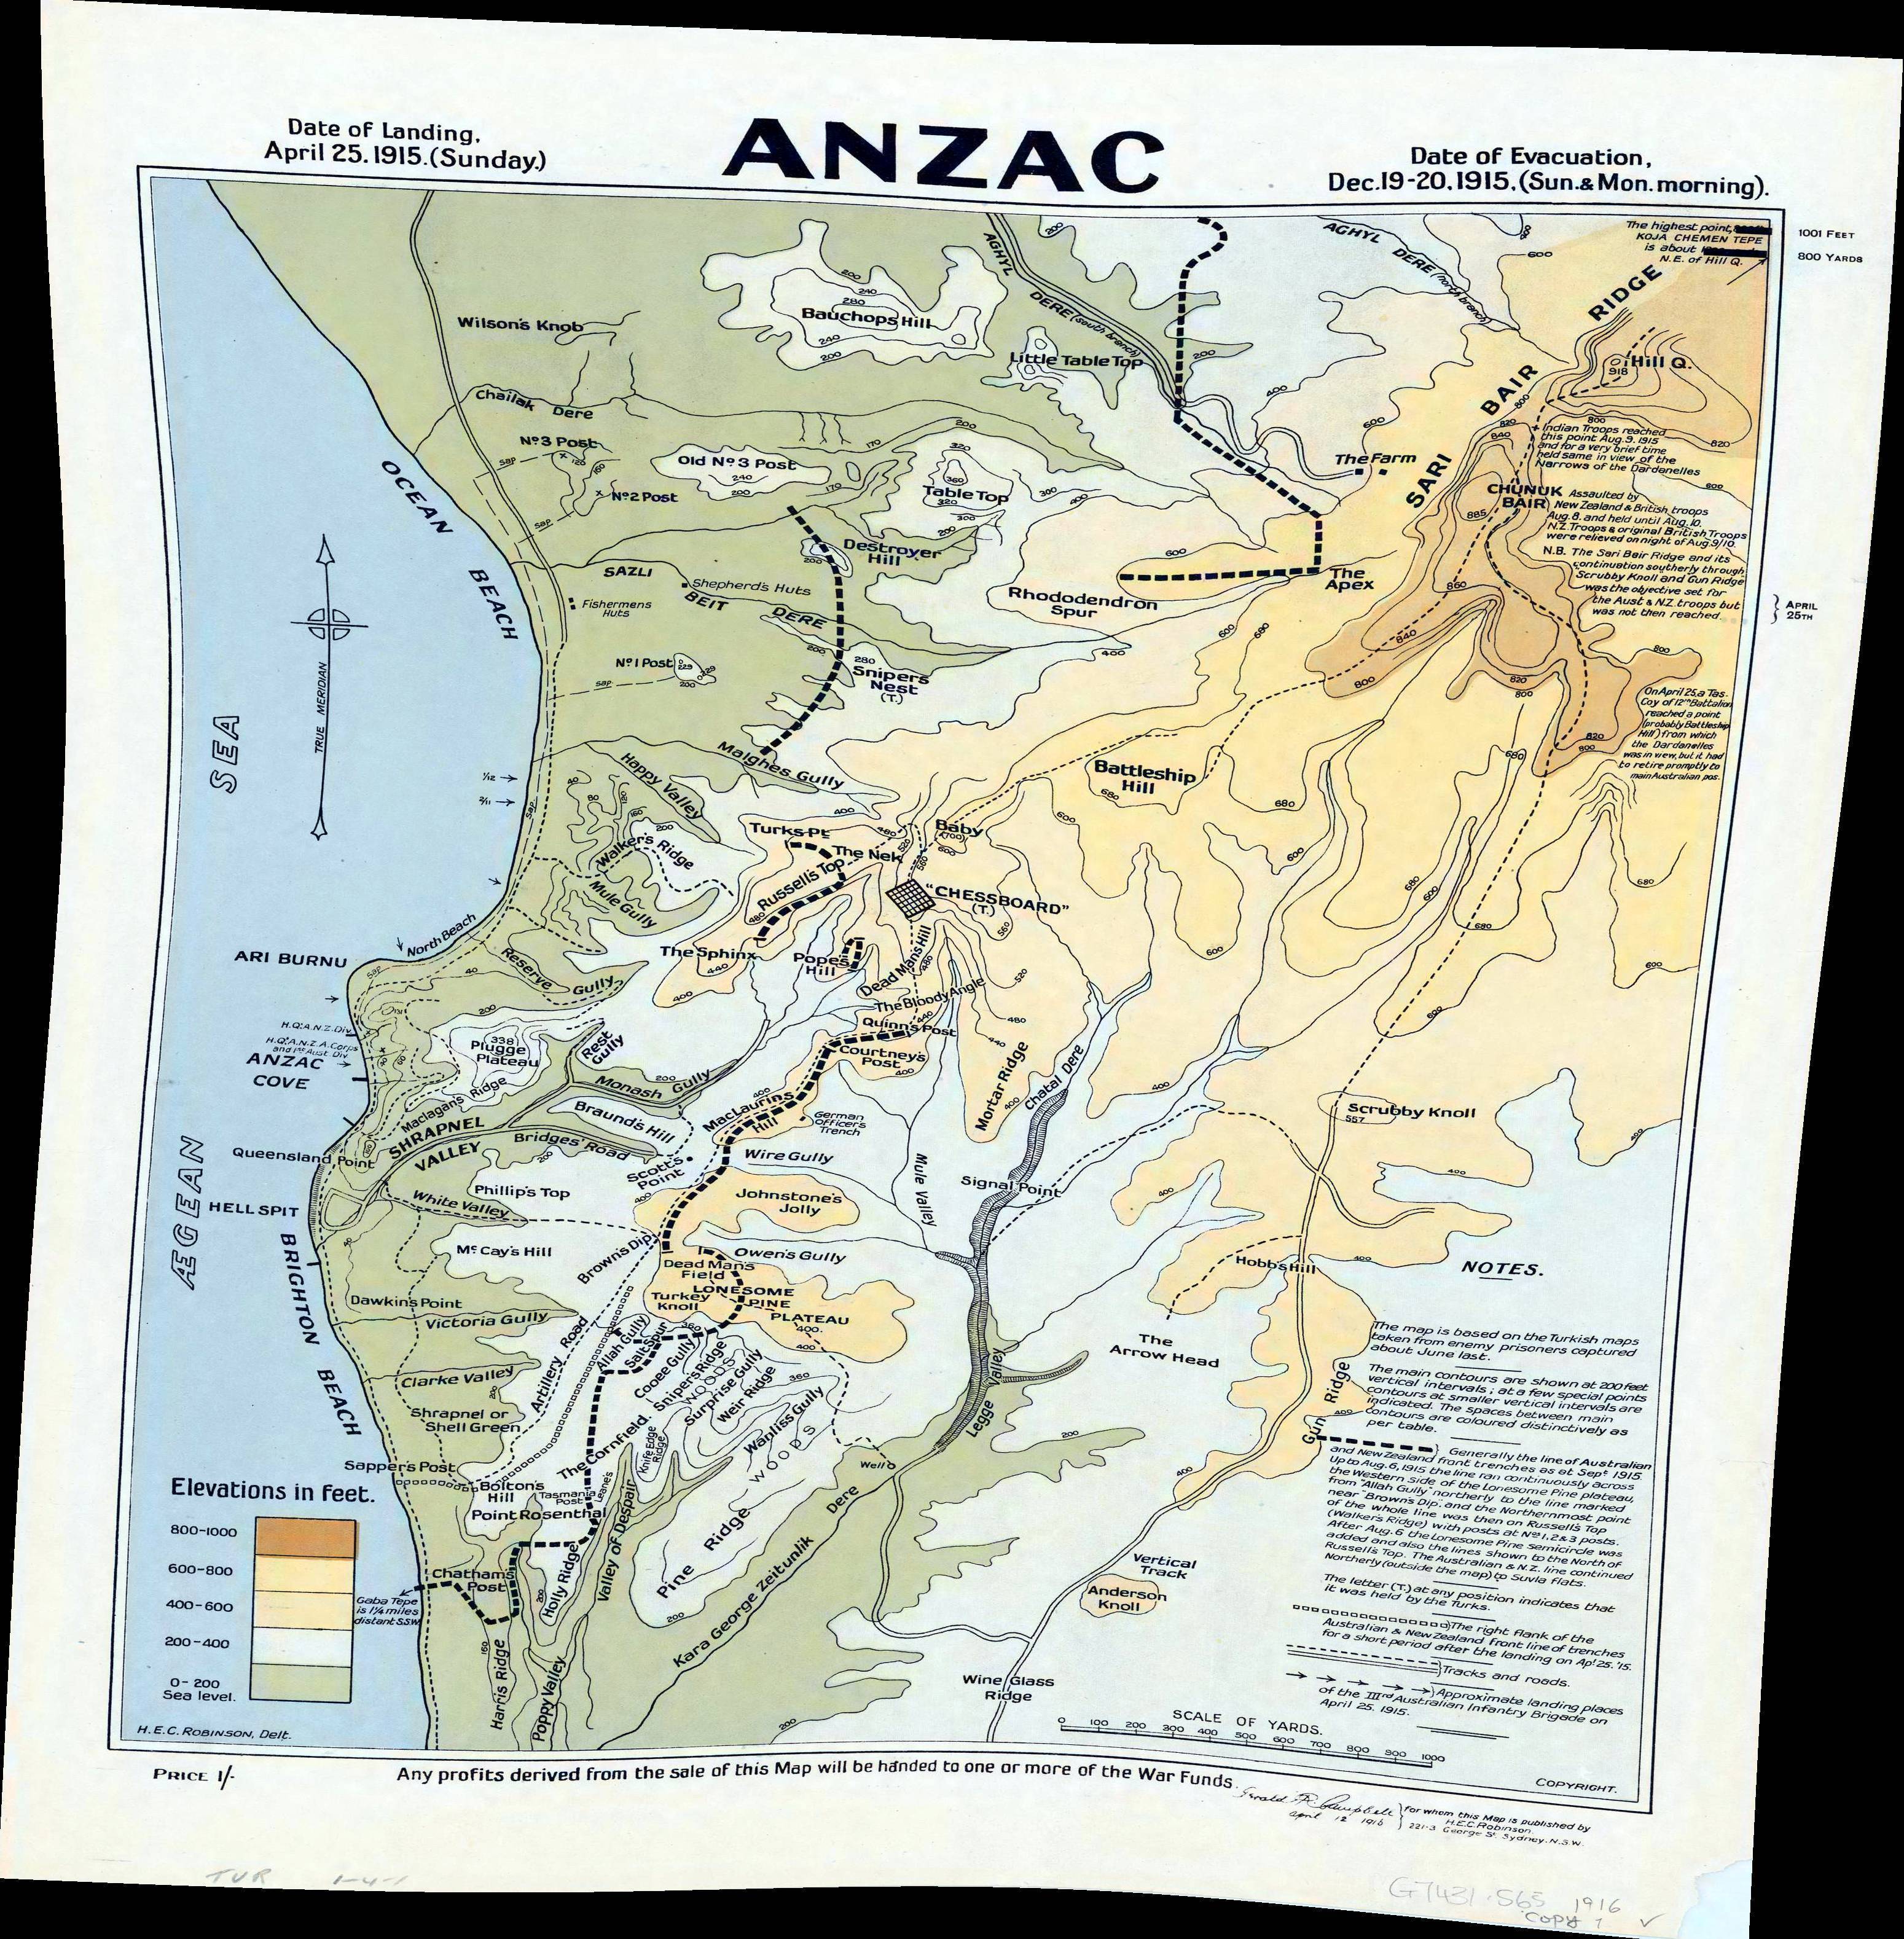
At this point, we don't know if Neilson remained with the rest of A Company or remained to the rear. It is assumed, without any evidence yet found to the contrary, that he remained with his Company and headed up the Razorback spur. His actual location from this point cannot be determined as no record of his movement has yet been found.
The companies headed independently through the scrub up the Razorback spur which led onto the 400 Plateau (named after its height on the map). It was now morning and the sun was shining. The 400 Plateau are was divided into two separate areas by a ravine that was named Owen's Gully (the location of a Turkish machine gun position) and Brown's Dip. The northern part of the 400 Plateau became known as Johnston's Jolly; the southern part was named Lone Pine (the map above refers to it as 'Lonesome Pine Plateau'). The plateau was covered in low scrub, offering some form of cover.
Fether's A Company halted his company high on the ridge and sent scouts ahead to locate the firing line, and back to obtain instructions. A and B Companies, now high on the slopes, had an excellent view out to sea. It was a sunny day and they were said to be in high spirits.
Heading onto the plateau, Col McCay realised the ridge to his right (which would become Bolton's Ridge or Hill) would be a key point in their defence from Turkish troops located south and east of the Gapa Tepe point. He located the Brigade-Major, Walter Cass, and ordered him to gather what men he could to defend the ridge. He saw the 8th Battalion, commanded by Colonel William Bolton, moving forward, so Cass directed them to the location (hence the name). The 8th - the last to land of the 2nd Brigade - was the only ANZAC battalion that remained together during the day. As each company and battalion appeared they were pushed forward into the front line with no defined orders other than 'to support the 3rd Brigade'. The 12th Battalion also appears to have moved to Bolton's Ridge.
Among the first to reach the Pine Ridge area was Lt Eric Plant's platoon from the 9th Battalion (3rd Brigade, Queensland). Capt John Whitham's company of the 12th Battalion (Tasmania, 3rd Brigade) moved forward from Bolton's Ridge when they saw the 6th Battalion moving up behind them. As the 6th Battalion reached the ridge, the companies carried on towards Gun Ridge, while Lieutenant-Colonel Walter McNicoll established the battalion headquarters below Bolton's Ridge. The 6th Battalion was engaged by Turkish small arms and artillery fire, causing heavy casualties. (Source: Wikipedia article on the Landing at Anzac Cove)
According to the account of Lieutenant Alfred Derham, A Company (which included William Neilson) eventually linked up with C Company (Maj Richard Saker) but there were 'still no orders, still no firing line to reinforce, still nothing to do but lie and be fired at'. Lt Derham was advised by Saker that the rest of his (C?) Company had arrived and that it would follow Derham's platoon. He was ordered to move in the same general direction as the 5th Battalion's A and B Companies (Fethers and Flockart).
By this point, the 5th Battalion's A, B and C Companies had neared the top of the Razorback where they waited below the crest. The company commanders were said to have assumed that the 3rd Brigade must have established a firing line somewhere ahead on the plateau, from where they could hear firing.
Col Wanliss was now separated from his battalion. According to 'Esprit de Corps' (page 39), 'each of the companies entered the battle independently, their commanders apparently believing that they should not waste time by waiting for the others'.
A Company (Maj Fethers) went over the crest first followed by C Company (Captain Flockart) and then B Company (Captain Richard Saker, originally with G Company). According to the book 'Our Friend the Enemy' by David Cameron (Big Sky Publishing, 1 October 2014):
Saker's company moved onto the plateau via the Razorback in three long columns. As they started to move across the plateau they became prime targets for the Turkish gun and machine-guns on Third Ridge. Fethers pushed on towards Johnston's Jolly, while Saker adopted a position to the right. None could find a firing line to reinforce. Saker gave orders for his men to advance in short rushes across the Daisy Patch and, once they reached the forward end of the field, he ordered his men to lie in the scrub.
Derham's platoon followed, both reaching an exposed spur on Weir's Ridge where they had cover from their front but not from Turkish rifle fire on their right. Derham was wounded but continued on.
The companies were met with shrapnel and machine gun fire from Turkish positions that they could not see. According to Bean, 'the company advanced over an abandoned Turkish trench, past the small open square of the Daisy Patch blooming with red poppies, into the thick scrub of Lone Pine, where a man five yards away was invisible'. The men moved through the scrub in search of the firing line but became separated.
Turkish machine gun fire became more accurate. Fethers was only 200 yards from the crest when he was hit by a sniper's bullet 'near the collar bone that evidently went right into his lungs, he only gave a gasp and went right out, poor chap' (Source: Major Flockart's letter to his mother, dated 28 April 1915). Maj Flockart, along with some of his men from C Company, followed the companies who had already headed out across Johnston's Jolly. They came upon the body of Major Fethers, Flockart's 'bosom companion'. According to the war correspondent Bean (Vol 1, page 389), 'Flockart dropped down beside it and covered his friend's face with his cap'. (According to the Scotch College website 'Great Scot', Fethers and Robert ('Bert') Pearce Flockart were 'great mates').
At 1000 hours brigade headquarters received a message from the 6th Battalion (which had deployed south towards Pine Ridge) asking for reinforcements. McCay sent half the 5th Battalion to assist. (Source: Wikipedia article on the Landing at Anzac Cove)
At this time, the 8th Battalion were digging in on Bolton's Ridge, except for two companies which moved forward to attack a group of Turks that had come up from the south behind the 6th Battalion.
At 1030 hours, the six guns of the 26th Jacobs Mountain Battery arrived, positioning three guns each side of White's Valley. At noon they opened fire on the Turks on Gun Ridge further east.
D Company (Capt Harry Carter) was the last of the 5th Battalion companies to land at Anzac Cove but had casualties on landing. According to a letter written by Lt Albert Heighway to his father, contained in a PDF document titled 'Come on Lads' on the Wesley College (Victoria) website:
... when we got within 50 yards of the shore the Turks opened fire on us. Then things were not too pleasant because we could not reply. ... Nobody was hit until we got within twenty yards of the shore and they turned a machine gun on us. One of my men was hit first through the neck, then I was the next to get it through the chest. ... I was steering the boat at the time. ... I believe a lot of my men were killed when they were stepping on to the shore. ... While I was lying there (in the boat, wounded, a bullet) just took the skin off my shoulder and another ripped my haversack. Dozens of them went within an inch of me. When the bullets cut through the sides of the boat you could smell the burning paint.
Heighway remained in the boat for seven hours until he was finally removed and evacuated off the peninsula to Alexandria, from where he penned the above letter.
As Heighway waited in the boat, the rest of D Company headed up the Razorback and reached the crest just as Saker was wounded in the leg.
Captain Carter and 'some of his troops' from D Company were held in reserve on the western side of Lone Pine. A platoon led by Lt Leo Levy was (apparently) spotted by 'an excitable junior officer' from another battalion calling out something like 'there they are!', resulting in 'a mistaken rush of soldiers'. This action drew Turkish machine gun attention to Levy's platoon just as it went over the crest.
Despite his injuries, Levy and Derham decided to advance, the latter hobbling after his men. The moved several hundred yards and then rested close to the southern side of Lone Pine. As their position was exposed, they headed towards a smaller group of Australians from the 6th (Capt Daly) and 5th (Lt Hooper) who had captured an abandoned Turkish mountain-battery position (possibly the same 'abandoned Turkish trench' noted above). The position was isolated and at risk of being cut off. For his efforts, Derham was awarded the Military Cross, the first for gallantry in the 5th Battalion.
Saker withdrew to the beach to have his wounds treated. According to the account of Lt Derham (A Company platoon), he (Derham) 'advanced his men in two short rushes in the direction of Owens Gully' but, upon hearing that Maj Saker had been wounded, returned to the Lone Pine area to assist. Derham, who had been wounded in the left thigh, carried on.
Bean noted that 'by the time it reached the forward edge of the Daisy Patch there were with the officers only a few of their N.C.O.'s and men. They lay down there in the scrub.'
Some time during these events, Flockart was wounded. He withdrew (or was taken) back to the beach and evacuated to Egypt for treatment. He was promoted to Major on 27 April 1915 and returned to Anzac Cove. He died on 15 July 1915 of shrapnel wounds he received at Gallipoli on 12 July 1915.
By 1200 hours, the 8th Battalion was dug in on Bolton's ridge. In front of the 8th were scattered remnants of the 5th, 6th, 7th, and 9th Battalions, mostly out of view of each other in the scrub.
Shortly after, the 6th Battalion sought further reinforcements to hold its position. McCay sent his last reserves, a company of the 1st Battalion, and ordered the 8th to leave one company on the ridge and advance on the right of the 6th Battalion. The scattered formations managed to hold their positions for the remainder of the afternoon. (Source: Wikipedia article on the Landing at Anzac Cove).
The book 'Esprit de Corps' (page 41) noted that 'the position held by Hooper and Daly was probably the farthest point inland reached by any member of the 5th Battalion during the entire Gallipoli campaign'. The 5th Battalion had temporarily ceased to exist as an organised unit.
Around 1300 hours, a column of Turkish reinforcements from the 27th Infantry Regiment, in battalion strength, were observed moving along the ridgeline from the southern section of Gun Ridge. The Turks then turned towards 400 Plateau (the Lone Pine area) and advanced in extended order. The Turkish attack soon forced the Australian troops in advanced positions to withdraw, with heavy casualties. The attack forced a wedge between the Australians on Baby 700 and those on 400 Plateau. Captain Carter (D Company) and his men, who had been held in reserve, were now sent forward to assist the withdrawal of a group on the northern part of 400 Plateau (Johnston's Jolly). Carter received a minor wound from shrapnel as a result of this action.
Most of the ANZACs (including A Company) now withdrew back to the western slope of 400 Plateau and to Bolton's Ridge. However, Daly and Levy remained in position. At 2330 hours, orders were sent out to pull back to the main line. The various ANZAC groups now dug in, not necessarily in their original companies.(Sources: 'Esprit de Corps' (page 41); Wikipedia article on the Landing at Anzac Cove).
Although in places there was a mixture of different companies and platoons dug in together, the 8th Battalion in the south still centred on Bolton's Ridge. North of them, after a exposed gap in southern sector of 400 Plateau, were the 6th and 7th Battalions, both now commanded by Colonel Walter McNicoll of the 6th. Further north of them were the various elements of the 5th Battalion. The 10th Battalion covered the northern sector of 400 Plateau known as Johnston's Jolly. By now they were battalions in name only, having all taken heavy casualties; the commanders had little accurate knowledge of where their men were located. (Source: Wikipedia article on the Landing at Anzac Cove)
At 1530 hours, the Turkish 77th and 27th Infantry regiments attacked. They did so again at 1645 hours. McCay was now under severe pressure and requested reinforcements. The second time he was informed there was only one uninvolved battalion left, the 4th, which Bridges was keeping in reserve until more troops from the New Zealand and Australian Division had been landed. McCay then spoke to Bridges direct and informed him the situation was desperate and if not reinforced the Turks would get behind him. General Bridges released the 4th Battalion to McCay who sent them to the south forming on the left of the 8th Battalion along Bolton's Ridge. They arrived just in time to help counter Turkish probing attacks by the 27th Infantry Regiment from the south. (Source: Wikipedia article on the Landing at Anzac Cove)
At 1720 hours McCay signalled Bridges that large numbers of unwounded men were leaving the battlefield and heading for the beaches. This was followed by Maclagan asking for urgent artillery fire support onto Gun Ridge, as his left was under a heavy attack and at 1816 hours Owen reported the left flank was rapidly being forced to retire. At dusk Maclagan made his way to Bridges headquarters and when asked for his opinion apparently replied 'It's touch and go. If the Turks come on in mass formation ... I don't think anything can stop them.'
As darkness fell, the Turkish artillery ceased firing, and although small arms fire continued on both sides, the effects were limited. Nightfall provided the opportunity to start digging more substantial trenches and to resupply the troops with water and ammunition. The Australians now rested - as did the Turkish defenders. (Source: Wikipedia article on the Landing at Anzac Cove)

Approximate movements from Anzac Cove and Battalion locations by the end of the day, 25 April 1915.
In the book 'Gallipoli', Les Carlyon noted that the first day on 400 Plateau was a series of mostly uncontrolled events, isolated struggles, rash advanced, muddle retreats, men rushed here and there to fill gaps, parties cut off, frontlines that didn't connect, failures of command, no-one in control.
26 April 1915
At around 1430 hours the next day, 26 April, Maj Saker's group of 200 men was ordered to attack. The objective was assumed to be the 3rd ridge (Weir's Ridge?), 1,500 yards to the east or possibly to dig a new line on the edge of the Daisy Patch - it was not clear. When the time came, only Saker's 200 men rose to attack. The already wounded Saker was hit and died almost as soon as he crossed the crest. The now leaderless men, with no idea what to do, crossed the Daisy Patch and kept going. The men of the 4th Battalion saw this advance and assumed it was their turn. They also left their trenches and began charging across no-man's land. It becamse a farce - many of the leading officers were killed or wounded, and the men of the 4th swung to the left and began advancing straight up no-man's land with Australian trenches on their left and Turkish trenches on their right. Scattered groups from other Battalions joined in and consequently hundreds of men were cut down. When darkness fell, those men who could were ordered back to their original line or dug in on the edge of the Daisy Patch, described as 'an odd bulge in their new front line forming the pimple'. It was apparently never established who had given the order to attack. ('Esprit de Corps', page 43; 'Gallipoli: The Battlefield Guide', by Mat McLachlan, Hachette, 2015)
The Australians now continued to dig in and consolidate their positions. The various companies tried to re-group. A firm line was established along Bolton's Ridge and through the western half of 400 Plateau. (Esprit de Corps, page 43).
The last significant action of the day was at 2200 hours south of Lone Pine, when a group of Turks charged towards Bolton's Ridge. By now the 8th Battalion had positioned two machine-guns to cover their front, which caused devastation amongst the attackers, and to their left the 4th Battalion that had been moved up to reinforce the line during the afternoon also became involved. When the Turks got to within 46 metres, the 8th Battalion counter-attacked in a bayonet charge and the Turks withdrew. The ANZAC defence was aided by Royal Navy searchlights providing illumination. Both sides now waited for the next attack, but the day's events had shattered both formations and they were no longer in any condition to conduct offensive operations. (Source: Wikipedia article on the Landing at Anzac Cove)
29 April - 5 May 1915
The 5th Battalion was withdrawn on 29 April 1915 to reorganise on Shell Green. It had suffered more than 50 per cent of casualties since the landing. The Battalion returned to the front line for the day on 30 April. On 1 May it was again withdrawn for a two-day rest. Many of the men bathed in the sea, fully aware of the potential to be killed in the process. The Battalion went back on the line on 3 May. On 5 May the entire 2nd Brigade was withdrawn. (Source: Esprit de Corps, pages 43 - 44)
Helles and Krithia
Some of the detail below has been extracted from Chapter 1 - 'The Struggle for Krithia' in Charles Bean's official history, Volume 2 'The story of ANZAC from 4 My 1915 to the evacuation of the Gallipoli Peninsula', pages 14 and following.
Attempts by the British and French forces to take Krithia were expected to be quick. Attempts to do so on 6 and 7 May 1914 had failed.
General Sir Ian Hamilton had requested two infantry brigades to Helles to reinforce existing forces there. The 2nd Brigade and the New Zealand Infantry Brigade were selected. The 2nd Brigade moved from the beachhead at Anzac Cove to the British and French lodgement at Cape Helles on 6 May. There is no reason to assume that Neilson did not travel with the Battalion.
In the evening of 7 May, following the second failed attempt, Hunter-Weston recommended to Hamilton a third attempt but using different groups of men. The New Zealanders were to attack on the Krithia Spur while the Indian and Australian brigages would be held in readiness to assault Achi Baba as soon as the hills behind Krithia were taken. This strategy was agreed by Hamilton. The assault would be launched at 1000 hours. (Bean, page 14).
The New Zealanders began to move from the reserve line to the British front line from 1030 hours. Turkish shrapnel opened up. Beyond the British line was an open ground where a rich growth of red poppies and white daisies was growing, which became known as the 'Daisy Field'. The New Zealanders were subject to Turkish machine gun fire. 'Not more than one in ten ... reached the other side' and those dthat did were 'either unable to advance or to retire'. By noon, the New Zealanders had only gained ground on the left. The New Zealanders were again ordered at 1500 hours to attack at 1730 hours. Protests were made that this would destroy the entire New Zealand force. (Bean, pages 16 - 18)
At 1115 hours on 8 May, the 2nd Brigade (which was not aware of the New Zealanders being engaged) was ordered by General Paris to move forward to a sheltered position. However, they would have to move in daylight over exposed ground. The 6th Battalion was moved closest to the Reserve Line, behind them Brigade HQ, then the 7th Battalion as shown in Bean's map below. The 5th Battalion was deployed to the right and the 8th on the left. The Brigade was in place by 1545 hours. (Bean, page 22)

The position of the 5th Battalion before the Krithia assault.
For various reasons detailed in Bean's Official History, Hamilton remained convinced that if the lines could be pierced, the Turkish front would collapse. He resolved to make one more attempt. At 1600 hours he issued orders that 'the whole line, reinforced by the Australians, should on the stroke of 5.30, fix bayonets and storm Krithia and Achi Baba'. Hamilton was aware that the Australian Brigade had reached Krithia Nullah, and was now lying in reserve. As the proposed advance would go up the spurs on the left and right, but not the Central Spur, the 2nd Brigade was ordered to take that route. At 1630 hours, orders were sent out to advance at 1730 hours, following 15 minutes of artillery and naval bombardment. (Bean, page 20).
The 2nd Brigade was just settling down to cook dinner at 1655 hours when they received the order to attack at 1730 hours. The order read as follows (Bean, page 22):
You will be required to attack at 5.30 PM precisely between the valley you are now in and the valley just S.E. of Krithia-Sedd-el-Bahr road. Move forward at once until you are in line with N.Z. Brigade on your left and your right ont the valley S.E. of Krithia road. This will be in advance of the Composite Brigade trenches. The Composite Brigade under Colonel Casson will support you. Your objective is the ridge beyond Krithia, with your right somewhat thrown back to join hands with the French or 2nd Naval Brigade who are at present on the French left. From G.O.C. Composite Division, Hill 138, 4.20 PM.
The men prepared as best they could, drawing on their training at Mena Camp. Col McCay and his Brigade Major William Call were well aware of the situation having learned first hand the previous two days. General Paris asked if their advance could include as much display as possible - bands and colours - as well as bayonets. McCay's operation order stated that the brigade was '... to attack between the valley it was now in and that running east of the Krithia Road; that the 6th and 7th would form the front line and supports, the 6th being on the left [along the Krithia Nullah spur] and the 7th on the right, while the 8th and 5th would form a general reserve moving forward direct to their front'. (Bean, page 23)
The 6th Battalion advanced in six widely extended lines made up of three leading and three supporting companies. The 7th Battalion, meanwhile, struggled to move to the right. It sent off its first company as soon as it was ready. Both 6th and 7th Battalions were expected to occupy a front of 500 yards. By 1730 hours the two battalions were 'only a few hundred yards short of the position in which, at that hour, they were ordered to be'. (Bean, page 23, 25 - 26)
According to Bean, 'Turkish bullets, coming in from a long distance, were now whistling thickly overhead and through the lines. Between the dry glass blades and low tufts of dingy herbage the dust began to rise in spurts like the sea at the commencement of a thunder-shower'. The 6th and 7th advanced 'at a rapid walking pace against a growing storm of rifle fire', some men using their shovels, blade upwards, as a kind of shield. The leading men of the 7th came across the Composite Brigade's Trench which then became known as 'Tommies Trench'. The men then moved forward from the trench and 'flung themselves forward into the storm'. The men of the 6th no longer advanced in formation; the 7th remained 'better preserved'. As they got closer to Turkish lines, more and more men fell and the line became very thin. A new line was drawn about half way between Tommies' Trench and the Turkish trenches. Those men from the 6th and 7th who had reached that point dug in. (Bean, pages 26 - 32)
Meanwhile, Cass, who had moved forwards with the 7th on the right, and was wounded, realised that there was a group of Turkish soldiers on the right which would threaten the 7th. Accordingly, he alerted two officers of the 5th and ordered that battalion to move to the right of the 7th to protect it. As they did so, several one Turkish soldiers were seen to jump up and run back. (Bean, page 33
The 5th Battalion advanced in lines of platoons of fighting columns, A and B Companies in the front, C and D in the rear. They immediately came under Turkish fire and lost heavily. (Bean, page 35)
Bean wrote that 'The lines of infantry were enveloped in dust from the patter of countless bullets in the sandy soil, and from the hail of shrapnel poured on them. ... No man, except the wounded, attempt to return to the trenches'.
Col Wanliss set up his HQ beside the Krithia road, 100 yards the rear of the 7th. The rest of his battalion dug a support trench in that location. Neilson may have been in that location. (Bean, page 36)
The men of the 5th who moved up to defend the right flank dug in to the rear right of the 7th. By 1830 hours, the 2nd Brigade became stationary. Dusk was approaching. McCay, situated at Tommies' Trench, could not determine the situation clearly so decided to see for himself with four others. They managed to advance with a telephone line 400 yards when one of the men with him was shot dead. He then saw for himself the 'scanty front line' of the 6th. He placed his HQ seventy yards to its rear with two men. One of the men was soon shot and died. McCay could now see however that the stone houses of Krithia were still 2,000 yards away. His Brigade had no chance of achieving Hamilton's designs. He informed General Paris of the situation at 1735 hours. (Bean, pages 33 - 35)

The position of the 5th Battalion after Krithia assault.
Dead and wounded men lay all around. According to Bean, the attack had moved 1,000 yards across open moorland under heavy fusillade. In the night, gaps in the front line were sealed. The cries of the wounded were heard. Many men had been hit in the stomach or intestines, from which wounds survival was rare. (Bean, page 36, 39)
Allied casualties came to about 6,500 men, but the advance had not achieved more than 600 yards. The 2nd Brigade, which had gone to Helles with 2,900 men had 1,056 casualties. The 6th Battalion's Major Henry Gordon Bennett was the only combat officer from that battalion still walking. McCay's leg was broken by a bullet and Colonel Bolton of the 8th Battalion took command. (Bean, page 41)
The 2nd Brigade's War Diary noted that 'during action of May 8th/9th, the whole of the Bde staff became casualties and all documents appear to have gone astry'.
The 2nd Brigade was relieved on the night of 11 May 1915 and rested behind the lines at Cape Helles from 13 to 15 May. It returned to Anzac Cove on 16 May 1915 where, according to its War Diary, 'the brigade was on reserve in Shrapnel Gully, bivouaced near the junction of Monash and Walker Road'.
According to 'Esprit de Corps', the situation at Anzac was now static with both sides established in well-dug trenches. The 5th Battalion now rested in dug-outs cut into the side of a hill overlooking Bridges' Road, which led up to Johnston's Jolly. Lt Col D S Wanliss assumed command of the Brigade, and Captain Flockart took command of the 5th Battalion. (page 49).
Turkish Counter-Assault - 19 May
The Turkish Army commander, the German officer Otto Liman von Sanders, had decided to commence an all-out assault on allied forces to 'drive them back into the sea' on 18 May.
Bean (page 139) noted that 'The 2nd Australian Brigade, which in consequence of its heavy losses at Helles was retained in reserve, was camped near the junction of Shrapnel and Monash Valleys. On the night of May 18th it was ordered to dispose two of its battalions so as to form an inner line of defence in case of need'. According to its (scant) War Diary, on the night of 18/19 May, 'enemy delivered attack all along line. The Bde were not called out' but 'remained in support furnishing road making parties by day and support 1st Bde with 4 Coys and 2 MG sections by night. The Bde also furnish 1 Battalion per night as (two words not clear) picquet'.
William Neilson was at Battalion Headquarters on 19 May when a Turkish shell burst in Battalion Headquarters. Another man was killed and a large quantity of papers were destroyed. It is not known exactly when he was killed but it may have been during the attacks or early in the morning. He was one of 160 men killed that day; close to 10,000 Turkish troops were believed to have been killed. (Bean, page 161). According to the book 'Esprit de Corps', '...the 5th Battalion did not take part in this battle although the men could clearly hear the rattle of rifle fire and the Turkish shouts of 'Allah! Allah!'. See also Bean's graphic account of the events of 18/19 May.

AWM Photograph A02035 (Source) said to be 'The headquarters of the 5th Battalion on MacLaurin's Hill, showing the steps leading up from the lower Terraces (left). The firing line is about 30 yards away from the dugouts, behind the ridge. Water containers are in the foreground and stacked to the right.'
MacLaurin's Hill was a 910m long section of the Second Ridge, located south of Steele's and Courtney's Posts, that connected Baby 700 to 400 Plateau, with a steep slope on the ANZAC side down to Monash Valley. It is not known if the photograph above was taken before or after Neilson was killed there, or even if this is the same location where he was killed. However, another photograph that appears to be in the same series or taken around the same time, A02012, shows 'A trench of the 5th Infantry Battalion on MacLaurin's Hill after artillery bombardment. Almost as quickly as the trenches are reconstructed they are blown up again.'
William Neilson was buried at Shrapnel Valley Cemetery, Plot 3, E7. John Simpson Kirkpatrick, of 'Simpson's Donkey' fame, was killed the same day.

William Neilson's headstone at Gallipoli. Photograph taken by Jenny Elliott in 2018.
According to the AWM site, 'The Victorian battalions forming the 2nd Brigade returned to ANZAC to help defend the beachhead, and in August 1915 the 2nd Brigade fought at the battle of Lone Pine. The battalion served at ANZAC until the evacuation in December 1915.
Page added 20 August 2019 (based on previous page), last updated 12 April 2022 (minor fixes). Copyright Andrew Warland. (andrewwarland(at)gmail.com)